This document provides instructions for Protein Prospector administrative tasks on both LINUX and Microsoft Windows platforms.
- Updating Protein/DNA Databases
- Modifying the main configuration file
- Parameters used by all versions of Protein Prospector
- The Sequence Database Directory
- The Upload Temporary Directory
- The Maximum Size of an Uploaded File
- The Path of the R Executable
- Whether Temporary Data File Used By R are Kept
- Whether the UCSF Banner Should Be Displayed
- Logging Parameters
- The Search Timeout in Seconds
- The Maximum Number of Sequences that can be Entered in MS-Product
- The Maximum Number of Peaks in a Single Spectrum for an MS-Fit Search
- The Maximum Reported Hits Limit for MS-Fit
- Allowing FA-Index to Use Large Databases on Computers With a Small Amount of RAM
- The Root Directory of the Viewer Repository
- The Root Directory of the Site Database Repository
- Parameters relevant only if the installation includes Batch-Tag searching
- The Root Directory of the Centroid Data File Repository
- The Root Directory of the Raw Data File Repository
- The Root Directory of the Repository for Uploaded Files
- Whether Multiple Processors are Used for Batch-Tag Searches
- The Maximum Number of MSMS Spectra in a Group in a Batch-Tag Search
- The Minimum Number of MSMS Spectra in a Group in a Batch-Tag Crosslink Search
- Whether to Duplicate Scans if the Charge isn't Specified in an Uploaded Centroided File
- The MPICH2 Run Executable (Windows Only)
- The Arguments Used When Running MPICH2 (Windows Only)
- The Minimum Password Length for the Batch-Tag Search Database
- The Batch-Tag Search Database Login Parameters
- The Batch-Tag Daemon Parameters
- Whether to Join Results Files
- Whether to Do the Expectation Value Search First
- Whether to Forward Request for Raw Data to a Different Server
- virtual_dir_proxy Parameter
- Raw Data Processing Parameters
- Modifying the Javascript file
- Changing the HTML link from the accession number in the search results
- Changing the HTML link from the UniProt IDs in the search results
- Changing the HTML link from the MS-Digest index number in the search results
- To Add/Change a Taxonomy Filter
- To Change Amino Acids Attributes
- To Add/Change Variable Amino Acid Modifications
- To Add/Change Constant Amino Acid Modifications
- To Add/Change the List of N-Terminus Modifications that can form a1 and b1 Ions
- To Add/Change Elements
- To Add/Change Enzyme Digest Rules
- To Add/Change Immonium Ion Recognition Rules
- To Change the Appearance of Graphs in the Package
- To Change the Protein Prospector Fragmentation Parameters
- To Change the Glycosylation B and Y ions considered
- To Change Additions to the List of Glycosylation Modifications
- To Change the Glycosylation Modification Building Blocks and Related Attributes
- To Change the Remote Database URL definitions that Enable HTML Links
- To Change the GlyTouCan IDs for given Glycosylation Modifications
- To Change the Protein Prospector Instrument Parameters
- To Change the Matrix Modification Definitions
- To Change the Computer Optimisation Parameters
- To Add/Change MS-Homology Score Matrices
- To Add/Change the List of Species for dbEST Prefix Databases
- To Add/Change the List of Databases Accessible by the autofaindex.pl Script
- To Add/Change Parameters Associated with Site Databases
- To Add/Change the Indicies Used by MS-Digest
- To Modify the Cross Linking Options in MS-Bridge/MS-Tag/Batch-Tag
- To Modify the Options on the MS-Bridge Link AAs menu
- To Add/Change the Quantitation Options
- To Add/Change the Purity Coefficients
- To Change the Link to the Unimod Web Site
- To Add/Change the MGF (Mascot Generic Format) Parameters
- To Modify the Distribution File
- To Modify the Data Repository Instrument File
- To Modify the Default Search Parameters
- To Modify the Parameters Used for the Expectation Value Search
- To Modify the Parameters for Calculating Expectation Values by the Linear Tail Fit Method and FDR Limits
- To Modify the Parameters Related to the Bond Score Max Option
- To Modify the Coefficients for Calculating Discriminant Scores
- Updating the taxonomy files
- Initializing the mySQL Database
- Backing Up the mySQL Database
- Restoring the mySQL Database
- Restoring the mySQL Database on Windows from Database mySQL Database Files
- Resetting the mySQL root password on Windows
- Resetting the mySQL prospector password on Windows
- Installing Batch-Tag Daemon
- Adding Additional MS-Viewer Automatic Conversion Scripts
- Mascot Converter - mascot_converter.pl
- X!Tandem Converter - tandem_converter.pl
- Modifying the Viewer Conversion Parameter File
- Adding Additional MS-Viewer MaxQuant SILAC Labelling Options
- Clearing the Cache When Updating Javascript Files
- LINUX Installation
- Download and Install
- Enable Cut and Paste
- Give Your Username Permission to Use sudo
- Configure the Network Capabilities
- Disabling Secure LINUX
- Setting Up Network Time Protocol
- Installing the Gnome Desktop
- Installing the Firefox Browser
- Install Required Packages
- Install Apache
- Compiling Prospector
- Create the Prospector Distribution
- Configure MPI
- Configure Apache
- Install and Configure mySQL
- Create the Sequence Database Directory and Add the SwissProt Database
- Create the Repository Directories
- Ensure that the Batch-Tag Daemon Starts when the System is Booted
- Start the Required Services
- Installing a Raw Daemon
- Example LINUX Installations
- Building the Windows Installers
Most of Protein Prospector's configuration files are in the directory. The files are all text files and must be edited with a text editor. Suitable programs are Notepad on a Windows platform or vi/emacs on a LINUX platform. You should not use a Word processor to edit the files.
A list of all the parameter files is shown below with a link to the relevant manual section.
Configuration files required by all versions of Protein Prospector:
- aa.txt
- acclinks.txt
- b1.txt
- bond_score.txt
- computer.txt
- dbEST.spl.txt
- dbhosts.txt
- dbstat_hist.par.txt
- distribution.txt
- elements.txt
- enzyme.txt
- enzyme_comb.txt
- expectation.txt
- fit_graph.par.txt
- fragmentation.txt
- glyco_by.txt
- glyco_cation.txt
- glyco_info.txt
- glycolinks.txt
- glytoucan_id.txt
- hist.par.txt
- homology.txt
- idxlinks.txt
- imm.txt
- indicies.txt
- info.txt
- instrument.txt
- link_aa.txt
- links.txt
- links_comb.txt
- mat_score.txt
- mgf.xml
- mq_silac_options.txt
- pr_graph.par.txt
- site_groups.txt
- site_groups_up.txt
- sp_graph.par.txt
- taxonomy.txt
- taxonomy_groups.txt
- unimod.txt
- uniprot_names.txt
- usermod_frequent.txt
- usermod_glyco.txt
- usermod_msproduct.txt
- usermod_quant.txt
- usermod_silac.txt
- usermod_xlink.txt
- viewer_conv.txt
- dbstat/default.xml
- msbridge/default.xml
- mscomp/default.xml
- msdigest/default.xml
- msfit/default.xml
- msfitupload/default.xml
- mshomology/default.xml
- msisotope/default.xml
- msnonspecific/default.xml
- mspattern/default.xml
- msproduct/default.xml
- msseq/default.xml
- mstag/default.xml
- taxonomy/citations.dmp
- taxonomy/delnodes.dmp
- taxonomy/division.dmp
- taxonomy/gc.prt
- taxonomy/gencode.dmp
- taxonomy/merged.dmp
- taxonomy/names.dmp
- taxonomy/nodes.dmp
- taxonomy/readme.txt
- taxonomy/speclist.txt
- taxonomy/taxonomy_cache.txt
Configuration files used by Batch-Tag/Search Compare:
- cr_graph.par.txt
- disc_score.txt
- disc_score2.txt
- error_hist.par.txt
- expectation.xml
- upidlinks.txt
- inst_dir.txt
- iTRAQ4plex.txt
- iTRAQ8plex.txt
- mmod_hist.par.txt
- quan.txt
- quan_msms.xml
- repository.xml
- batchtag/default.xml
- searchCompare/default.xml
One other file that you may need to modify is
-
Obtain FASTA formatted sequence database files for the seqdb directory (specified in the main configuration file):
Locations to download FASTA formatted database files via ftp:
- Genbank Production of this database as a single large file has been discontinued. Release 166 (June 2008) was the last release. The database download file (rel166.fsa_aa.gz) could still be found by google at the time of writing (Feb 2009). Individual protein FASTA files are now provided on a per-division basis with names like gbXXXX.fsa_aa.gz where XXXX is the division.
File (3.2.2009) Entries Compressed .gz File Bytes Uncompressed File Bytes uniprot_sprot.fasta 408,099 63,686,261 193,201,640 uniprot_trembl.fasta 7,001,017 1,347,048,256 3,113,770,239 Combined 7,409,116 1,410,734,517 3,306,971,879
Combined Database file Size in Bytes FASTA File 3,306,971,879 Protein Prospector acc File 117,434,752 Protein Prospector idc File 59,272,928 Protein Prospector idi File 12 Protein Prospector idp File 59,272,928 Protein Prospector mw File 118,545,856 Protein Prospector pi File 118,545,856 Protein Prospector tax File 65,747,868 Protein Prospector tl File 176,928 Total Disk Space Requirement 3,845,969,007
File (9.4.2024) Entries Compressed .gz File Bytes Uncompressed File Bytes uniprot_sprot.fasta 571,684 93,179,359 285,491,239 uniprot_trembl.fasta 245,532,082 61,346,322,649 119,839,928,596 Combined 245,896,766 61,439,502,008 120,125,419,835
Combined Database file Size in Bytes FASTA File 120,125,419,835 Protein Prospector acc File 4,952,710,728 Protein Prospector idc File 1,967,174,128 Protein Prospector idi File 16 Protein Prospector idp File 1,967,174,128 Protein Prospector mw File 3,934,348,256 Protein Prospector pi File 3,934,348,256 Protein Prospector tax File 2,348,124,376 Protein Prospector tl File 267,818 Total Disk Space Requirement 139,229,567,541
The UniProtKB database is made up from a concatenation of uniprot_sprot.fasta.gz and uniprot_trembl.fasta.gz for the directory ftp://ftp.ebi.ac.uk/pub/databases/uniprot/knowledgebase,
The Ludwignr database is a non-redundant database made up from several smaller databases contained in the directory ftp://ftp.ch.embnet.org/pub/databases/nr_prot. You need to download the ones you are interested in individually and then concatenate them together to make one file. The database files currently have a .seq suffix.
To do concatenation on the LINUX operating system you can use the cat command from the command line. For Windows you could install cygwin and use its cat command. Alternatively you could use the Windows copy command from a command window. Ie:
		copy file1 + file2 + file3 DestFile
		copy *.seq FinalDatabase
-
Uncompress and rename the database files according to the format: UniProt.##, Genpept.##, Owl.##, SwissProt.##, NCBInr.##, dbEST.##, Ludwignr.##, IPI.##. The prefixes shown in italics (UniProt, Genpept, Owl, SwissProt, NCBInr, dbEST, Ludwignr or IPI) are a necessary part of the name, which allow the software to differentiate the specific dialect of the FASTA format comment line used in each database. You may also use the corresponding lowercase prefixes gen, owl, swp, ipi, nr, or dbest. They can also be used for a second database that is of the same format as the uppercase one. If you want to know more details, please read the FA-Index manual, particularly the filenaming sections.
-
Create indices in the seqdb directory for each database, by using the program. The indicies are necessary for preliminary filtering by species, protein MW and protein pI. FA-Index must be run after each update of a database, even if the update is done by only adding new entries to the end of the original file.
If you really want to know what FA-Index does and why, please read the manual. Don't even think about trying to use proprietary databases or update databases daily, UNLESS you read the FA-Index manual, particularly the generic database filenaming sections.
FA-Index will create a file with a .usp suffix (eg. Genpept.r95.usp) where it writes the comment line for each FASTA entry which the FA-Index program cannot parse out the species. Viewing this file can help troubleshoot FASTA format problems for anyone using proprietary databases.
The main Protein Prospector configuration file is info.txt. Although the parameters defined in this don't need to be defined in any particular order it is best to retain the order used in the distributed version of the file. This will make diagnosis easier if problems occur.
The parameters in info.txt are name-value pairs. A name-value pair is a line in the file where the name is followed by a space character and the rest the line is the value. The value may contain space characters. If just the name is specified then the value is assumed to be an empty string.
For example:
ucsf_banner false
Here ucsf_banner is the name and false is the value
Each parameter has a default value which is used if the parameter is missing from the file. When the parameters are listed below, the default value is listed after the parameter. In some cases the default value is an empty string. Sometimes it is not appropriate to use the default value.
If the parameter is a directory name it is permissable to use UNC paths for Windows systems.
Some of these parameters are relevant to all Protein Prospector installations whereas others are only relevant if the installation includes Batch-Tag searching.
name: seqdb
default value: seqdb
This is the directory containing the sequence databases. It is almost always appropriate to specify this. In most cases it is best from a performance point of view to have the sequence databases on a separate disk partition and administrators need to make sure this is big enough for current and likely future needs. One reason for this is to stop the database files becoming fragmented.
The sequence database directory can be on a network drive and UNC paths are permitted. However this is not recommended.
If the several Prospector instances have been installed as a computing cluster then it is recommended that each of the cluster nodes has its own sequence database directory with identical copies of any databases used.
If the installation has both a UNIX and a Windows component it is possible to specify paths for both of these instances in the same file by using directives named:
name: seqdb_unix
and
name: seqdb_win
instead of:
name: seqdb
name: upload_temp
default value: temp
The MS-Fit Upload and Batch-Tag Web forms both have an Upload Data From File option. When the file is first uploaded it is copied into the upload temporary directory.
By default the upload temporary directory is simply set to the temp directory in the Protein Prospector distribution. If you have the basic Protein Prospector package (without the Batch-Tag option) there is no particular reason to change this. The only relevant program is MS-Fit Upload and this program will delete the file as soon as it has extracted the relevant information from it.
If you are using the Batch-Tag Web program then any successfully uploaded files are copied to a user data repository from the upload temporary directory. Thus it may be appropriate to locate the upload temporary directory on the same disk partition or network drive as the user data repository.
If the installation has both a UNIX and a Windows component it is possible to specify paths for both of these instances in the same file by using directives named:
name: upload_temp_unix
and
name: upload_temp_win
instead of:
name: upload_temp
name: max_upload_content_length
default value: 0
It is possible to restrict the size in bytes of any uploaded file via the max_upload_content_length parameter. If an uploaded file exceeds this length then the search will be rejected and no files will be generated on the system.
If this parameter is set to zero then the size of the uploaded file is not restricted by Protein Prospector. It may however be restricted by the web server software.
name: r_command
default value:
The R statistics package is used for drawing some of the plots in the Protein Prospector output. In order for this to work the R package needs to be installed and the r_command parameter needs to contain the full path to the R executable file.
For a Windows system this might be:
r_command C:\Program Files\R\R-2.2.1\bin\R
For a LINUX system it could be:
r_command /usr/bin/R
If the r_command parameter is missing from the info.txt file then Protein Prospector assumes that R is not installed and the relevant plots will be missing from the reports.
If the installation has both a UNIX and a Windows component it is possible to specify paths for both of these instances in the same file by using directives named:
name: r_command_unix
and
name: r_command_win
instead of:
name: r_command
Protein Prospector creates temporary data files which the R statistics package uses to draw its plots (such as the error scatterplot in MS-Product). These are normally deleted after they are used. If you set the keep_r_data_file flag to 1 then these are retained in the temporary directory from which they are generally deleted after 2 days. This flag is only normally set for diagnostic purposes or if you want access to the data for any reason.
name: ucsf_banner
default value: false
A black UCSF banner can be displayed at the top of the search forms and results pages. You can choose whether or not to display this based on the ucsf_banner parameter. Note that this parameter will not turn the banner on or off on static web pages. To do this you need to modify the html/js/info.js file.
It is possible to create log files when search forms are submitted to the server. These can be used to diagnose problems.
The log files are created in a subdirectory of the logs directory. The subdirectory is named after the date the search form was submitted. The date format is yyyy_mm_dd to enable easy sorting of the directories.
Each binary (eg mssearch.cgi, msform.cgi, etc) can write out a log file. This will contain some of the CGI environment variables, the process ID, the program start and end times and optionally the search parameters.
The log files can be automatically deleted after a specified period. For example to delete the log files after 7 days the following name-value pair should be specified:
delete_log_days 7
If the delete_log_days parameter is set to zero the log files are never deleted. This is the default situation.
To write a log file for the mssearch.cgi binary which contains the basic logging information the following name-value pair should be specified:
mssearch_logging true
If you additionally want to record the parameters from the search form in the log file then you also need to specify the following name-value pair:
mssearch_parameter_logging true
The equivalent name-value pairs for msform.cgi and searchCompare.cgi are:
msform_logging true
msform_parameter_logging true
searchCompare_logging true
searchCompare_parameter_logging true
The log files are in XML format. However as they are not valid XML files until the associated search has finished they are first created with a .txt suffix which changes to a .xml suffix at the end of the search. Thus a file with .txt suffix either represents a search that is in progress or one that has failed.
A typical log file name is:
mssearch_000107_4264.xml
Here mssearch is the program binary name, 000107 is the form submission date in hhmmss format and 4264 is the process id number.
Typical contents of a basic log file:
<?xml version="1.0" encoding="UTF-8"?>
<?Tue Apr 01 00:01:07 2008, ProteinProspector Version 5.0.0?>
<program_log>
<pid>4264</pid>
<start_time>Tue Apr 01 00:01:07 2008</start_time>
<SCRIPT_NAME>/prospector/cgi-bin/mssearch.cgi</SCRIPT_NAME>
<REMOTE_HOST></REMOTE_HOST>
<REMOTE_ADDR>127.0.0.1</REMOTE_ADDR>
<HTTP_USER_AGENT>Mozilla/5.0 (Windows; U; Windows NT 5.2; en-US; rv:1.8.1.13)
                 Gecko/20080311 Firefox/2.0.0.13
</HTTP_USER_AGENT>
<HTTP_REFERER>http://localhost/prospector/cgi-bin/msform.cgi?form=mspattern</HTTP_REFERER>
<end_time>Tue Apr 01 00:01:46 2008</end_time>
<search_time>39 sec</search_time>
</program_log>
Typical contents a log file which also contains the search parameters:
<?xml version="1.0" encoding="UTF-8"?>
<?Tue Apr 15 12:57:35 2008, ProteinProspector Version 5.0.0?>
<program_log>
<pid>1612</pid>
<start_time>Tue Apr 15 12:57:35 2008</start_time>
<SCRIPT_NAME>/prospector/cgi-bin/mssearch.cgi</SCRIPT_NAME>
<REMOTE_HOST>127.0.0.1</REMOTE_HOST>
<REMOTE_ADDR>127.0.0.1</REMOTE_ADDR>
<HTTP_USER_AGENT>Mozilla/5.0 (Windows; U; Windows NT 5.2; en-US; rv:1.8.1.13)
                 Gecko/20080311 Firefox/2.0.0.13
</HTTP_USER_AGENT>
<HTTP_REFERER>http://localhost/prospector/cgi-bin/msform.cgi?form=msfitstandard</HTTP_REFERER>
<parameters>
<const_mod>Carbamidomethyl%20%28C%29</const_mod>
<data>842.5100%0D%0A
      856.5220%0D%0A
      864.4733%0D%0A
      870.5317%0D%0A
      940.4754%0D%0A
      943.4885%0D%0A
      959.4934%0D%0A
      970.4308%0D%0A
      975.4785%0D%0A
      1045.5580%0D%0A
      1048.5716%0D%0A
      1063.5712%0D%0A
      1064.5892%0D%0A
      1098.6185%0D%0A
      1147.5876%0D%0A
      1163.5996%0D%0A
      1178.6280%0D%0A
      1179.6014%0D%0A
      1187.6316%0D%0A
      1193.5461%0D%0A
      1211.6607%0D%0A
      1248.5664%0D%0A
      1280.5561%0D%0A
      1289.7670%0D%0A
      1314.7019%0D%0A
      1328.6521%0D%0A
      1332.7121%0D%0A
      1360.6820%0D%0A
      1406.6617%0D%0A
      1447.7010%0D%0A
      1459.7311%0D%0A
      1475.7471%0D%0A
      1508.8107%0D%0A
      1576.7986%0D%0A
      1624.7649%0D%0A
      1699.9255%0D%0A
      1721.9134%0D%0A
      1767.9147%0D%0A
      1776.8961%0D%0A
      1783.9077%0D%0A
      1794.8293%0D%0A
      1799.9017%0D%0A
      1816.9798%0D%0A
      1859.8805%0D%0A
      2088.9872%0D%0A
      2211.1046%0D%0A
      2240.1851%0D%0A
      2256.2412%0D%0A
      2284.2079%0D%0A
      2299.2019%0D%0A
      2808.4450%0D%0A
      3156.6352%0D%0A
</data>
<data_format>PP%20M%2FZ%20Charge</data_format>
<data_source>Data%20Paste%20Area</data_source>
<database>SwissProt.2007.12.04</database>
<detailed_report>1</detailed_report>
<dna_frame_translation>3</dna_frame_translation>
<enzyme>Trypsin</enzyme>
<full_pi_range>1</full_pi_range>
<high_pi>10.0</high_pi>
<input_filename>lastres</input_filename>
<input_program_name>msfit</input_program_name>
<instrument_name>ESI-Q-TOF</instrument_name>
<low_pi>3.0</low_pi>
<met_ox_factor>1.0</met_ox_factor>
<min_matches>4</min_matches>
<min_parent_ion_matches>1</min_parent_ion_matches>
<missed_cleavages>1</missed_cleavages>
<mod_AA>Peptide%20N-terminal%20Gln%20to%20pyroGlu</mod_AA>
<mod_AA>Oxidation%20of%20M</mod_AA>
<mod_AA>Protein%20N-terminus%20Acetylated</mod_AA>
<mowse_on>1</mowse_on>
<mowse_pfactor>0.4</mowse_pfactor>
<ms_mass_exclusion>0</ms_mass_exclusion>
<ms_matrix_exclusion>0</ms_matrix_exclusion>
<ms_max_modifications>2</ms_max_modifications>
<ms_max_reported_hits>5</ms_max_reported_hits>
<ms_parent_mass_systematic_error>0</ms_parent_mass_systematic_error>
<ms_parent_mass_tolerance>20</ms_parent_mass_tolerance>
<ms_parent_mass_tolerance_units>ppm</ms_parent_mass_tolerance_units>
<ms_peak_exclusion>0</ms_peak_exclusion>
<ms_prot_high_mass>125000</ms_prot_high_mass>
<ms_prot_low_mass>1000</ms_prot_low_mass>
<msms_deisotope>0</msms_deisotope>
<msms_join_peaks>0</msms_join_peaks>
<msms_mass_exclusion>0</msms_mass_exclusion>
<msms_matrix_exclusion>0</msms_matrix_exclusion>
<msms_peak_exclusion>0</msms_peak_exclusion>
<output_filename>lastres</output_filename>
<output_type>HTML</output_type>
<parent_mass_convert>monoisotopic</parent_mass_convert>
<report_title>MS-Fit</report_title>
<search_name>msfit</search_name>
<sort_type>Score%20Sort</sort_type>
<species>All</species>
<user1_name>Acetyl%20%28K%29</user1_name>
<user2_name>Acetyl%20%28K%29</user2_name>
<user3_name>Acetyl%20%28K%29</user3_name>
<user4_name>Acetyl%20%28K%29</user4_name>
</parameters>
<end_time>Tue Apr 15 12:57:46 2008</end_time>
<search_time>11 sec</search_time>
</program_log>
name: timeout
default value: 0
The timeout parameter can be used to abort searches that have exceeded a given number of seconds. If this parameter is set to zero then search times are not restricted by Protein Prospector. They may however be restricted by the Web Server software. Note that Batch-Tag search times are never restricted by web server software as they are controlled by a search daemon.
name: max_msprod_sequences
default value: 2
The max_msprod_sequences parameter controls the maximum number of.sequences that can be simultaneously entered into MS-Product. The value can be 1, 2 or 3.
name: max_msfit_peaks
default value: 1000
The max_msfit_peaks parameter controls the maximum number of peaks (after peak filtering) that can be used in an MS-Fit search. If too many peaks are used the program can run out of memory.
name: msfit_max_reported_hits_limit
default value: 500
The msfit_max_reported_hits_limit parameter controls the limit on the Maximum Reported Hits parameter in MS-Fit. If too many hits are reported the program can run out of memory and it can take a long time to generate the report.
name: faindex_parallel
default value: false
Whether to create FA-Index files in series or in parallel. It this is set to true then FA-Index does 2 passes through the database. If it is set to false in does 5 passes through the database. Setting it to true is faster but uses more memory. Generally you should set only set this to true if you have a small amount of RAM and very large databases.
name: viewer_repository
default value:
Root repository directory for the MS-Viewer spectral viewer program. If blank the results/msviewer directory is used. All data uploaded and saved by users of the MS-Viewer program is stored here. Note that until the data is saved in the repository it is only saved in a temporary directory for around 2 days.
name: site_db_dir
default value:
If modification site databases are required a directory needs to be specified to hold these. As site databases are SQLite files it is important that the directory specified is not on a network filesystem, particularly not an NFS filesystem. Within the site database directory there should be a subdirectory for each FASTA database for which there is a site database. Eg if the FASTA database is called SwissProt.2016.9.6.fasta then the subdirectory should be called SwissProt.2016.9.6. Within this directory there should be subsequent subdirectories for each site database that there is. This subdirectory is used to hold the files from which the site database is created. An sqlite file is created for each of these subdirectories.
name: centroid_dir
default value:
This is the root directory for the repository of centroided data. This directory will typically contain a subdirectory for each instrument for which you have centroided data. If you are using several computers in a cluster this parameter will typically be a directory accessible by all computers in the cluster (eg. a UNC directory on a Windows system).
Data which are uploaded to the server is stored in a separate repository for uploaded files which is organized by user.
name: raw_dir
default value:
This is the root directory for the repository of raw data. This directory will typically contain the same subdirectories as the repository for centroided data. If you are using several computers in a cluster this parameter will typically be a directory accessible by all computers in the cluster (eg. a UNC directory on a Windows system).
If the installation has both a UNIX and a Windows component it is possible to specify paths for both of these instances in the same file by using directives named:
name: raw_dir_unix
and
name: raw_dir_win
instead of:
name: raw_dir
name: user_repository
default value:
The repository for uploaded files is used to store search results files and project files along with data files which are uploaded using the Batch-Tag Web program. Every user has a separate directory where this information is stored. The user_repository parameter is used to specify the root directory of this repository. If you are using several computers in a cluster this parameter will typically be a directory accessible by all computers in the cluster (eg. a UNC directory on a Windows system).
If the installation has both a UNIX and a Windows component it is possible to specify paths for both of these instances in the same file by using directives named:
name: user_repository_unix
and
name: user_repository_win
instead of:
name: user_repository
name: multi_process
default value: false
Protein Prospector can optionally use MPICH2 to make use of multiple processors and hence speed up Batch-Tag searches. If you are using this then the multi_process parameter should be set to true.
name: msms_max_spectra
default value: 500
When doing Batch-Tag searching this is the maximum number of spectra that a single process deals with in a pass through the database. If the MPI option is used then a single search will use multiple processes. Thus the number of passes through the database that are required depends on this parameter, on the number of spectra in the dataset and the number of processes that MPI has been set up to use.
name: min_xlink_spectra
default value: 4
When doing a Batch-Tag crosslink search the usual number of spectra searched in a group is overridden as more hits are saved. The value stored as msms_max_spectra (typically 500) is multiplied by the ratio "Maximum Report Hits"/"# Saved Tag Hits" (both these are from the search form) to get the size of the group. If this value is less than min_xlink_spectra then a value of min_xlink_spectra is used.
name: duplicate_scans
default value: false
When data files are uploaded using the Batch-Tag Web program they are converted to MGF format before being stored in the upload repository. Generally, when there is no precursor charge specified in the centroid file then the Precursor Charge Range option on the Batch-Tag Web form is used to supply the charges and the MGF file created doesn't contain charge information. If the duplicate_scans parameter is set to true then the MGF file that is created will contain duplicate peak lists for every charge from the Precursor Charge Range and the corresponding charge information will be placed in the MGF file. mzXML files often don't have charge information stored in the file.
name: mpi_run
default value:
If MPICH2 is being used to allow parallel Batch-Tag searches on a Windows platform the mpi_run parameter needs to contain the full path to the mpiexec executable file. This parameter is only relevant if the multi_process parameter is set to true.
A typical definition could be:
mpi_run C:\Program Files\MPICH2\bin\mpiexec.exe
On LINIX installations this is dealt with by the PATH environment variable so this parameter is ignored.
name: mpi_args
default value:
mpi_args contains the command line arguments used by mpiexec when using MPICH2 to run a parallel Batch-Tag search. This parameter is only relevant if the multi_process parameter is set to true.
A typical definition could be:
mpi_args -n 3 -localroot
This parameter is ignored on LINIX installations where the Perl script cgi-bin/mssearchmpi.pl is used instead.
name: min_password_length
default value: 0
Users have to log in to do Batch-Tag Searching and to view the results in Search Compare. When creating a new user a password has to be selected. The min_password_length is the minimum number of characters that a password can contain. If this is set to 0 the password field can be left blank if the user doesn't want to protect their data with a password.
These are the parameters that Protein Prospector uses to log into the Batch-Tag Daemon mySQL database.
name: db_host
default value: localhost
db_host is the computer on which the database resides. If you have several instances of Prospector installed on a computer cluster then this needs to be set to the computer where the database has been installed.
name: db_port
default value: 0
db_port is the port used to access the database. If the default value of 0 is used then the default mySQL port is used.
name: db_name
default value: ppsd
db_name is the database name. You can have more than one database but only one can be used at a time. Generally you should only change this parameter if you know what you are doing.
name: db_user
default value: prospector
name: db_password
default value: pp
db_user and db_password are the user name and password used to log into the database. These parameters are set when the Protein Prospector package is installed. A random password is selected at this time.
These parameters define the user name and password that Protein Prospector uses to log into the Batch-Tag Daemon mySQL database.
name: btag_daemon_name
default value (Windows): btag_daemon
default value (UNIX): btag-daemon
For Windows this parameter defines the name of Batch-Tag Daemon service whereas for UNIX it defines the name of the Batch-Tag Daemon binary.
The only reason for changing this is if you have more than one instance of Protein Prospector installed on the same computer. In this case the daemons would have to have different names.
name: btag_daemon_remote
default value: false
Protein Prospector will normally try to start the Batch-Tag Daemon if you submit a Batch-Tag search and it isn't running. If you set btag_daemon_remote to true then the daemon is assumed to be running on a remote computer so no attempt is made to start it. This makes it possible to set up one computer as a web server and some other computers as compute nodes. These don't even need to have the same Operating Systems running on them. Thus you could have a Windows Web Server that can deal with quantitation and LINUX compute nodes.
name: max_btag_searches
default value: 1
This is the maximum number of Batch-Tag searches that can run at one time on the current computer. If more searches are submitted then they will be placed in a queue. If you want to stop the daemon for any reason but want to make sure any ongoing searches complete you can temporarily set this parameter to 0.
name: max_jobs_per_user
default value: 1
This is the maximum number of Batch-Tag searches that can run at one time on the current computer by a single user. If a server has a lot of users you could set this to 1 to prevent a single user taking up all the search slots. It will also ensure that any given search by a user will finish more quickly as their individual searches won't be competing with each other.
name: email
default value: false
If this parameter is set to true Protein Prospector attempts to send an email to the user once a search has either completed or has been aborted. The computer has to be set up to send email for this to work.
name: server_name
default value: localhost
name: server_port
default value: 80
name: virtual_dir
default value:
These parameters are used to create the URL for running Search Compare when users are sent an email after a Batch-Tag search has finished.
For example for a results retrieval URL of:
http://prospector.ucsf.edu/prospector/cgi-bin/msform.cgi?form=search_compare&search_key=Md7XxQhUQ4R7HQ9i
The following parameters would need to be defined:
server_name prospector.ucsf.edu
virtual_dir prospector
http://prospector.ucsf.edu:8888/prospector/cgi-bin/msform.cgi?form=search_compare&search_key=Md7XxQhUQ4R7HQ9i
would require:
server_name prospector.ucsf.edu
server_port 8888
virtual_dir prospector
name: job_status_refresh_time
default value: 5
After a Batch-Tag search is submitted a Job Status page is displayed which reports on the progress of the job. By default the information is updated every 5 seconds. You can change the update rate by changing the job_status_refresh_time parameter.
name: daemon_loop_time
default value: 5
The daemon_loop_time is the time the Batch-Tag Daemon sleeps between the times when it checks if it has anything to do. The default value for this parameter is 5 sec.
name: single_server
default value: false
If this is set to false then searches take longer and longer to start the more searches are running. This is to ensure load balancing if there are multiple daemons running on multiple servers. If you have a single server you should set this to true, particularly if it has a lot of processors.
name: aborted_jobs_delete_days
default value: 0
Information on aborted searches is kept in a database table. You can delete this information after a certain time via the aborted_jobs_delete_days parameter. If the default value of 0 is used then the information is not deleted.
name: session_delete_days
default value: 0
Every time a user logs into Protein Prospector an entry is added to a table in the Batch-Tag search database. A key into the table is stored in a cookie in the user's browser which is deleted once the user closes the browser. The entries can be deleted from the database after a time controlled by the session_delete_days parameter. Once the entry has been deleted from the database then the user will have to log in again whether or not they have closed the browser. If the default value of 0 is used then the entries are never deleted from the table. A value of 2 is recommended for this parameter.
name: preload_database
default value: none defined
The Batch-Tag Daemon can load sequence databases into a memory mapped file which the database search programs can access. Multiple databases can be preloaded in this way.
For example:
preload_database SwissProt.2007.12.04
preload_database NCBInr.11.Dec.2007
would preload the SwissProt.2007.12.04 and NCBInr.11.Dec.2007 database into memory mapped files.
The following parameters can be modified whilst the daemon is running.
email
server_name
server_port
virtual_dir
max_btag_searches
daemon_loop_time
session_delete_days
aborted_jobs_delete_days
On Windows systems the file just needs to be saved for it to be reread. Thus you need to be careful when saving the file that there are no errors in it.
On LINUX systems, after saving the file, you also need to send a HUP signal to the btag-daemon process. Ie:
kill -HUP pid
where pid is the process ID of the btag-daemon process.
name: join_results_files
default value: true
When Batch-Tag is doing a multi-process search it stores the results for each process is a separate file. For example if the search key is YnX4ZKu8ZOd3vdvJ and there are 8 processes running the files will be called:
YnX4ZKu8ZOd3vdvJ.xml_0
YnX4ZKu8ZOd3vdvJ.xml_1
YnX4ZKu8ZOd3vdvJ.xml_2
YnX4ZKu8ZOd3vdvJ.xml_3
YnX4ZKu8ZOd3vdvJ.xml_4
YnX4ZKu8ZOd3vdvJ.xml_5
YnX4ZKu8ZOd3vdvJ.xml_6
YnX4ZKu8ZOd3vdvJ.xml_7
If join_results_files is set to true the files will be joined together at the end of a search into a single file called:
YnX4ZKu8ZOd3vdvJ.xml
If join_results_files is set to false then the files are not joined together. This could be potentially beneficial if there are a very large number of processors in which case joining the files together could be a significant proportion of the search time.
name: expectation_search_first
default value: false
When a Batch-Tag search is performed a search is sometimes done against a random database to determine coefficients for expectation value calculations. This can either be done before the normal search or after it. If it is done after the normal search then it is possible to quickly estimate the length of a search which could then be automatically aborted if it was going to take too long. Doing the expectation value search first has been left as an option so that in the future a facility for viewing the results of partially completed searches can be added.
name: raw_data_forwarding
default value: false
Any Protein Prospector programs that access raw data files, either to display the raw data or to do quantitation, needs to run on a computer running Windows. If the parameter raw_data_forwarding is set to true then in such cases the name of the server binary will have RawData appended to it (eg. searchCompareRawData.cgi) to allow the request to be forwarded to a Windows server. Note that the Protein Prospector instance running on the Windows server will also need to have the raw_data_forwarding parameter set.
Some directives will also be required in the apache setup file. In the example shown below server2 is the server with the Windows version of Protein Prospector. Note that all requests to the msdisplay binary need to be forwarded to the Windows server.
RewriteCond %{REQUEST_URI}   ^.*RawData.cgi
RewriteRule ^/(.*)RawData.cgi http://server2/$1.cgi [P]
RewriteCond %{REQUEST_URI}   ^.*msdisplay.cgi
RewriteRule ^/(.*)/msdisplay.cgi http://server2/$1/msdisplay.cgi [P]
Also see the virtual_dir_proxy parameter below.
If the server has to deal with a lot of quantitation traffic it is possible to have multiple quantitation servers. The Apache file directives and a Perl script to set this up are shown below. The Perl script gets started up when the Apache server starts. It then serves requests to the quantitation servers in turn.
Apache setup file directives:
RewriteEngine on
RewriteLog  "/var/log/apache2/rewrite.log"
RewriteLogLevel 5

Force TRACE requests to return errors
# Needed for port 80 reconnects at UCSF
RewriteCond %{REQUEST_METHOD} ^TRACE
RewriteRule .* - [F]

RewriteMap  lb  prg:/var/lib/prospector/bin/load_balance.pl
RewriteCond %{REQUEST_URI}  ^.*RawData.cgi  [OR]
RewriteCond %{REQUEST_URI}  ^/prospector\d  [OR]
RewriteCond %{REQUEST_URI}  ^.*msdisplay.cgi
RewriteRule ^(.+)$  ${lb:$1}  [P,L]
Perl script:
use strict;

# Don't buffer output.
$| = 1;

# The pool of possible servers for the round-robin.
my @servers = ( "munch01", "munch02" );
my $domain = "ucsf.edu";
my $server = "";

my $range = scalar @servers;
my $count = 0;
my $uri = "";

while ( $uri = <STDIN> ) {
   $count = ( ($count + 1) % $range );
   # Assign the server by round-robin
   $server = $servers[$count] . ".ucsf.edu";

   # Additional rewrites (instead of doing them in Apache).
   $uri =~ s/RawData.cgi/.cgi/;
   if ( $uri =~ /^\/prospector(\d)/ ) {
      $server = "munch0$1";
      $uri =~ s/^\/prospector\d/\/prospector/;
   }

   print "http://$server/$uri";
}
name: virtual_dir_proxy
default value:
This is required by systems where there is a proxy server and 1 or more servers behind it running instances of Protein Prospector. Some parts of the Prospector require a full address to be written into the output for this to work. For example something like:
<img src="/prospector/temp/Jul_27_2009/imageskk.11.png" />
is normally written into the output to display an image from the R package, such as the error scatterplot from MS-Product.
If we set virtual_dir_proxy to prospector1 then this server will write:
<img src="/prospector1/temp/Jul_27_2009/imageskk.11.png" />
instead.
A rewrite rule in the apache setup file can then be used to change this into a full address so that the proxy server will find the file.
RewriteCond %{REQUEST_URI}   ^/prospector1/.*
RewriteRule ^/prospector1/(.*) http://prospector1.ucsf.edu/prospector/$1 [P]
After v6.0.0 it became possible to interact with a raw data extraction daemon on a Windows server rather than forwarding reports requiring raw data to a server with Prospector installed. The Windows server can be set up to queue extraction requests and Search Compare does not need to be running whilst the extraction is taking place. Once the extraction request has completed the report is accessible from a Search Table link.
name: raw_data_batch_option
default value:
This controls the processing of raw data. If this is undefined then the raw data processing is built into Search Compare, MS-Display and MS-Product. Setting the flag to "optional" means that there is an optional menu for turning this on and off on Search Compare. MS-Display and MS-Product have inbuilt raw data processing. Setting the flag to "on" indicates that all raw data processing is handled by a daemon.
name: quan_remain_time_measurement_point
default value: 30
quan_remain_time_measurement_point is used in conjunction with the quan_remain_time_no_abort_limit defined below. It is the time elapsed before the remaining quantitation extraction time is measured. This is to allow a more accurate estimation of the extraction time.
name: quan_remain_time_no_abort_limit
default value: 0
If the remaining quantitation extraction time is greater than quan_remain_time_no_abort_limit then Search Compare is automatically aborted and the report is replaced by the Search Table. The Search Compare report is accessible from the Search Table once the raw data extraction has taken place.
If quan_remain_time_no_abort_limit is set to 0 then Search Compare is not automatically aborted.
name: quan_wait_time_no_abort_limit
default value: 0
If the quantitation extraction is queued (before extraction) for longer than quan_wait_time_no_abort_limit then Search Compare is automatically aborted and the report is replaced by the Search Table. The Search Compare report is accessible from the Search Table once the raw data extraction has taken place.
If quan_wait_time_no_abort_limit is set to 0 then Search Compare is not automatically aborted.
The file html/js/info.js controls some aspects of what is displayed on static web pages such as the home page mshome.htm. There are some variables near the top of the file that can be modified.
pubWebServer
If pubWebServer is set to false then the links to FA-Index on static web pages are not shown.
batchMSMSSearching
If batchMSMSSearching is set to false then all the links in the Batch MSMS Searching section of the home page are not shown.
sciexAnalystRawData
If sciexAnalystRawData is set to false then the link to Wiff Read on the home page is not shown.
ABITOFTOFRawData
If ABITOFTOFRawData is set to false then the link to Peak Spotter on the home page is not shown.
ucsfBanner
If ucsfBanner is set to false then the black UCSF area of the web page is not shown on static web pages.
feedbackEmail
The feedbackEmail variable is used to control the email address that users are prompted to send queries to.
See also:Clearing the Cache When Updating Javascript Files
The database accession number in the search results has a HTML link to retrieve the complete entry including comments from a remote database. In order for this link to be created the programs need to know the URL for the remote database. This is accomplished through parameters contained in the acclinks.txt file. Occasionally the URL's to the remote database may need to be updated, or new ones added for a new database. This requires editing of the acclinks.txt file.
Within the acclinks.txt file an entry for an HTML link from the accession number MUST contain 1 line:
The line must contain the following information:
- The prefix name for the database as listed in the HTML input page for each program. The prefix should be long enough to uniquely identify the database or set of databases you wish to refer to.
-
The URL to link to if the accession number for the entry is added to the end of the URL. The URL addition is internal to the programs and is expected to retrieve a fully annotated entry from a remote database.
Note that this link need not be to a sequence database. The link could be to whatever a Protein Prospector server administrator specifies.
Example:
Below is an example of the entry for UniprotKB in acclinks.txt:
UniProt http://www.pir.uniprot.org/cgi-bin/upEntry?id=
The lowercase prefixes gen, owl, swp, or nr are intended to be used for a second database that is of the same format as the uppercase one. See Linking for creating links into NCBI databases.
As mentioned above the prefix name can refer to a single database or a set of databases. For example if you have two user created databases called PA3_mouse and PA33_mouse, an entry in the acclinks.txt file of the form:
PA3 some_url_prefix
would give the databases the same accession number link. On the other hand entries of the following form:
PA3 some_url_prefix
PA33 another_url_prefix
would give the databases different accession number links.
Protein Prospector server administrators who find improved options for links to publicly available databases are encouraged to send the modified parameter files to for inclusion in subsequent Protein Prospector releases.
The upidlinks.txt file contains the remote database URL definitions from gene names in the Protein Prospector results pages. Currently gene names are only reported in the Search Compare output.
The instructions for modifying this file are essentially the same as those for modifying the acclinks.txt file.
Some example are given below:
SwissProt http://www.pir.uniprot.org/cgi-bin/upEntry?id=
swp http://www.pir.uniprot.org/cgi-bin/upEntry?id=
UniProt http://www.pir.uniprot.org/cgi-bin/upEntry?id=
The MS-Digest index number in the search results has an HTML link to retrieve an MS-Digest listing for the matched database entry. In order for this link to be created the programs need to know the URL to MS-Digest and some default parameters. This is accomplished through information contained in the idxlinks.txt file. A server administrator can customize these parameters by editing the idxlinks.txt file.
Within the idxlinks.txt file an entry for an HTML link from the MS-Digest index number MUST contain 2 lines:
The lines must contain the following information:
- The program name for which the specified HTML link will be created from the index number link in the program's output.
-
The URL to link to if the enzyme, MS-Digest index number, and modified AA parameters (from MS-Fit only) for the entry are added to the end of the provided URL. The URL addition is internal to the programs and is expected to provide an MS-Digest listing for the database entry corresponding to the index number.
Note that this link need not be the same for each Protein Prospector program creating the link, and that the MS-Digest parameters can be customized. Furthermore, this link need not be to MS-Digest at all; the link could be to whatever a Protein Prospector server administrator specifies.
Example:
Below is an example of the entries for msfit and mstag in idxlinks.txt:
msfit
MSDIGEST?
mstag
MSDIGEST?mod_AA=Peptide+N-terminal+Gln+to+pyroGlu&mod_AA=Oxidation+of+M&mod_AA=Protein+N-terminus+Acetylated
The items on the taxonomy menu are controlled by the files taxonomy.txt and taxonomy_groups.txt. You can edit these file to add to or modify the available options.
If the taxonomy you want to add is contained in either taxonomy/names.dmp or taxonomy/speclist.txt then you can add it to the taxonomy.txt file. It is recommended that you use capital letters.
The taxonomy_groups.txt file can deal with more complex definitions. Within this file a single taxonomy entry must contain at least ONE line and individual entries are separated by a line with only the ">" symbol.
The first line of an entry contains the taxonomy name as it is to appear on the Taxonomy menu. All other lines should contain taxonomies that are available in either taxonomy/names.dmp or taxonomy/speclist.txt.
Some examples are listed below. Most of these were introduced to give backwards compatibility with previous versions of Protein Prospector.
Grouping two or more species.
HUMAN MOUSE
HOMO SAPIENS
MUS MUSCULUS
>
Groups of two or more taxonomies.
ROACH LOCUST BEETLE
ROACHES
GRASSHOPPERS AND LOCUSTS
BEETLES
>
Defining your own name for something that is a valid taxonomy option. In this case RODENTS is valid but RODENT isn't.
RODENT
RODENTS
>
Other examples:
MICROORGANISMS
'FLAVOBACTERIUM' LUTESCENS
[BREVIBACTERIUM] FLAVUM
[POLYANGIUM] BRACHYSPORUM
ABIOTROPHIA DEFECTIVA
ACARYOCHLORIS MARINA
ACARYOCHLORIS MARINA MBIC11017
ACETIVIBRIO CELLULOLYTICUS
ACETIVIBRIO ETHANOLGIGNENS
ACETOBACTER ACETI
ACETOBACTER ESTUNENSIS
.....
.....
ZYMOMONAS MOBILIS
ZYMOMONAS MOBILIS SUBSP. FRANCENSIS
ZYMOMONAS MOBILIS SUBSP. MOBILIS
ZYMOMONAS MOBILIS SUBSP. MOBILIS ATCC 10988
ZYMOMONAS MOBILIS SUBSP. MOBILIS ZM4
ZYMOMONAS MOBILIS SUBSP. POMACEAE
>
Detailed information on all amino acids used in the programs is located on the server in the file aa.txt.
You can edit this file to change the attributes shown below. This is not recommended unless you know what you are doing.
An entry for an amino acid MUST contain 9 lines:
line 1) contains a name for the amino acid. This isn't currently used by the programs.
line 2) contains a single letter code for the amino acid.
line 3) contains the elemental formula of the amino acid.
lines 4) and 5) contain elemental formulae for side-chains that are used in
calculating d and w ions. If there are no beta
substituents, or they are irrelevant, then use 0
(zero) on these lines.
line 6) contains the pk_C_term for the amino acid.
line 7) contains the pk_N_term the amino acid.
line 8) contains the pk_acidic_sc for the amino acid. You should enter n/a for not applicable.
line 9) contains the pk_basic_sc for the amino acid. You should enter n/a for not applicable.
The pK values are taken from:
Bjellqvist, B., Hughes, G. H., Paquali, C., Paquet, N., Ravier, F., Sanchez, J.-C., Frutiger, S., Hochstrasser, D. (1993) The focusing positions of polypeptides in immobilized pH gradients can be predicted from their amino acid sequences. Electrophoresis, 1993, Pp. 1023-1031
Bjellqvist, B., Basse, B., Olsen, E. and Celis, J. E. (1994) Reference points for comparisons of two-dimensional maps of proteins from different human cell types defined in a pH scale where isoelectric points correlate with polypeptide compositions, Electrophoresis, Vol. 15, Pp. 529-539
Below is an example of the entry for Isoleucine:
Isoleucine
I
C6 H11 N1 O1
C1 H3
C2 H5
3.55
7.5
n/a
n/a
Make sure the elements in your amino acid are present in the file elements.txt. See also, To Add/Change Elements.
It is not possible to add new amino acids. The ones currently defined are:
Alanine (A)
Cysteine (C)
Aspartic Acid (D)
Glutamic Acid (E)
Phenylalanine (F)
Glycine (G)
Histidine (H)
Isoleucine (I)
Lysine (K)
Leucine (L)
Methionine (M)
Asparagine (N)
Proline (P)
Glutamine (Q)
Arginine (R)
Serine (S)
Threonine (T)
Valine (V)
Tryptophan (W)
Tyrosine (Y)
Homoserine Lactone (h)
Met Sulfoxide (m)
Phosphorylated Serine (s)
Phosphorylated Threonine (t)
Phosphorylated Tyrosine (y)
Selenocysteine (U)
The files usermod_frequent.txt, usermod_glyco.txt, usermod_msproduct.txt, usermod_quant.txt, usermod_silac.txt and usermod_xlink.txt contain the variable modifications used on the search forms. An administrator can add new modifications to these files or edit existing ones.
The file usermod_msproduct.txt is used to store modifications for use by MS-Product but not by MS-Tag, Batch-Tag, MS-Bridge, MS-Digest and MS-Fit. One major use of this file is to add new modifications for the MS-Viewer program. As these are often from other search engines they may not be appropriate for MS-Tag and Batch-Tag.
The file usermod_glyco.txt is used to store glycopeptide related modifications for use by MS-Product, MS-Viewer, MS-Tag, Batch-Tag, MS-Bridge, MS-Digest and MS-Fit.
The file usermod_silac.txt is used to store SILAC quantitation modifications for use by MS-Product, MS-Viewer, MS-Tag, Batch-Tag, MS-Bridge, MS-Digest and MS-Fit.
The file usermod_quant.txt is used to store non-SILAC quantitation modifications for use by MS-Product, MS-Viewer, MS-Tag, Batch-Tag, MS-Bridge, MS-Digest and MS-Fit.
The file usermod_xlink.txt is used to store crosslinking related modifications for use by MS-Product, MS-Viewer, MS-Tag, Batch-Tag, MS-Bridge, MS-Digest and MS-Fit. These modifications are referenced by the file links.txt.
Note that as of release 5.14.0 the file usermod.txt is no longer required. If you have rearranged all the modifications into the above categories the file must be removed. If it is present then the modifications contained in it will still be added to the menus but will be placed in an Unknown category. Modifications in the file should not be present in any of the other files.
For the file usermod_glyco.txt an entry for a variable modification MUST contain a single line. This contains a name for the modification followed by a bracketed list of amino acids to check for the modification. For modifications in this file the name must be made up from the following elements: "HexNAc", "NeuAcAc", "NeuGcAc", "NeuAc", "NeuGc", "Phospho", "Sulfo", "Galactosyl", "Glucosylgalactosyl", "+Formyl", "+Formyl", "Fuc", "Ac", "Hex", "Xyl" optionally followed by integer numbers. The elemental formulae corresponding to these elements are in the source code. "+Cation:K" and "+Cation:Na" mods are automatically generated for glycosylation modifications.
For the rest of the Usermod files an entry for a variable modification MUST contain 3 lines:
line 1) contains a name for the modification;
line 2) contains an elemental formula for the modification (elements
can be negative - eg Amidation would be N H O-1);
line 3) contains a list of amino acids/termini to check for the modification.
Although the software doesn't require it we suggest that the modifications are kept in the same order as the supplied file where the modifications names are in alphabetic order.
It is strongly recommended that you use names which follow the PSI_MOD standard for naming modifications. Also you should check the Unimod website to see if the modification you want to add already has a name. If you add a modification and either change the name or the elemental formula then all previous search results using this modification will be invalid and should be deleted.
Some examples of what line 3) can contain are:
1). Restricting the modification to the protein N or C terminus:
Protein N-term
Protein C-term
2). Restricting the modification to one of a list of amino acids at the protein N or C terminus:
Protein N-term M
3). Modification to the peptide N or C terminus:
C-term
N-term
4). Modification to one of a list of amino acids at the peptide N or C terminus:
N-term Q
C-term M
5). Neutral loss modification:
Neutral loss
6). Modification to one of a list of amino acids:
STY
Below is an example of the entry for Phosphorylation of S, T and Y:
Phospho
P O3 H
STY
The list of possible constant modifications is generated automatically from the list of possible variable modifications. Note that as of release 5.14.0 glycosylation and cross-linking modifications are not added to the list of possible constant modifications.
The list of N-Terminus modifications the can form a1 and b1 ions is stored in the b1.txt file. The N-terminus modifications in this file have to have definitions in either usermod.txt, usermod_glyco.txt or usermod_xlink.txt
Some example entries are listed below:
Acetyl
iTRAQ4plex
iTRAQ8plex
Detailed information on all elements used in the programs is located on the server in the elements.txt file. You must edit this file to add or modify an element.
Within the elements.txt file an entry for an element MUST contain 1 line:
The line contains the following information:
a). The symbol for the element.
b). The valency of the element.
c). The number of isotopes listed on the line.
d). A mass/abundance pair for each isotope.
Below is an example of the entry for hydrogen:
H 1 2 1.007825035 .99985 2.014101779 0.00015
If you add a new element, please, send the modified parameter file to for inclusion in subsequent Protein Prospector releases.
Stable Isotope elements may also be added. For example:
2H 1 1 2.014101778 1.0
13C 4 1 13.003354838 1.0
15N 3 1 15.000108898 1.0
18O 2 1 17.999160419 1.0
The masses and isotopic abundances currently used are from:
Audi, G. and Wapstra, A. H. (1995) The 1995 update to the atomic mass evaluation, Nucl. Phys. A, Vol. 595, pp. 409-480 (1995)
Detailed information on all enzymatic digests used in the programs is located on the server in the enzyme.txt file. You must edit this file to add or modify the rules for an enzymatic digest.
Within this file an entry for an enzymatic digest MUST contain 4 lines:
line 1) contains a name for the enzymatic digest which will appear on the digest menu;
line 2) contains a list of cleavage amino acids;
line 3) contains a list of exception amino acids (a '-' character indicates no exceptions);
line 4) either C for cleavage on the C terminus side of an amino acid or N for cleavage
on the N terminus side.
Below is an example of the entry for Trypsin:
Trypsin
KR
P
C
The file enzyme_comb.txt is used to specify enzyme combinations. You can combine the cleavage rules for two or more enzymes by having them on the same line in this file separated by a '/' character. For example to have an option which combines the cleavage rules for CNBr and Trypsin you would need the following line:
Trypsin/CNBr
The enzyme combinations will appear on the digest menu after the enzymes that have been defined in the enzyme.txt file.
Any enzyme used in the enzyme_comb.txt must have been defined in the enzyme.txt file.
It is possible to mix enzymes which cleave on the N-terminus side with those that cleave on the C-terminus side.
If you add a new enzymatic digest please send the modified parameter file to for inclusion in subsequent Protein Prospector releases.
The imm.txt file contains the immonium ion elemental formulae and corresponding compositional information for use by Protein Prospector programs.
The first 2 entries in the file are for the immonium tolerance and the minimum fragment ion mass (both in Da). This is followed by a list of immonium ions.
An entry for an immonium ion contains:
1). The elemental formula using elements defined in elements.txt.
2). The compositional information. List all the amino acids corresponding to the elemental formula.
3). Ions labelled as M are major peaks; these are used to include an amino acid when using immonium ions to extract compositional ions in MS-Tag and MS-Seq. Minor ions are labelled m and are only likely to be present alongside major ions. They are reported in the immonium and related ions section of the MS-Product report.
4). Use I if the ion is an immonium ion or - otherwise.
5). A list of amino acids to exclude if the mass is missing or a dash (-) character if there are no amino acids to exclude. Excluding amino acids on the basis of missing peaks is a feature that can be turned off.
The fields must be separated by the | character.
For example:
C2 H6 N O|S|M|I|-
C4 H8 N|P|M|I|P
C4 H8 N|R|M|-|-
C4 H10 N|V|M|I|-
C3 H8 N O|T|M|I|-
C5 H10 N|KQ|M|-|-
C5 H12 N|IL|M|I|IL
C3 H7 N2 O|N|M|I|-
C4 H11 N2|R|M|-|-
C3 H6 N O2|D|M|I|-
C4 H10 N3|R|m|-|-
C5 H13 N2|K|M|I|-
C4 H9 N2 O|Q|M|I|-
C4 H8 N O2|E|M|I|-
C4 H10 N S|M|M|I|-
C5 H8 N3|H|M|I|H
C5 H10 N3|R|M|-|R
C8 H10 N|F|M|I|-
C6 H8 N O2|P|M|-|-
C6 H13 N2 O|K|m|-|-
C5 H9 N2 O2|Q|m|-|-
C8 H10 N O|Y|M|I|-
C6 H8 N3 O|H|m|-|-
C10 H11 N2|W|M|I|-
Any suggestion for improving this scheme should be sent to for inclusion in subsequent Protein Prospector releases.
Edit the fit_graph.par.txt file.
Edit the pr_graph.par.txt file.
Edit the sp_graph.par.txt file.
Edit the dbstat_hist.par.txt file.
Edit the hist.par.txt file.
Edit the error_hist.par.txt file.
Edit the mmod_hist.par.txt file.
Edit the cr_graph.par.txt file.
Many of the graphs in the package are HTML5/Javascript plots which use the information in their corresponding parameter file to control their appearance. Note that from release 5.16.0 onwards Java applets are no longer used to render graphical output.
The files contains comment lines (starting with a # character) explaining the parameter fields beneath them. The parameters are name-value pairs. A name-value pair is a line in the file where the name is followed by a space character and the rest the line is the value.
Colors are specified as 3 integers for the red, green and blue intensities respectively. The intensity values must be between 0 and 255.
A font specification is made up of a font family (Georgia, Palatino Linotype, Book Antiqua, Times New Roman, Arial, Helvetica, Arial Black, Impact, Lucida Sans Unicode, Tahoma, Verdana, Courier New or Lucida Console), a font style identifier (PLAIN, BOLD or ITALIC) and a point size.
The names of the parameters are shown in bold below:
- The graph width in pixels.
- applet_width
- The graph height in pixels.
- applet_height
- The width of the graph axes and the lines used to draw the graph in pixels.
- line_width
- The graph background color.
- applet_background_color_red
- applet_background_color_green
- applet_background_color_blue
- The graph axes color.
- axes_color_red
- axes_color_green
- axes_color_blue
- The default peak color.
- default_peak_color_red
- default_peak_color_green
- default_peak_color_blue
- The number of application colors - should be set to zero for MS-Isotope
- number_application_colors
- The application colors.
- application_color_1_red
- application_color_1_green
- application_color_1_blue
- application_color_2_red
- application_color_2_green
- application_color_2_blue
- etc
- The default font - the font for all text except the peak labels.
- default_font_family
- default_font_style
- default_font_points
- The peak label font.
- peak_label_font_family
- peak_label_font_style
- peak_label_font_points
- The X-Axis label.
- x_axis_label
Fragmentation types are stored in the file fragmentation.txt. The information corresponding to a fragmentation type consists of one or more lines in this file. Individual fragment type entries in the file are separated by a line with only the ">" symbol.
Note that only the score parameters (section 9 below) can be edited for the ESI-TRAP-CID-low-res, ESI-Q-CID and ESI-ETD-low-res instrument types.
The first line for an entry contains the fragmentation type name. This can be followed by lines (some optional) which override the default fragmentation type parameters. The additional lines have the form of name value pairs separated by a space. The possible parameters are listed below:
1). A list of fragment ions types (one per line) which occur in MS/MS fragmentation.
name: it
possible values: a
                 a-H2O
                 a-NH3
                 a-H3PO4
                 a-SOCH4
                 b
                 b-H2O
                 b-NH3
                 b+H2O
                 b-H3PO4
                 b-SOCH4
                 bp2                   Doubly charged b ion for data where the charge can't be determined
                                       from the peak list.
                 bp2-H2O
                 bp2-NH3
                 bp2-H3PO4
                 bp2-SOCH4
                 bp3                   Triply charged b ion for data where the charge can't be determined
                                       from the peak list. Currently only implemented for ESI-TRAP-CID-low-res
                                       instrument.
                 c+2                   Ion type to deal with incorrectly assigned monoisotopic peak
                 c+1                   Ion type to deal with incorrectly assigned monoisotopic peak
                 c
                 cp2                   Doubly charged c ion for data where the charge can't be determined
                                       from the peak list.
                 c-1
                 x
                 y
                 y-H2O
                 y-NH3
                 y-H3PO4
                 y-SOCH4
                 yp2                   Doubly charged y ion for data where the charge can't be determined
                                       from the peak list.
                 yp2-H2O
                 yp2-NH3
                 yp2-H3PO4
                 yp2-SOCH4
                 yp3                   Triply charged y ion for data where the charge can't be determined
                                       from the peak list. Currently only implemented for ESI-TRAP-CID-low-res
                                       instrument.
                 Y
                 z
                 zp2                   Doubly charged z ion for data where the charge can't be determined
                                       from the peak list.
                 z+1
                 z+1p2                 Doubly charged z+1 ion for data where the charge can't be determined
                                       from the peak list.
                 z+2                   Ion type to deal with incorrectly assigned monoisotopic peak
                 z+3                   Ion type to deal with incorrectly assigned monoisotopic peak
                 I                     Internal ions.
                 C                     C-ladder ions.
                 N                     N-ladder ions.
                 i                     Immonium and low mass ions.
                 m
                 d
                 v
                 w
                 h                     MH-H2O, b-H2O if b, b-H2O if y.
                 n                     a-NH3 if a, b-NH3 if b, y-NH3 if y.
                 B                     b+H2O if b.
                 P                     a-H3PO4 if a, b-H3PO4 if b, y-H3PO4 if y.
                 S                     b-SOCH4 if b, y-SOCH4 if y.
                 MH-H2O
                 MH-NH3
                 MH-H3PO4
                 MH-SOCH4
                 MH-SOCH4
                 M±x                   Eg. M-60, M-2, M+1. Used for ECD/ETD for labelling neutral loss peaks in MS-Product.
                                       The losses specified here are also used by the msms_ecd_or_etd_side_chain_exclusion
                                       parameter in the params/instrument.txt file.
The following ion types are possible in MS-Tag.
a,a-NH3,a-H2O,a-H3PO4,b,b-H2O,b-NH3,b+H2O,b-H3PO4,b-SOCH4,c+2,c+1,c,c-1,d
bp2,bp2-H2O,bp2-NH3,bp2-H3PO4,bp2-SOCH4,cp2
x,y,y-NH3,y-H2O,y-H3PO4,y-SOCH4,Y,z,z+1,z+2,z+3
yp2,yp2-H2O,yp2-NH3,yp2-H3PO4,yp2-SOCH4,zp2,z+1p2
I,C,N,h,n,B,P,S
None are defined by default.
2). A list of amino acids which lose NH3 in MS/MS fragmentation.
name: nh3_loss
default value: RKNQ
3). A list of amino acids which lose H2O in MS/MS fragmentation.
name: h2o_loss
default value: STED
4). A list of positive charge bearing amino acids.
name: pos_charge
default value: RHK
5). A list of amino acids that don't generate d ions.
name: d_ion_exclude
default value: FHPWY
6). A list of amino acids that don't generate v ions.
name: v_ion_exclude
default value: GP
7). A list of amino acids that don't generate w ions.
name: w_ion_exclude
default value: FHWY
8). The maximum internal ion mass.
name: max_internal_ion_mass
default value: 700.0
9). MS-Tag/Batch-Tag scores for various ion types
name: unmatched_score
name: immonium_score
name: related_ion_score
name: m_score
name: a_score
name: a_loss_score
name: a_phos_loss_score
name: b_score
name: b_plus_h2o_score
name: b_loss_score
name: b_phos_loss_score
name: c_ladder_score
name: c_plus_2_score
name: c_plus_1_score
name: c_score
name: c_minus_1_score
name: d_score
name: v_score
name: w_score
name: x_score
name: n_ladder_score
name: y_score
name: y_loss_score
name: y_phos_loss_score
name: Y_score
name: z_score
name: z_score
name: z_plus_1_score
name: z_plus_2_score
name: z_plus_3_score
name: bp2_score
name: bp2_loss_score
name: bp2_phos_loss_score
name: yp2_score
name: yp2_loss_score
name: yp2_phos_loss_score
name: internal_a_score
name: internal_b_score
name: internal_loss_score
name: mh3po4_score
name: msoch4_score
default value: 0
Below is an example of the entry for ESI-Q-CID:
ESI-Q-CID
it a
it a-NH3
it a-H2O
it b
it b-NH3
it b-H2O
it b+H2O
it y
it y-NH3
it y-H2O
it I
it i
it P
it S
it M-H2O
it M-NH3
it M-SOCH4
unmatched_score -0.1
immonium_score 0.5
related_ion_score 0.5
a_score 0.5
a_loss_score 0.0
a_phos_loss_score 0.5
b_score 1.5
b_plus_h2o_score 1.0
b_loss_score 0.5
b_phos_loss_score 1.5
y_score 3.0
y_loss_score 1.5
y_phos_loss_score 3.0
internal_a_score 0.25
internal_b_score 0.5
internal_loss_score 0.25
max_internal_ion_mass 500.0
>
The file glyco_by.txt contains the information on the glycosylation B and Y ions that are considered.
In this file the B ions are specified before the Y ions. The first Y ion specified is Y0 and the second 0,2X. Otherwise the order of the ions is not important.
Losses of H2O, C2H6O3, CH6O3, 2H2O and C2H4O2 can be specified for B ions. No other losses are allowed.
Number ranges can be used to specify multiple ions in the same line. These are allowed for B and Y ions. Eg. HexNAc6Hex3-7Fuc1-5 specifies a total of 20 ions in a single line. Commas can also be used. Eg 2-3,5 specifies 2, 3 and 5. Number ranges cannot be used together with losses.
There can be no blank lines but all lines beginning with # may contain comments and are ignored by the programs.
The B and Y ion specification ends at the first space character on a line or the end of a line. Thus you can include comments after the first space character on a line. This could for example be the mass of the ion.
The file glyco_cation.txt contains the information on additions to the list of glycosylation modifications.
Anything listed in this file also needs to have a corresponding entry in glyco_info.txt and in a usermod file. The list is used to generate entries in the Sets option for variable glycosylation modifications on the MS-Tag and Batch-Tag forms. An example modification generated is HexNAc4Hex5Fuc+Cation:N(1)H(4).
The file glyco_info.txt contains glycosylation modification building blocks and related attributes.
An entry for an glycosylation building block MUST contain 4 lines:
1) the name of the building block.
2) the elemental composition of the building block.
3) a code for drawing a symbol related to the building block when annotating spectra.
4) a code related to the building block for links to the GNOme GlycanComposition Browser at https://gnome.glyomics.org/CompositionBrowser.html
For line 3 and 4 enter "" for a blank field.
The order of some items is important. Eg. NeuAcAcAc before NeuAcAc before NeuAc before Ac. This is to prevent say NeuAcAcAc being parsed as NeuAc.
Two examples are shown below:
##########################
HexNAc
C8 H13 N O5
B
HexNAc
##########################
NeuAcAcAc
C15 H21 N O10
P<Ac><Ac>
""
##########################
The file glycolinks.txt contains remote database URL definitions that enable HTML links from glycosylation modifications in Protein Prospector results pages.
An entry for an HTML link from the glycosylation modifications contain the URL to link to if the GlyTouCan ID for the glycosylation modification is added to the end of the URL. The URL addition is internal to the programs and is expected to retrieve a fully annotated entry from a remote database.
In the example shown below all but one of the links have been commented out as only one can be active at a given time.
https://glycosmos.org/glycans/show/
#https://glytoucan.org/Structures/Glycans/
#https://glycomb.beta.glycosmos.org/glycopeptide-entry?accession_number=
#https://www.glygen.org/glycan/
#https://gnome.glyomics.org/restrictions/GlyGen.CompositionBrowser.html?
The file glytoucan_id.txt contains.GlyTouCan IDs for given glycosylation modifications.
An example is shown below:
HexNAcFuc G57006OK
The file instrument.txt contains the information for the items on the instrument menu.
An entry for an instrument option typically extends over several lines. Individual entries in the file are separated by a line with only the ">" symbol. The first line for an entry contains the instrument name as it appears on the instrument menu. This can be followed by lines (some optional) which override the default instrument parameters. The additional lines have the form of name value pairs separated by a space. The possible parameters are listed below:
1). A mandatory entry from the file fragmentation.txt.
name: frag
default value:
For example:
frag ESI-Q-CID
2). The number of decimal places used when printing out parent ion masses in reports.
name: parent_precision
default value: 4
3). The number of significant figures used when printing out parent ion mass errors in reports.
name: parent_error_significant_figures
default value: 3
4). The number of significant figures used when printing out parent ion intensities in reports.
name: parent_intensity_significant_figures
default value: 3
5). The number of decimal places used when printing out fragment ion masses in reports.
name: fragment_precision
default value: 4
6). The number of significant figures used when printing out fragment ion mass errors in reports.
name: fragment_error_significant_figures
default value: 2
7). The number of significant figures used when printing out fragment ion intensities in reports.
name: fragment_intensity_significant_figures
default value: 3
8). The mass window used when doing quantitation based on MSMS reporter ions (eg. iTRAQ).
name: quan_tolerance
default value: 0.2
If for example a value of 0.2 Da is used then all signals in the range ±0.2 Da of the expected exact mass are summed.
9). Whether to allow incorrect charges when reporting matches in MS-Product.
name: allow_incorrect_charge
default value: false
It is appropriate to set this to true if you generally can't reliably work out the charge of fragment ions from the peak list.
name: allow_incorrect_charge
default value: false
10). MS peak filtering parameters.
Note that all these parameters can also be used as CGI parameters to the MS-Fit, MS-Bridge and MS-NonSpecific programs. CGI parameters will override what is in the instrument.txt file.
name: ms_peak_exclusion
default value: false
This flag controls whether or not to apply peak intensity filtering and filtering based on the number of peaks in the MS spectrum.
name: ms_min_intensity
default value: 0.0
If the ms_peak_exclusion flag is set then any peaks with intensities less than the ms_min_intensity will be excluded.
name: ms_matrix_exclusion
default value: false
name: ms_max_matrix_mass
default value: 1300.0
If the ms_matrix_exclusion flag is set to true then the software attempts to detect and remove any peaks less than or equal to ms_max_matrix_mass that the software judges from their mass offset to be from non-peptide peaks.
name: ms_mass_exclusion
default value: false
name: ms_min_mass
default value: 50.0
name: ms_max_mass
default value: 10000.0
If the ms_mass_exclusion flag is set to true then peaks with a mass less than ms_min_mass or greater than ms_max_mass are filtered out.
name: ms_max_peaks
default value: 200
name: ms_min_peaks
default value: 5
If the ms_peak_exclusion flag is set then only ms_max_peaks are retained via an intensity filter. Also any spectra with less than msms_min_peaks peaks will not be processed.
11). MSMS peak filtering parameters.
Note that all these parameters can also be used as CGI parameters to the MS-Tag, MS-Product and Batch-Tag programs. CGI parameters will override what is in the instrument.txt file.
name: msms_min_precursor_mass
default value: 0.0
Any spectrum where the M+H of the precursor ion (as calculated from the m/z and the charge) is less than msms_min_precursor_mass will not be processed.
name: msms_pk_filter
default value: Max MSMS Pks
There are 3 possible values: "Max MSMS Pks", "Max MSMS Pks / 100 Da" and "Unprocessed MSMS". The first 2 options are used in conjunction with the "msms_max_peaks" option. The "Max MSMS Pks" option imposes a limit to the total number of peaks in the spectrum. The "Max MSMS Pks / 100 Da" option imposes a limit to the number of peaks in any given 100 Da range. If "Unprocessed MSMS" then all MSMS peak filtering is disabled and the value of all other MSMS peak filtering flags is ignored. These options are generally used as a CGI parameter by MS-Product to control the peak list displayed.
name: msms_ft_peak_exclusion
default value: false
It this flag is set to true then the isotope distributions for the precursor peak, the charge reduced peak and the resonant peak are removed for the peak list.
name: msms_ecd_or_etd_side_chain_exclusion
default value: false
It this flag is set to true then an algorithm is used which attempts to remove charge-reduced side-chain loss peaks from ECD or ETD spectra. The side chain loss peaks considered are the ones specified in the fragmentation.txt using M±x directives. For singly charged peaks a region of the spectrum down to the maximum specified loss is removed. For other charges a tolerance window is used which is the greater of the precursor tolerance and the fragment tolerance.
name: msms_peak_exclusion
default value: false
This flag controls whether or not to apply peak intensity filtering and filtering based on the number of peaks in the MSMS spectrum.
name: msms_min_intensity
default value: 0.0
If the msms_peak_exclusion flag is set then any peaks with intensities less than the msms_min_intensity will be excluded.
name: msms_join_peaks
default value: false
The next stage of the peak list processing is to attempt to join together split peaks if the msms_join_peaks flag is set to true.
name: msms_matrix_exclusion
default value: false
name: msms_max_matrix_mass
default value: 400.0
If the msms_matrix_exclusion flag is set to true then the software attempts to detect and remove any peaks less than or equal to msms_max_matrix_mass that the software judges from their mass offset to be from non-peptide peaks.
name: msms_deisotope
default value: false
name: msms_deisotope_hi_res
default value: false
The next stage is to deisotope the spectrum if the either the msms_deisotope or the msms_deisotope_hi_res flag is set to true. msms_deisotope will assign charges up to charge 2 whereas msms_deisotope_hi_res will assign charges up to charge 4.
name: msms_mass_exclusion
default value: false
name: msms_min_mass
default value: 50.0
name: msms_precursor_exclusion
default value: 15.0
If the msms_matrix_exclusion flag is set to true then peaks with a mass less than msms_min_mass or within msms_precursor_exclusion of the precursor mass are filtered out.
name: msms_max_peaks
default value: 60
name: msms_min_peaks
default value: 5
If the msms_peak_exclusion flag is set then only msms_max_peaks are retained via an intensity filter. If msms_pk_filter is set to Max MSMS Pks then before applying the filter the spectrum is split into 2 halves and the same number of peaks are retained in each half. If msms_pk_filter is set to Max MSMS Pks / 100 Da then the spectrum is split up into 100 Da ranges and a maximum of msms_max_peaks are retained in each range.
Also any spectra with less than msms_min_peaks peaks will not be processed.
The file homology.txt contains the information for the matrix modification options.
An entry for a matrix modification option MUST contain least TWO lines. Individual entries in the file are separated by a line with only the ">" symbol. The first line for an entry contains the matrix modification option name as it appears in the Matrix Modification section of the Batch-Tag or MS-Tag form. Subsequent lines (of which there must be at least one) should contain the following information separated by a space:
a). an amino acid;
b). a list of amino acids that the amino acid in a) can mutate or be modified to.
Below are examples of entries for a comprehensive homology option and for an option which allows BX and Z codes in the database to become the relevant standard amino acid.
Homology
A CDEFGHIKLMNPQRSTVWY
C ADEFGHIKLMNPQRSTVWY
D ACEFGHIKLMNPQRSTVWY
E ACDFGHIKLMNPQRSTVWY
F ACDEGHIKLMNPQRSTVWY
G ACDEFHIKLMNPQRSTVWY
H ACDEFGIKLMNPQRSTVWY
I ACDEFGHKLMNPQRSTVWY
K ACDEFGHILMNPQRSTVWY
L ACDEFGHIKMNPQRSTVWY
M ACDEFGHIKLNPQRSTVWY
N ACDEFGHIKLMPQRSTVWY
P ACDEFGHIKLMNQRSTVWY
Q ACDEFGHIKLMNPRSTVWY
R ACDEFGHIKLMNPQSTVWY
S ACDEFGHIKLMNPQRTVWY
T ACDEFGHIKLMNPQRSVWY
V ACDEFGHIKLMNPQRSTWY
W ACDEFGHIKLMNPQRSTVY
Y ACDEFGHIKLMNPQRSTVW
>
Unknown Amino Acid
B DN
X ACDEFGHIKLMNPQRSTVWY
Z EQ
>
Computer optimisation options are currently only relevant to the Windows version. They are contained in the computer.txt file.
The following parameters are currently available:
1). The default memory block size used in memory mapping.
name: block_size
default value: 65536
This number is applicable for Windows systems and should not be changed.
2). The number of blocks to use as a default memory map size when reading a database.
name: num_blocks
minimum value: 1
default value: 16384
maximum value: 16384
The default value assumes that 1 GByte blocks are mapped in. The maximum value is 1 GByte. You might want to vary this parameter to see if it affects search times. If you have a lot of RAM then a much bigger number could be appropriate.
MS-Homology uses scoring matrices like those used in the BLAST or FASTA programs. The user is offered a choice of which one to use via the Score Matrix menu.
Users can add new scoring matrices or edit existing ones by editing the mat_score.txt file.
An example of a score matrix as defined in the file is given below:
BLOSUM62MS
A  4
R -1  5
N -2  0  6
D -2 -2  1  6
C  0 -3 -3 -3  9
Q -1  1  0  0 -3  5
E -1  0  0  2 -4  2  5
G  0 -2  0 -1 -3 -2 -2  6
H -2  0  1 -1 -3  0  0 -2  8
I -1 -3 -3 -3 -1 -3 -3 -4 -3  4
L -1 -2 -3 -4 -1 -2 -3 -4 -3  4  4
K -1  2  0 -1 -3  1  1 -2 -1 -2 -2  5
M -1 -1 -2 -3 -1  0 -2 -3 -2  2  2 -1  5
F -2 -3 -3 -3 -2 -3 -3 -3 -1  0  0 -3  0  6
P -1 -2 -2 -1 -3 -1 -1 -2 -2 -3 -3 -1 -2 -4  7
S  1 -1  1  0 -1  0  0  0 -1 -2 -2  0 -1 -2 -1  4
T  0 -1  0 -1 -1 -1 -1 -2 -2 -1 -1 -1 -1 -2 -1  1  5
W -3 -3 -4 -4 -2 -2 -3 -2 -2 -2 -2 -3 -1  1 -4 -3 -2 11
Y -2 -2 -2 -3 -2 -1 -2 -3  2 -1 -1 -2 -1  3 -3 -2 -2  2  7
V  0 -3 -3 -3 -1 -2 -2 -3 -3  2  1 -2  1 -1 -2 -2  0 -3 -1  4
B -2 -1  3  4 -3  0  1 -1  0 -3 -4  0 -3 -3 -2  0 -1 -4 -3 -3  4
Z -1  0  0  1 -3  3  4 -2  0 -3 -3  1 -1 -3 -1  0 -1 -3 -2 -2  1  4
X  0  0  0  0  0  0  0  0  0  0  0  0  0  0  0  0  0  0  0  0  0  0  0
#  A  R  N  D  C  Q  E  G  H  I  L  K  M  F  P  S  T  W  Y  V  B  Z  X
>
The first line is the name of the scoring matrix as it will appear on the Score Matrix menu.
Subsequent lines contain the scores assigned by the MS-Homology program to the mutation of one amino acid to another. The scores must be separated by space or tab characters. The scores may be positive, negative or zero.
Lines starting with a "#" character are treated as comments.
Separate entries are separated by a line with only the ">" symbol.
If MS-Homology encounters an amino acid that is not present in the score matrix then a default value of zero is used.
A list of species for dbEST prefix databases is maintained in the file dbEST.spl.txt
This file is necessary because of the lack of a standardized species field in the comment lines of dbEST fasta files. The FA-Index program scans through this list and tries to find one of these strings in the line. If it finds one, it assigns that string as the species for the entry. The order of species listed in this file is not crucial but the FA-Index will run faster if the more common entries are in order of number of occurrences starting at the top of the file. Note however that, for example, Citrus clementina has to appear after Citrus clementina x Citrus reticulata as it is contained within it. The comment line at the end of the file is to make sure there is a carriage return after the last entry. If the entry doesn't contain one of these species strings it is labelled as an UNREADABLE species. A list of the comment lines from these UNREADABLE entries is contained in the file seqdb\dbEST*.unr after every FA-Index run. You can look through the dbEST*.unr file to see if you can add any more fields to this file for new versions of the database. FA-Index must be run again in order to assign the new species.
Some lines from a typical dbEST.spl.txt are shown below. Note how the Homo sapiens and Mus musculus species are listed first as there separate dbEST databases for these species. The remaining species are listed in alphabetic order except for examples such as the Citrus clementina one mentioned above.
Homo sapiens
Mus musculus
Abutilon theophrasti
Acacia mangium
Acanthamoeba castellanii
Acanthamoeba healyi
Acanthopanax sessiliflorus
Acanthoscurria gomesiana
Acanthus ebracteatus
Acarus siro
Acetabularia acetabulum
Acipenser sinensis
Acipenser transmontanus
Acorus americanus
Acropora cervicornis
Acropora millepora
Acropora palmata
Acropora tenuis
Actinidia arguta
Actinidia chinensis
Actinidia deliciosa
Actinidia eriantha
Actinidia hemsleyana
Actinidia indochinensis
Actinidia polygama
....
....
Citrus aurantiifolia
Citrus aurantium
Citrus clementina x Citrus reticulata
Citrus clementina
Citrus jambhiri
Citrus hassaku
Citrus latifolia
Citrus limettioides
Citrus limon
Citrus macrophylla
Citrus medica
Citrus natsudaidai
Citrus nobilis x Citrus kinokuni
Citrus reshni
Citrus reticulata
Citrus sinensis
Citrus sunki
Citrus tamurana
Citrus x limonia
Citrus x paradisi
....
....
Zinnia violacea
Zoophthora radicans
Zostera marina
Zosterisessor ophiocephalus
The Perl script autofaindex.pl can automatically download databases from remote servers. It logs in and downloads the database files, decompresses them if necessary, concatenates them if necessary and then runs FA-Index to produce database index files. Random and reverse databases can also be created.
The parameters for the various databases are contained in the dbhosts.txt file. Users can modify or add entries to this file.
An entry for a remote database MUST contain at least 7 elements:
1). Identifies the database type in the file (eg, SwissProt, UniProtKB, NCBInr, dbEST, etc).
2). The ftp url of the remote file without the ftp:// bit. There can be more than one of these in which case the databases are concatenated before indexing.
3). Username. Generally anonymous but might not be if you were using this with a server that didn't allow anonymous login.
4). Password. Generally your email address. guest@unknown works OK with ncbi. The server complains but still lets the file transfer go ahead.
5). Compression ratio. The compressed file size divided by the actual file size. This is how the script knows whether there's enough space on your file system to proceed with the transfer. It's best to err on the pessimistic side here.
6). If the line contains Random the random database is created along with the normal version. If it contains Reverse the reverse database is created along with the normal. RandomReverse will create normal, random and reverse. Normal will just create the normal database.
7). File size of last download. Currently not used.
The entry for the NCBInr database looks like this:
NCBInr
ftp.ncbi.nih.gov/blast/db/FASTA/nr.gz
anonymous
guest@prospector.ucsf.edu
0.4
Random
0
The entry for the UniProtKB database looks like this. This is an example where that are 2 downloaded files that are concatentated together.
UniProtKB
ftp.ebi.ac.uk/pub/databases/uniprot/knowledgebase/uniprot_sprot.fasta.gz
ftp.ebi.ac.uk/pub/databases/uniprot/knowledgebase/uniprot_trembl.fasta.gz
anonymous
guest@prospector.ucsf.edu
0.4
Random
0
Three parameter files are associated with site database searching: site_groups.txt, site_groups_up.txt and uniprot_names.txt.
site_groups.txt is used to define site database modification groups. Modifications are defined in site databases for the group rather than for the individual modifications. Entries in this file also affect the sorting for Search Compare modification reports. In the default version of the file, groups have been specified for Glycosylation modifications and for labelled modifications.
A modification group entry contains two or more lines. Individual entries in the file are separated by a line with only the ">" symbol. The first line for an entry contains the name for the modification group. This is the name which is used to identify the group in site databases. The same name should also be used in the file site_groups_up.txt. Subsequent lines for an entry contains the modifications in the modification group. These correspond to the modification names used on the Batch-Tag/MS-Tag variable modifications menu.
Due to a large increase in the number of Glycosylation modification the modifications for the groups N-glycosylation and O-GalNAc are generated automatically. The only modifications that need to be specified for these groups should be corresponding modifications from the usermod_old.txt file which has been provided to maintain compatibility with versions prior to 5.22.0.
The "N-glycosylation" group only need to contain N-glycosylation modifications from the usermod_old.txt file.
The "O-GalNAc" group only need to contain O-GalNAc modifications from the usermod_old.txt file.
For glycosylations first the usermod_glyco.txt file is read and a list is made of all the modifications in it. Then any modifications found in sets in the current file are removed from this list. Eg. from the "O-GlcNAc" and "Other-glycosylation" groups. From what remains in the list the N residue modifications are assigned to the N-glycosylation group and the modifications on S, T or Y are assigned to the O-GalNAc group.
Glycosylation modifications with Cation:K or Cation:Na additions are automatically generated for all modifications in the usermod_glyco.txt file but cannot be considered for modifications in the usermod_old.txt file.
Neutral mod modifications should not be added to this file as they are not site specific.
An example entry is given below:
O-GlcNAc
HexNAc (ST)
HexNAc+Formyl (ST)
HexNAc (Y)
PhosphoHexNAc (ST)
>
An example of a group defined for different labelling states of the GlyGly modification is shown below:
GlyGly
GlyGly (Uncleaved K)
Label:2H(4)+GlyGly (Uncleaved K)
Label:13C(6)15N(2)+GlyGly (Uncleaved K)
>
site_groups_up.txt is used to associate site database modification groups with names used in UniProt dat files and peff database files.
A modification group entry contains two or more lines. Individual entries in the file are separated by a line with only the ">" symbol. The first line for an entry contains the name for the modification group. This is the name which is used to identify the group in site databases. The same name should also be used in the file site_groups.txt. Subsequent lines for an entry contains the names used for the modification group in the FT CARBOHYD lines of UniProt dat files or ModRes entries in peff database files.
An example entry for N-Glycosylation is given below:
N-Glycosylation
N-linked (GlcNAc or GlcNAc...)
N-linked (GlcNAc)
N-linked (GlcNAc...)
N-linked (GlcNAc...) (complex)
N-linked (GlcNAc...) (high mannose and complex)
N-linked (GlcNAc...) (high mannose or complex)
N-linked (GlcNAc...) (high mannose or hybrid or polylactosaminoglycan)
N-linked (GlcNAc...) (high mannose or hybrid)
N-linked (GlcNAc...) (high mannose or polylactosaminoglycan)
N-linked (GlcNAc...) (high mannose)
N-linked (GlcNAc...) (hybrid)
N-linked (GlcNAc...) (keratan sulfate)
N-linked (GlcNAc...) (low mannose)
N-linked (GlcNAc...) (polylactosaminoglycan)
N-linked (Man)
>
Entries for groups of labelled modifications are not required in this file.
uniprot_names.txt is used when creating a site database from a peff file or a UniProt dat file.
An entry for a modification must contain 4 lines:
1) Contains the name used for the modification in an FT MOD_RES line in a UniProt dat file.
2) Contains the PSI mod name as used in the peff database format.
3) Contains the PSI-MS Name or Interim Name used by the Unimod web site.
4) Contains the modified amino acid.
Lines 3 and 4 need to correspond to the names used for the modifications in the usermod_*.txt parameter files.
An example entry for Phospho (S) is given below:
Phosphoserine
MOD:00046
Phospho
S
MS-Digest can currently report Bull Breese (%Hydrophobicity) and HPLC indicies for peptides. The corresponding coefficients used by MS-Digest for each amino acid are contained in the file indicies.txt. These can be edited if desired.
The relevant publications are:
Bull, Henry B. and Breese, Keith (1974) "Surface Tension of Amino Acid Solutions: A Hydrophobicity Scale of the Amino Acid Residues", Arch. Biochem. Biophys, 161, 665-670
Browne, C. A., Bennett, H. P. J. and Solomon, S. (1982) "The Isolation of Peptides by High-Performance Liquid Chromatography Using Predicted Elution Positions", Anal. Biochem., 124, 201-208
The file indicies.txt also contains amino acid coefficients from the following publications:
Hopp, T. P. and Woods, K.R. (1981) Proc. Natl. Acad. Sci., 78, 3824-
Kyte, Jack and Doolittle, Russell F. (1974) "A Simple Method for Displaying the Hydropathic Character of a Protein", J. Mol. Biol., 157, 105-132
Engelman, D. M., Steitz, T. A. and Goldman, A. (1986) "Identifying Nonpolar Transbilayer Helices in Amino Acid Sequences of Membrane Proteins", Ann. Rev. Biophys. Chem, 15, 321-353
These aren't currently used by anything.
The file links.txt contains the information required by the Links Search Type option of the MS-Bridge form and the Crosslinking section on the MS-Tag/Batch-Tag form.
If the first character of a line in the file is a '#' character it is treated as a comment.
The entries in the file are separated by a line containing a '>' character.
The first line of an entry is the string that is to appear on the Links Search Type menu on MS-Bridge/MS-Tag/Batch-Tag.
The Disulfide (C) entry deals with disulfide bonds and should not be edited.
Subsequent lines for an entry are parameters and are in the form of name-value pairs. A name-value pair is a line in the file where the name is followed by a space character and the rest the line is the value. The value may contain space characters. If just the name is specified then the value is assumed to be an empty string.
name: link_aa_1
name: link_aa_2
These are the amino acids that the cross-linker attaches to. link_aa_1 is one end of the cross-link and link_aa_2 the other end. Single letter codes are used for amino acids and the string Protein N-term for the protein N-terminus. If the cross-linker can attach to more than one amino acid or terminal group these should be separated by commas.
name: bridge_formula
The elemental formula of the cross-linker.
name: usermod
Entries from the usermod_xlink.txt file which define modified amino acids that can occur as a result of the cross linking. These need to be on the amino acids or terminal groups specified by the link_aa_1 and link_aa_2 parameters.
name: p_cid_imm_formula
The elemental composition of the immonium ion related to the P Ion which is formed in CID spectra.
name: p_cid_score
name: p_cid_xl_score
name: p_cid_imm_score
name: p_cid_h2o_score
name: p_cid_nh3_score
name: p_cid_xl_h2o_score
name: p_cid_xl_nh3_score
name: p_cid_imm_h2o_score
name: p_cid_imm_nh3_score
name: p_etd_score
name: p_etd_xl_score
These parameters are scores for various types of P-Ion which are used when doing MS-Tag or Batch-Tag searches.
name: max_p_score
To prevent overscoring of P and related ions this is the maximum score they can contribute for one of the two crosslinked peptides.
An example entry is shown below:
DSS
link_aa_1 K,Protein N-term
link_aa_2 K,Protein N-term
bridge_formula C8 H10 O2
p_cid_imm_formula C5 H9 N
p_cid_score 2.0
p_cid_xl_score 2.0
p_cid_imm_score 2.0
p_cid_h2o_score 1.0
p_cid_xl_h2o_score 1.0
p_cid_imm_h2o_score 1.0
p_etd_score 2.0
p_etd_xl_score 2.0
usermod Xlink:DSS1 (Uncleaved K)
usermod Xlink:DSS2 (Uncleaved K)
usermod Xlink:DSS1 (Protein N-term)
usermod Xlink:DSS2 (Protein N-term)
>
For labile crosslinker entries the name on the first line of the entry must end in a * character. E.g. DSSO* or BrASSO*. The rest of the entry depends on the Prospector version number. If you try to use parameters that don't correspond to the version then the system should output an error message after which you will need to correct the parameter file.
Between versions 6.3.0 and 6.7.x the following parameters are used.
name: labile_mod1_formula
name: labile_mod2_formula
name: labile_mod1_score
name: labile_mod2_score
An example entry is shown below:
DSSO*
link_aa_1 K,Protein N-term
link_aa_2 K,Protein N-term
bridge_formula C6 H6 O3 S
labile_mod1_formula C3 H2 O1
labile_mod2_formula C3 H2 O1 S1
labile_mod1_score 3.0
labile_mod2_score 2.0
usermod Xlink:DSSO* (Uncleaved K)
usermod Xlink:DSSO* (Protein N-term)
>
Here the labile formulae (such as C3 H2 O1 and C3 H2 O1 S1) represent what is left on the fragment after the labile loss.
After version 6.8.0 (and in some development versions before v6.8.0) the following parameters are used:
name: labile_mod1_score
name: labile_mod2_score
name: labile2_mod1_score
name: labile2_mod2_score
name: labile_xlink_mod
Two example entries are shown below:
Example 1: DSSO*
DSSO*
link_aa_1 K,Protein N-term
link_aa_2 K,Protein N-term
bridge_formula C6 H6 O3 S
labile_xlink_mod Xlink:DSSO* (Uncleaved K)
labile_xlink_mod Xlink:DSSO* (Protein N-term)
labile_mod1_score 4.0
labile_mod2_score 3.0
usermod Xlink:DSSO* (Uncleaved K)
usermod Xlink:DSSO* (Protein N-term)
>
Here the following entries are needed in the usermod_xlinks.txt file.
Xlink:DSSO*
C6 H8 S O4
Full | C3 H2 O1 S1 | C3 H2 O1
Protein N-term
Xlink:DSSO*
C6 H8 S O4
Full | C3 H2 O1 S1 | C3 H2 O1
Uncleaved K
Example 2: BrASSO*
BrASSO*
link_aa_1 K,Protein N-term
link_aa_2 C
bridge_formula C7 H9 N1 O3 S1
max_p_score 6.0
labile_xlink_mod XL:T-Alkene (Uncleaved K)
labile_xlink_mod XL:T-Alkene (Protein N-term)
labile_xlink_mod XL:T-Thiol (C)
labile_mod1_score 3.0
labile2_mod1_score 3.0
usermod Xlink:BrASSO* (Uncleaved K)
usermod Xlink:BrASSO* (Protein N-term)
usermod Xlink:BrASSO* (C)
>
Here the following entries are needed in the usermod_xlinks.txt file.
XL:T-Alkene
C3 H2 O1
Uncleaved K
XL:T-Alkene
C3 H2 O1
Protein N-term
XL:T-Thiol
C4 H5 N1 O1 S1
C
Xlink:BrASSO*
C7 H9 N1 O3 S1
Full | C3 H2 O1
Protein N-term
Xlink:BrASSO*
C7 H9 N1 O3 S1
Full | C3 H2 O1
Uncleaved K
Xlink:BrASSO*
C7 H11 N1 O4 S1
Full | C4 H5 N1 O1 S1
C
The file links_comb.txt is used to specify multiple crosslinkers for use in the same search. You can combine two or more crosslinkers by having them on the same line in this file separated by a '/' character. For example to have an option specifying both DSS and DSS:2H(12) you would need the following line:
DSS/DSS:2H(12)
The crosslinker combinations will appear on the Link Search Type menu after the crosslinkers that have been defined in the links.txt file.
Any crosslinker used in the links_comb.txt must have been defined in the links.txt file.
If you add a new crosslinker combination please send the modified parameter file to for inclusion in subsequent Protein Prospector releases.
The options on the MS-Bridge Link AAs menu are contained in the file link_aa.txt
Some typical menu options are shown below.
C->C
K,Protein N-term->K,Protein N-term
K,Protein N-term->Q
E,D,Protein C-term->E,D,Protein C-term
The file quan.txt contains the quantitation options for MS data.
The file quan_msms.xml contains the quantitation options for MSMS data.
The quantitation menu in Search Compare is made up of entries from the 2 files.
An entry for an MS quantitation type MUST contain least TWO lines. Individual quantitation types in the file are separated by a line with only the ">" symbol. The first line for an entry contains the quantitation type name as it appears on the Quantitation menu on the Search Compare form.
The O18 entries should not be modified. For the other quantitation types the subsequent lines contain modifications from the usermod.txt followed by the modified amino acid in brackets. Each separate modification from usermod.txt must only appear once.
Example entry for ICAT.
ICAT-C:13C (C)
ICAT-C:13C(9) (C)
>
Example entry for SILAC K.
Label:13C (K)
Label:13C(6) (K)
>
Example entry for SILAC C of R and SILAC NC of L.
Label:13C (R) 13C 15N (L)
Label:13C(6)15N(1) (L)
Label:13C(6) (R)
>
Example entry for SILAC C of K and R.
Label:13C (K+R)
Label:13C(6) (KR)
>
The default MSMS quantitation file looks as follows:
<?xml version="1.0" encoding="UTF-8"?>
<quan_msms_document>
	<quan_msms_type>
		<name>iTRAQ4plex</name>
		<reporter_ion formula="C5 13C1 H13 N2" />
		<reporter_ion formula="C5 13C1 H13 N 15N" />
		<reporter_ion formula="C4 13C2 H13 N 15N" />
		<reporter_ion formula="C3 13C3 H13 N1 15N1" />
	</quan_msms_type>
	<quan_msms_type>
		<name>iTRAQ8plex</name>
		<reporter_ion formula="C6 N2 H13" />
		<reporter_ion formula="13C1 C5 N2 H13" />
		<reporter_ion formula="13C1 C5 15N1 N1 H13" />
		<reporter_ion formula="13C2 C4 15N1 N1 H13" />
		<reporter_ion formula="13C3 C3 15N1 N1 H13" />
		<reporter_ion formula="13C3 C3 15N2 H13" />
		<reporter_ion formula="13C4 C2 15N2 H13" />
		<reporter_ion formula="C8 H10 N" quan_peak="false" />
		<reporter_ion formula="13C6 15N2 H13" />
	</quan_msms_type>
</quan_msms_document>
An MSMS quantitation type is defined between <quan_msms_type> tags. The <name> tag defines the name as it appears in the Search Compare quantitation menu. If you need a purity file (see below) it should have the same name with a .txt suffix. Eg. if the name is iTRAQ4plex the purity file should be called iTRAQ4plex.txt. The <reporter_ion> tags have 3 possible attributes:
The formula attribute is the elemental formula of the reporter ion
The mass attribute is the mass of the reporter ion. If the formula is also specified then the mass is calculated from the formula and the mass attribute is ignored.
The quan_peak attribute is a flag denoting whether the ion is to be used for quantitation purposes. If not it is only used for the purity correction.
iTRAQ4plex.txt contains the iTRAQTM purity coefficients for 4-plex iTRAQTM.
iTRAQ8plex.txt contains the iTRAQTM purity coefficients for 8-plex iTRAQTM.
iTRAQTM reagent batches are labelled with purity values indicating the percentages of each reporter ion that have masses differing by -2 Da, -1 Da, +1 Da and +2 Da from the reporter ion mass. This allows the software to make the necessary corrections before reporting the quantitation ratios.
The files contain one or more entries which will appear on a menu on the Search Compare form. The entries are separated from each other by a line which just contains a ">" symbol.
The first line of an entry contains the string which will appear on the menu. Subsequent lines contain the nominal reporter ion mass followed by the percentages corresponding to -2 Da, -1 Da, +1 Da and +2 Da mass shifts.
An example from the itraq.txt is shown below:
Default iTRAQ4plex
114 0.0 1.0 5.9 0.2
115 0.0 2.0 5.6 0.1
116 0.0 3.0 4.5 0.1
117 0.1 4.0 3.5 0.1
>
In the itraq8.txt file there also needs to be an entry for the Phenylalanine immonium ions at 120 Da. For example:
Default iTRAQ8plex
113 0.0 1.0 5.9 0.2
114 0.0 1.0 5.9 0.2
115 0.0 2.0 5.6 0.1
116 0.0 3.0 4.5 0.1
117 0.1 4.0 3.5 0.1
118 0.1 4.0 3.5 0.1
119 0.1 4.0 3.5 0.1
120 0.0 0.0 3.5 0.1
121 0.1 4.0 3.5 0.1
>
Obviously there is no component at -2 Da and -1 Da for the Phenylalanine immonium ion.
The following publication outlines the purity correction method for 4-plex iTRAQTM:
Shadforth, I. P., Dunkley, T. P. J., Lilley, K. and Nessant, C. (2005) i-Tracker: For Quantitative Proteomics Using iTRAQTM, BMC Proteomics, Vol. 6, Pp. 145-150
When the mass modifications option is used in MS-Tag or Batch-Tag hits containing a mass modification are displayed as a mass in brackets after the modified amino acid. For example:
STTTGHLIYK(14.0067)
If you click on the hit peptide to bring up the MS-Product report then the sequence displayed at the top of the report links to the Unimod web site if you click on the mass. This suggests modifications from the Unimod database that have a similar mass shift.
The file unimod.txt has 3 parameters that define the url used for this link:
main_url http://www.unimod.org/modifications_list.php?a=advsearch&asearchfield[]=mono_mass&asearchopt_mono_mass=Between&
start_range value_mono_mass=
end_range value1_mono_mass=
main_url is the initial part of the url.
start_range is the parameter used to define the start of the mass range.
end_range is the parameter used to define the end of the mass range.
It is possible to edit these values if you want something else to happen when a user follows this link.
The MGF parameters are used to enable Protein Prospector to extract information from the TITLE line in an MGF file. They are stored in the file mgf.xml.
Several different TITLE line formats are supported. Users should not generally edit the existing ones but it is possible to add new ones. A typical TITLE line might look like this (this is produced by the Mascot dll in Sciex Analyst 2):
TITLE=File: F25uLUCSF.wiff, Sample: F2 26_5-28002 (sample number 1), Elution: 26.813 to 28.437 min,
   Period: 1, Cycle(s): 1129, 1139, 1150 (Experiment 3), 1125 (Experiment 4)
The parameters for each different format which is supported are contained between <mgf_type> tags. The parameters are explained below:
<name>
Each format that is supported has to be given a unique name. You should not change the names of any of the formats in the supplied file.
<start>, <end> and <contains>
Protein Prospector uses the information in these tags to work out which of the supported formats the current title line corresponds to. The <start> parameter is what is at the start of the title line after the TITLE= identifier. The <end> parameter is what is at the end of the title line. One or more <contains> parameters can be used to specify other identifying strings that would distinguish this title line format from the other supported title line formats. It is not always possible to specify <start> and <end> tags.
The different formats are considered in the order they appear in the file. Thus a more specific format should be placed before a more general format. For example:
<mgf_type>
   <name>ANALYST_DISTILLER</name>
   <contains>S</contains>
   <contains>(rt=</contains>
   <contains>p=</contains>
   <contains>c=</contains>
   <contains>e=</contains>
   <contains>[</contains>
   <contains>]</contains>
   <spot_start>rt=</spot_start>
   <spot_end>,</spot_end>
</mgf_type>
Would recognize:
TITLE=1: Scan 5 (rt=4.106, p=0, c=1, e=1) [C:\MSDATA\QS20060131_S_18mix_02.wiff]
and should be placed before the more generic:
<mgf_type>
   <name>DISTILLER</name>
   <contains>S</contains>
   <contains>(rt=</contains>
   <contains>[</contains>
   <contains>]</contains>
   <spot_start>rt=</spot_start>
   <spot_end>)</spot_end>
</mgf_type>
<spot_start> and <spot_end>
These tags are used to delimit the "spot" information which is used in the S column in the Search Compare output. This should preferably be a retention time. If the title line contains a retention time window the start of the window is generally preferable. If no retention time is available a scan number should be used. If the sample is on a spotting plate a spot number could be used.
The file distribution.txt is currently only used for high resolution ETD deisotoping. It contains a precalculated Averagine distribution at 10 Da intervals between 100 Da and 4999 Da and considers 10 isotope peaks. This is to avoid having to do the calculation on the fly. There is provision in the format for having non-averagine distributions. However this is not currently an option. Some example lines from the file are shown below:
Averagine
100	1	0.05	0	0	0	0	0	0	0	0
110	1	0.06	0	0	0	0	0	0	0	0
120	1	0.06	0.01	0	0	0	0	0	0	0
130	1	0.06	0.01	0	0	0	0	0	0	0
140	1	0.08	0.01	0	0	0	0	0	0	0
......
3830	0.41	0.88	1.00	0.80	0.49	0.26	0.11	0.04	0.02	0
3840	0.41	0.88	1.00	0.80	0.50	0.26	0.11	0.05	0.02	0.01
3850	0.41	0.88	1.00	0.80	0.50	0.26	0.11	0.05	0.02	0.01
3860	0.40	0.87	1.00	0.80	0.50	0.26	0.12	0.05	0.02	0.01
The first line of an entry gives the distribution type (here Averagine). Subsequent lines first give the mass then the relative abundances of the first ten isotopes with the highest abundance given a value of 1. Tab characters are used to separate the fields.
The Batch-Tag program can make use of a data repository. This is a browsable area from which one or more MSMS peak list files can be selected to make a project which will be searched in a batch. In this way it is possible to search multiple LC fractions in the same search. Also all the acquired data can be kept together in one place and only one copy of each file is required. It is possible to set up a script that will automatically populate such a repository as the data is collected.
The base directories of the repository are specified in the info.txt file via the centroid_dir and raw_dir directives (see modifying the main configuration file. The base directories would typically contain a directory for each physical instrument. Then there could be further subdirectories based on say years and months or users. An example is shown below. Here centroid_dir has been defined as peaklists and this contains four subdirectories called TOFTOF, QStarPulsar, QStarElite and Orbitrap. Each instrument then has further subdirectories based on the years and months in which the data was collected.
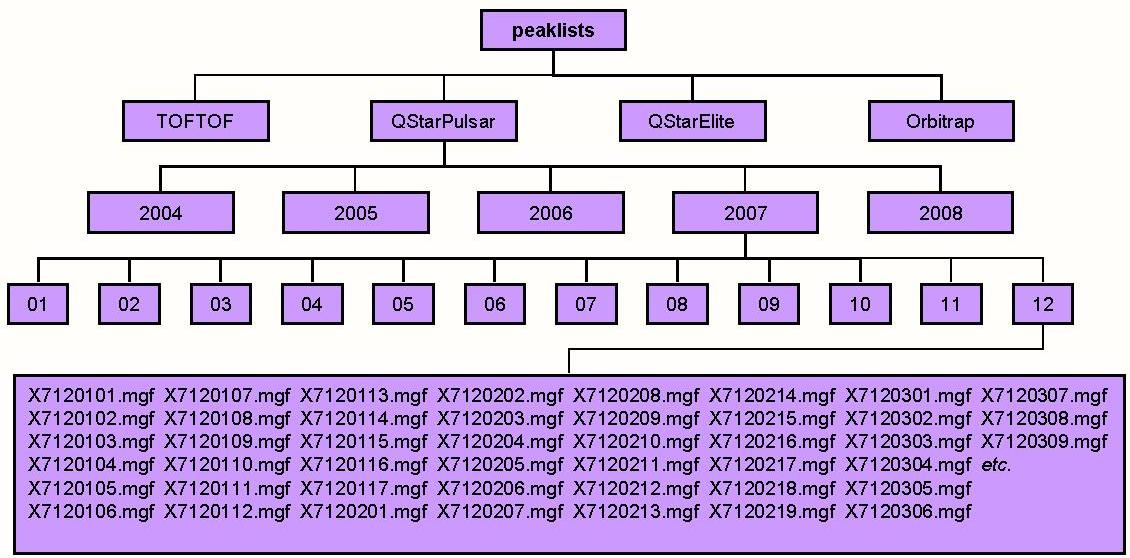
In the figure below raw_dir has been defined as raw. The directory names and raw data file names need to mirror the ones used in the peak list repository. Thus for example peaklists/QStarPulsar/2007/12/X7120107.mgf corresponds to raw/QStarPulsar/2007/12/X7120107.wiff. If the raw data file is not present at the expected location then most types of quantitation and viewing the raw data will not be possible for that particular project.
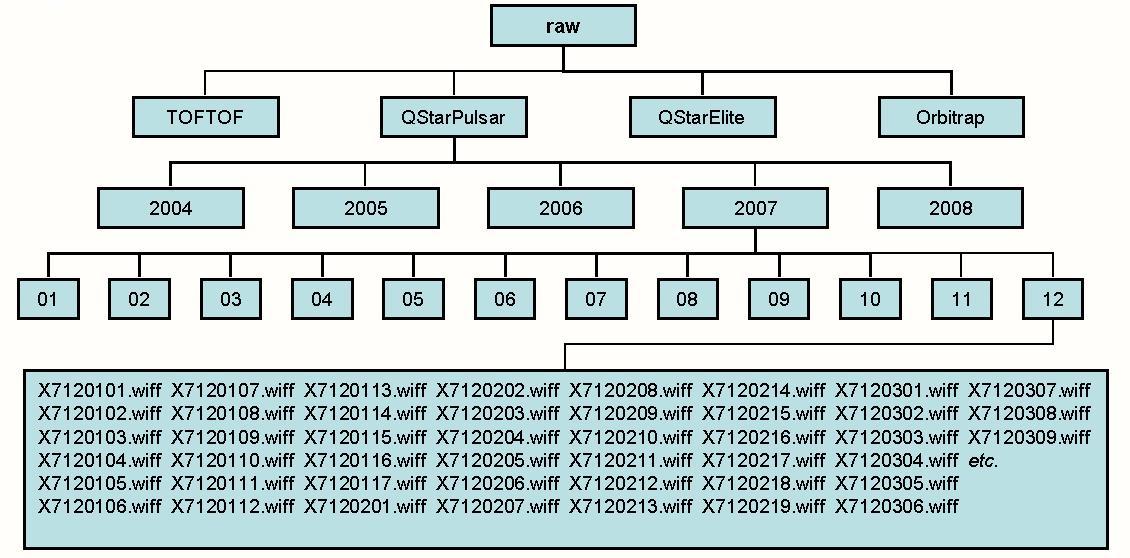
Up until v5.4.0 the inst_dir.txt file was used to describe the repository. Although inst_dir.txt is still supported the repository.xml file described below offers more options. If repository.xml is present inst_dir.txt is ignored.
inst_dir.txt maps the directory names you choose for each physical instrument to the generic names specified in the instrument.txt file.
A typical example is:
TOFTOF MALDI-TOFTOF
QStarPulsar ESI-Q-TOF
QStarElite ESI-Q-TOF
Orbitrap ESI-ION-TRAP-low-res
This ensures that the correct Instrument parameter is automatically set and that peak lists from incompatible instruments aren't mixed in the same project.
From Protein Prospector v5.4.0 a new file repository.xml was introduced to allow more flexibility. Primarily to support experiments where CID and ETD spectra are taken on the same precursor it is now possible to have multiple peak list files associated with a single raw data file. This is achieved by using different suffixes in the file name. Also each physical instrument can have a set of default search parameters associated with it which are set on the Batch-Tag form at the point at which you create the project. Generally this would be used to set the default mass tolerances to sensible values.
An example of a typical file is shown below. In the example the TOFTOF instrument definition is equivalent to the entry in the inst_dir.txt shown above. The entries for the QStarPulsar and QStarElite show how different default search parameters can be set for 2 different instruments of the same type. Note that although any of the parameters on the Batch-Tag search form can be set here most of them are not specific to a particular instrument. The automation guidance manual has a list of all the possible Batch-Tag parameters.
The Orbitrap entry shows how to set things up for an instrument that generates multiple MSMS peak list files for a single raw data file. The CID MSMS peak list files have a of suffix _ITMSms2cid and the ETD files have a suffix of _ITMSms2etd. Thus if the raw data file was called T8102005.RAW then the CID MSMS peak list would be called T8102005_ITMSms2cid.mgf and the ETD file T8102005_ITMSms2etd.mgf. This type of definition could also be used if you had multiple peak list generation packages and you wanted to compare the results.
<?xml version="1.0" encoding="UTF-8"?>
<instrument_information>
	<instrument>
		<directory name="TOFTOF" />
		<type name="MALDI-TOFTOF" />
	</instrument>
	<instrument>
		<directory name="QStarPulsar" />
		<type name="ESI-Q-TOF">
			<parameters>
				<msms_parent_mass_tolerance>50</msms_parent_mass_tolerance>
				<msms_parent_mass_tolerance_units>ppm</msms_parent_mass_tolerance_units>
				<fragment_masses_tolerance>100</fragment_masses_tolerance>
				<fragment_masses_tolerance_units>ppm</fragment_masses_tolerance_units>
			</parameters>
		</type>
	</instrument>
	<instrument>
		<directory name="QStarElite" />
		<type name="ESI-Q-TOF">
			<parameters>
				<msms_parent_mass_tolerance>15</msms_parent_mass_tolerance>
				<msms_parent_mass_tolerance_units>ppm</msms_parent_mass_tolerance_units>
				<fragment_masses_tolerance>100</fragment_masses_tolerance>
				<fragment_masses_tolerance_units>ppm</fragment_masses_tolerance_units>
			</parameters>
		</type>
	</instrument>
	<instrument>
		<directory name="Orbitrap" />
		<type name="ESI-ION-TRAP-low-res" suffix="_ITMSms2cid">
			<parameters>
				<msms_parent_mass_tolerance>15</msms_parent_mass_tolerance>
				<msms_parent_mass_tolerance_units>ppm</msms_parent_mass_tolerance_units>
				<fragment_masses_tolerance>0.6</fragment_masses_tolerance>
				<fragment_masses_tolerance_units>Da</fragment_masses_tolerance_units>
			</parameters>
		</type>
		<type name="ESI-ETD-low-res" suffix="_ITMSms2etd">
			<parameters>
				<msms_parent_mass_tolerance>20</msms_parent_mass_tolerance>
				<msms_parent_mass_tolerance_units>ppm</msms_parent_mass_tolerance_units>
				<fragment_masses_tolerance>0.6</fragment_masses_tolerance>
				<fragment_masses_tolerance_units>Da</fragment_masses_tolerance_units>
			</parameters>
		</type>
	</instrument>
</instrument_information>
A further possibility is to have a single raw directory tree for a given instrument and multiple peak list directory trees. For example:
	<instrument>
		<directory name="OrbitrapHCDOrbi" raw_dir="Orbitrap" raw_type="raw" />
		<type name="ESI-Q-high-res" />
	</instrument>
	<instrument>
		<directory name="OrbitrapCIDIT" raw_dir="Orbitrap" raw_type="raw" />
		<type name="ESI-ION-TRAP-low-res" />
	</instrument>
	<instrument>
		<directory name="OrbitrapETDOrbi" raw_dir="Orbitrap" raw_type="raw" />
		<type name="ESI-ETD-high-res" />
	</instrument>
	<instrument>
		<directory name="OrbitrapETDIT" raw_dir="Orbitrap" raw_type="raw" />
		<type name="ESI-ETD-low-res" />
	</instrument>
Here there is a single directory tree called Orbitrap under the raw directory and 4 directory trees called OrbitrapHCDOrbi, OrbitrapCIDIT, OrbitrapETDOrbi and OrbitrapETDIT under the peaklists directory. These directory trees each contain the appropriate peak lists.
If repository.xml is present Protein Prospector ignores the inst_dir.txt file.
The default parameters for the search forms are stored in the following files:
- batchtag/default.xml
- msbridge/default.xml
- mscomp/default.xml
- msdigest/default.xml
- msfit/default.xml
- msfitupload/default.xml
- mshomology/default.xml
- msisotope/default.xml
- msnonspecific/default.xml
- mspattern/default.xml
- msproduct/default.xml
- msseq/default.xml
- mstag/default.xml
- searchCompare/default.xml
These files contain the cgi parameters used by the programs and their default values. An example of the type of thing found in one of the files is shown below:
<?xml version="1.0" encoding="UTF-8"?>
<parameters>
<const_mod>Carbamidomethyl%20%28C%29</const_mod>
<database>SwissProt</database>
<density_bandwidth>1.0</density_bandwidth>
<dna_reading_frame>1</dna_reading_frame>
<enzyme>Trypsin</enzyme>
<full_mw_range>1</full_mw_range>
<full_pi_range>1</full_pi_range>
<high_pi>10.0</high_pi>
<input_filename>lastres</input_filename>
<input_program_name>msfit</input_program_name>
<low_pi>3.0</low_pi>
<max_histogram_mass>15000.0</max_histogram_mass>
<min_histogram_mass>600.0</min_histogram_mass>
<missed_cleavages>0</missed_cleavages>
<output_filename>lastres</output_filename>
<output_type>HTML</output_type>
<prot_high_mass>125000</prot_high_mass>
<prot_low_mass>1000</prot_low_mass>
<report_title>DB-Stat</report_title>
<search_name>dbstat</search_name>
<species>All</species>
</parameters>
A full list of all the relevant parameters can be found in the document ProteinProspector Automation Guidance.
The parameters for the expectation value search are stored in the file expectation.xml. The contents of the current default file are shown below.
<?xml version="1.0" encoding="UTF-8"?>
<parameters>
<database>SwissProt</database>
<full_pi_range>1</full_pi_range>
<max_hits>2000000</max_hits>
<missed_cleavages>3</missed_cleavages>
<msms_full_mw_range>1</msms_full_mw_range>
<msms_max_modifications>0</msms_max_modifications>
<msms_max_reported_hits>5</msms_max_reported_hits>
<msms_parent_mass_tolerance>0.5</msms_parent_mass_tolerance>
<msms_parent_mass_tolerance_units>Da</msms_parent_mass_tolerance_units>
<parent_mass_convert>monoisotopic</parent_mass_convert>
<report_title>BatchTag</report_title>
<search_name>batchtag</search_name>
<species>All</species>
<use_instrument_ion_types>1</use_instrument_ion_types>
</parameters>
<copy_parameter>fragment_masses_tolerance</copy_parameter>
<copy_parameter>fragment_masses_tolerance_units</copy_parameter>
<copy_parameter>instrument_name</copy_parameter>
<copy_parameter>allow_non_specific</copy_parameter>
<copy_parameter>enzyme</copy_parameter>
<copy_parameter>expect_calc_method</copy_parameter>
<copy_parameter>const_mod</copy_parameter>
<copy_parameter>project_name</copy_parameter>
<copy_parameter>msms_precursor_charge_range</copy_parameter>
The search parameters that are shown between the <parameters> tags are used in every expectation value search. Thus the database is always SwissProt and the species is always All. The parameters in <copy_parameters> tags are copied from the search form. If an expectation value search has previously been done with the same values for all the copy parameters then a new expectation value search is not performed.
In the Protein Prospector Batch-Tag program expectation values are calculated by a linear tail fit method. This involves collecting a distribution of the scores for all peptides that fall within a Precursor m/z tolerance specified in the file expectation.xml. The scores are plotted as a histogram and the gradient and offset of a survival curve of the tail of the distribution are obtained to enable expectation values to be calculated. Some aspects of the tail fit calculation can be modified via parameters in the expectation.txt file. Modifying this file is not generally necessary or recommended.
tail_percent
The tail_percent parameter has a default value of 10. This is the percentage of the scores from the distribution that are used for the linear tail fit.
max_used_peptides
The max_used_peptides parameter has a default value of 10000. A search against a randomized SwissProt database (using the parameters in expectation.xml) is used to generate peptides from which to assemble the score distribution. The program stops generating new peptides for a particular spectrum when max_used_peptides different peptides have been processed.
min_used_peptides
The min_used_peptides parameter has a default value of 2800. A search against a randomized SwissProt database is used to generate peptides from which to assemble the score distribution. The program keeps cycling through the database to generate new peptides until at least min_used_peptides peptides have been generated for each spectrum. In some cases it may not be possible to generate min_used_peptides peptides so the database cycling will stop after 5 cycles. If min_used_peptides peptides haven't been generated then an expectation value is not calculated for this spectrum.
A fairly similar approach to calculating expectation values by a tail fit method is outlined in the following publication:
Fenyo, D. and Beavis, R. C. (2003) A Method for Assessing the Statistical Significance of Mass Spectrometry-Based Protein Identifications Using General Scoring Schemes, Anal. Chem., Vol. 75, Pp. 768-774
fdr_calc_min_best_disc_score, fdr_calc_min_protein_score, fdr_calc_min_peptide_score, fdr_calc_max_protein_evalue, fdr_calc_max_peptide_evalue
These are limits to use in Search Compare for Best Discriminant Score, Min Protein Score, Min Peptide Score, Max Protein E Value and Max Peptide E Value when the report is filtered by FDR Limits Only. Typical values are:
fdr_calc_min_best_disc_score -4
fdr_calc_min_protein_score 10.0
fdr_calc_min_peptide_score 10.0
fdr_calc_max_protein_evalue 0.1
fdr_calc_max_peptide_evalue 0.1
bond_score_directionality
The bond_score_directionality parameter has a default value of true. Its value determines whether N-terminal fragment ions (e.g. b/c) are summed separately to C-terminal fragment ions (e.g. y/z).
bond_score_max
The bond_score_max parameter has a default value of 4.0. This defines the maximum possible score at any given peptide bond. This can either consider direction or not (bond_score_directionality parameter). The scores from different charge states, with different losses and different labile versions of the peptide are summed and the maximum applied.
The coefficients for calculating discriminant scores are stored in the files disc_score.txt and disc_score2.txt.
The discriminant score is calculated using the coefficients in disc_score2.txt if an expectation value is available. Otherwise it uses the coefficients in disc_score2.txt. Expectation values will not be available if you did the Batch-Tag search with the Expectation Calc Method parameter set to None. They will also not be available if you set the Expectation Calc Method parameter to Linear Tail Fit and there were less than min_used_peptides (from the expectation.txt file) for a particular MSMS precursor m/z.
There should be entries in both disc_score.txt and disc_score2.txt for all the instrument entries in instrument.txt.
The possible coefficients in disc_score.txt are:
best_score
maximum_best_score
score_diff
offset
and the discriminant score equation is:
d = ( x × max ( b, m ) ) + ( y × s ) + z;

where

d = discriminant score
x = best_score coefficient
b = best peptide score for protein
m = maximum_best_score coefficient
y = score_diff coefficient
s = score difference between score for the peptide hit and the 6th best peptide hit
    (similar hits aren't counted when counting up to 6)
z = offset coefficient
If maximum_best_score is not defined in the file then b will be used in the equation
The possible coefficients in disc_score2.txt are:
best_score
maximum_best_score
expectation
offset
and the discriminant score equation is:
d = ( x × max ( b, m ) ) + ( y × log10 ( e )) + z;

where

d = discriminant score
x = best_score coefficient
b = best peptide score for protein
m = maximum_best_score coefficient
y = expectation coefficient
e = expectation value
z = offset coefficient
If maximum_best_score is not defined in the file then b will be used in the equation.
The files in the taxonomy directory are used for taxonomy pre-searches and for the Preferred Species option in Search Compare. You can update them as long as the format of the files has not changed.
Updated versions are available from the following locations:
There is also a file called taxonomy/taxonomy_cache.txt. The purpose of this is to speed up taxonomy pre-searches if the Taxonomy menu is used. This file is updated if you do a taxonomy pre-search on a taxonomy that isn't in the cache - such as would happen if you edited either taxonomy.txt or taxonomy_groups.txt. It is automatically created if it is not already present and is updated if you update the other taxonomy files. The file contains a list of the relevant taxonomy nodes used for each of the options on the Taxonomy menu.
Versions of Protein Prospector with batch MSMS database searching can optionally have a mySQL database that stores information on users, projects and searches. Normally this will be created and initialized when the software is installed. However if the database needs to be recreated from scratch a script called prospector.sql is available to do this. The script is run as follows (remember this will irretrievably delete any existing database):
mysql -u root -ppp ppsd < prospector.sql
This assumes that the root password is pp.
The root password may be set for the first time as follows:
mysqladmin -u root password NEWPASSWORD
It can be changed using the command:
mysqladmin -u root -pOLDPASSWORD password NEWPASSWORD
eg:
mysqladmin -u root -pfoo password bar
Passwords for other users can be changed using the same command.
Several Prospector programs related to batch MSMS searching automatically log into the mySQL database using parameters that are defined in the info.txt file. A mySQL user for Protein Prospector needs to be created as defined by the db_user parameter. The default value for the user is prospector.
To create a mySQL user called prospector first login to mySQL as the root user (assuming the root password is pp):
mysql -u root -ppp
Then enter the following command which also sets the prospector user's password to pp.
mysql> GRANT ALL ON ppsd.* TO prospector IDENTIFIED BY 'pp';
Then exit from mySQL.
mysql> quit
Once the database has been created you can manually login to mySQL to look at or edit the database with a command such as:
mysql -u prospector -ppp ppsd
Here ppsd is the name of the Prospector's mySQL database.
The database table names can be shown using the command:
mysql> show tables;
The definition for a given table can be viewed using the desc command. Eg:
mysql> desc sessions;
The contents of a table can be viewed using the select command. This is a very flexible command with many options. Eg to view all fields of the sessions table enter:
mysql> select * from sessions;
The mySQL Batch-Tag database can be backed up using the mysqldump command. This works on both Windows and LINUX. For example:
mysqldump -e -u prospector -ppp -h localhost ppsd > ppsd_backup.sql
The -u parameter is used to specify the mySQL user and the -p parameter the password (here pp). If you don't specify the password you will be prompted for it. The -h command is used to specify the host thus it may be possible to run this command from a different server. The contents of the database are here copied to the file ppsd_backup.sql with contains the sql commands necessary to rebuild the database. It is probably better to run the backup command when no searches are running.
When running this command I once got the rather cryptic looking error message:
mysqldump: Got error: 1045: Access denied for user 'ODBC'@'localhost' (using password: YES) when trying to connect
It turned out that I'd pasted the command from a web site where an en dash (–) was used rather than a minus sign (-) when specifying the parameters. This was probably a function of Microsoft Word being used at some point when creating the document on the web site.
Another potential useful way of using the mysqldump command is the following:
mysqldump -e -u root -proot -h localhost --tab=. ppsd
This will create separate tab delimited text files and sql files for each table in the database.
If the database does not already exist on the server then it must first be created. If it does already exist then skip this step but be aware that restoring the database will overwrite the one that is there. First log in as root to the mysql console. For example if the root password is root:
mysql -u root -proot
At the mysql prompt enter the commands:
create database ppsd;
GRANT ALL ON ppsd.* TO prospector IDENTIFIED BY 'pp';
quit
The second command grants permission to the user prospector assuming the password is pp.
If you ever want to delete a database then you must first login to the mysql console as above and then enter the following commands at the mySQL prompt (assuming the database is called ppsd):
drop database ppsd;
quit
An example command to restore a database would be:
mysql -u prospector -ppp -h localhost ppsd < ppsd_backup.sql
You may need to restore the Prospector mySQL database files from a disk backup rather than an SQL file. The procedure given below is for Windows. It assumes you have done a fresh mySQL install and created an empty ppsd database.
Stop the mySQL service in the Windows Control Panel.
Find mySQL installation directory. A typical place is:
C:\Program Files (x86)\MySQL\MySQL Server 5.0
There should be 3 folders: bin, data and share. Make a copy of the data directory in case something goes wrong.
Enter the data directory. The relevant files are the directory ppsd and the files ib_logfile0, ib_logfile1 and ibdata1. Check the size of the ib_logfile0 file in MB and make a note of it.
Delete the directory and the 3 files and replace them with the ones from your backup. Note that the ib_logfile0 and ib_logfile1 files are supposed to be the same length. This procedure may not work if your backup one aren't. Note the size of the backup ib_logfile0 in MB.
Edit the file my.ini which should be in the parent MySQL Server 5.0 directory. Change the parameter innodb_log_file_size so it matches the size of the backup ib_logfile0 file.
Start the mySQL service in the Windows Control Panel.
You should now be able to follow the procedures in Backing Up the mySQL Database to create a backup sql file.
If you want to go back to your new mySQL installation you will need to stop the mySQL service, restore the data directory and change back to the old value of innodb_log_file_size in the my.ini file.
If you forget the mySQL root password there is a method for resetting it in Windows.
1). Stop the mySQL service in Control Panel->Administrative Tools->Services.
2). Create a text file (say C:\rootpw.txt) with the following line in it (changing the password as desired)
SET PASSWORD FOR 'root'@'localhost' = PASSWORD('root');
3). From a Command Prompt window which has been run as administrator enter the following command (first make sure that the my.ini file is in the correct specified directory):
mysqld-nt --defaults-file="C:\Program Files (x86)\MySQL\MySQL Server 5.0\my.ini" --init-file="C:\rootpw.txt"
4). Open up another Command Prompt window and log in to mysql using the following command:
mysql -u root -p
5). Enter the password you used in the rootpw.txt file when prompted.
6). Quit the mysql console by entering quit at the mysql prompt.
7). From the task manager end the mysqld-nt process you started.
8). Delete the rootpw.txt file.
9). Restart the mySQL service.
First log in as root to the mysql console. For example if the root password is root:
mysql -u root -proot
At the mysql prompt enter the following 3 commands one after another:
UPDATE mysql.user SET Password=PASSWORD(�test�) WHERE user=�prospector�; FLUSH PRIVILEGES; quit;
This sets the password to test.
The Batch-Tag daemon runs as a Windows service. It can be installed by entering the following command into a Command Prompt windows run as administrator:
btag_daemon.exe install user password
Here user and password are the user and password that daemon will run under.
If you want the daemon to start automatically when the computer is booted then you will need to edit the startup-type for the Batch-Tag Daemon service on the Services control panel once the service has been installed. If you don't do this the service will be started automatically whan a search is submitted as long as the search is submitted on the same computer as that on which the daemon is running.
The daemon service can be uninstalled with the command:
btag_daemon.exe uninstall
For MS-Viewer to work it requires an ascii text results file in a table format with either commas or tab characters separating the data in the columns. These files are typically called csv (comma separated value) or tab delimited text files. Also the method for describing the peptide modifications in the results needs to be the same as that used by Protein Prospector. There need to be columns containing some kind of scan identifier to allow the correct spectrum to be extracted from the peak list file in addition to columns containing the precursor charge, the database peptide and the peptide modifications. If there are multiple peak list files corresponding to different fractions in the data there must be a column with the fraction name in it.
If the database search was not done using Batch-Tag and Search Compare in Protein Prospector it is unlikely that it is going to be directly usable by MS-Viewer. A Perl script is thus required to convert the results file to a suitable format. The distribution comes with 2 such scripts, mascot_converter.pl and tandem_converter.pl, to deal with results from Mascot and X!Tandem. The script needs to reside in the cgi-bin directory and a corresponding entry made in the viewer_conv.txt file.
The source code for the Mascot and X!Tandem conversion scripts is given below along with a description of the viewer_conv.txt file.
#!/usr/bin/perl
use strict;

package Modification; {

	sub new {
		my $class = shift();
		my $self = {};
		bless $self, $class;
		my ( $v1, $v2, $v3 ) = @_;
		$self->{mod} = $v1;
		$self->{res} = $v2;
		$self->{term} = $v3;
		return $self;
	}
}

package main; {

	my $inFName = $ARGV[0];
	my $outFName = $ARGV[1];
	open(INFILE,"<$inFName") || die "cannot read filter file";
	open(OUTFILE,">$outFName" ) || die "cannot create output file";
	my $phase = 0;
	my $pepSeqCol = 0;
	my $pepModCol = 0;
	my %constMod = ();
	my %varMod = ();
	my $line;
	my $lineEnd = "";
	while ( $line = <INFILE> ) {
		if ( $lineEnd eq "" ) {
			if ( $line =~ /\r/ ) {
				$lineEnd = "\r\n";
			}
			else {
				$lineEnd = "\n";
			}
		}
		$line =~ s/\s+$//;					#remove any white space from end of line
		if ( $line =~ /^\"*Fixed modifications\"*/ ) {
			$phase = 1;
			next;
		}
		if ( $line =~ /^\"*Variable modifications\"*/ ) {
			$phase = 2;
			next;
		}
		if ( $line =~ /^\"*Protein hits\"*/ ) {
			$phase = 3;
			next;
		}
		if ( $phase == 1 ) {		#define the constant modifications
			if ( $line =~ /^(\d+),(.+) \((.+)\),([+-]?(\d+\.\d+|\d+\.|\.\d+))/ ) {
				$constMod{$1} = &addModification ( $2, $3 );
			}
		}
		elsif ( $phase == 2 ) {		#define the variable modifications
			if ( $line =~ /^(\d+),\"*(.+) \((.+)\)\"*,([+-]?(\d+\.\d+|\d+\.|\.\d+))/ ) {
				$varMod{$1} = &addModification ( $2, $3 );
			}
		}
		elsif ( $phase == 3 ) {		#modify the column headers
			if ( $line =~ s/pep_var_mod,pep_var_mod_pos/pep_mod/ ) {
				my @headers = &splitCommaNotQuote ( $line );
				my $size = @headers;
				for ( my $i = 0 ; $i < $size ; $i++ ) {
					if ( $headers [$i] eq "pep_seq" ) {
						$pepSeqCol = $i;
					}
					if ( $headers [$i] eq "pep_mod" ) {
						$pepModCol = $i;
						last;
					}
				}
				print OUTFILE $line . $lineEnd;
				$phase = 4;
			}
		}
		elsif ( $phase == 4 ) {
			my @fields = &splitCommaNotQuote ( $line );
			my $siz = @fields;
			my $mods = &doConstModString ( $fields [$pepSeqCol] ) . &doVariableModString ( $fields [$pepModCol+1] );
			chop $mods;				#get rid of last semi colon
			for ( my $i = 0 ; $i < $siz ; $i++ ) {
				my $f = $fields [$i];
				if ( $i == $pepModCol ) {
					$f = $mods;
					$i++;					#mods are now in a single column
				}
				if ( $f =~ /,/ ) {
					print OUTFILE "\"" . $f . "\"";
				}
				else {
					print OUTFILE $f;
				}
				if ( $i != $siz - 1 ) {
					print OUTFILE ",";
				}
			}
			print OUTFILE $lineEnd;
		}
	}
	close INFILE;
	close OUTFILE;

	sub addModification {
		my ( $mod, $res ) = @_;
		my $term = "";
		if ( $res =~ /C-term(.*)$/ ) {
			if ( $1 eq "" ) {
				$res = "";
				$term = "c";
			}
			else {
				$res = substr $1, 1;
			}
		}
		elsif ( $res =~ /N-term(.*)$/ ) {
			if ( $1 eq "" ) {
				$res = "";
				$term = "n";
			}
			else {
				$res = substr $1, 1;
			}
		}
		return new Modification ( $mod, $res, $term );
	}
	sub splitCommaNotQuote {
		my ( $line ) = @_;

		my @fields = ();

		while ( $line =~ m/((\")([^\"]*)\"|[^,]*)(,|$)/g ) {
			if ( $2 ) {
				push( @fields, $3 );
			}
			else {
				push( @fields, $1 );
			}
			last if ( ! $4 );
		}
		return @fields;
	}
	sub doConstModString {
		my ( $peptide ) = @_;

		my $constModStr = "";

		for my $key ( keys %constMod ) {
			my $cMod = $constMod{$key};
			my $mod = $cMod->{mod};
			my $res = $cMod->{res};
			my $term = $cMod->{term};
			if ( $term eq "n" ) {
				$constModStr .= $mod . '@N-term;';
			}
			elsif ( $term eq "c" ) {
				$constModStr .= $mod . '@C-term;';
			}
			else {
				my $i;
				my $len = length $res;
				for ( $i = 0 ; $i < $len ; $i++ ) {
					my $aa = substr $res, $i, 1;
					my $idx = 0;
					while ( 1 ) {
						$idx = index ( $peptide, $aa, $idx );
						if ( $idx == -1 ) {
							last;
						}
						$constModStr .= $mod . "@" . ( $idx + 1 ) . ";";
						$idx += 1;
					}
				}
			}
		}
		return $constModStr;
	}
	sub doVariableModString {
		my ( $mask ) = @_;
		my $len = length $mask;

		my $varModStr = "";
		if ( $len > 0 ) {
			my $nterm = substr $mask, 0, 1;
			if ( $nterm ne "0" ) {
				if ( $varMod {$nterm}->{res} eq "" ) {
					$varModStr .= $varMod {$nterm}->{mod} . '@N-term;';
				}
				else {
					$varModStr .= $varMod {$nterm}->{mod} . '@1;';
				}
			}
			for ( my $i = 2 ; $i < $len - 2 ; $i++ ) {
				my $aa = substr $mask, $i, 1;
				if ( $aa ne "0" ) {
					$varModStr .= $varMod {$aa}->{mod} . "@" . ( $i - 1 ) . ";";
				}
			}
			my $cterm = substr $mask, $len - 1;
			if ( $cterm ne "0" ) {
				if ( $varMod {$cterm}->{res} eq "" ) {
					$varModStr .= $varMod {$cterm}->{mod} . '@C-term;';
				}
				else {
					$varModStr .= $varMod {$cterm}->{mod} . "@" . ( $len - 4 ) . ";";
				}
			}
		}
		return $varModStr;
	}
}
#!/usr/bin/perl
use strict;

my $inFName = $ARGV[0];
my $outFName = $ARGV[1];
open(INFILE,"<$inFName") || die "cannot read filter file";
open(OUTFILE,">$outFName" ) || die "cannot create output file";
my $phase = 1;
my $pepModCol = 0;
my $startCol = 0;
my $line;
while ( $line = <INFILE> ) {
	my @columns = split ( "\t", $line );
	my $siz = @columns;
	if ( $columns [0] eq "Spectrum" ) {					#this is the header line
		for ( my $i = 0 ; $i < $siz ; $i++ ) {
			if ( $columns [$i] eq "start" ) {
				$startCol = $i;
			}
			elsif ( $columns [$i] eq "modifications" ) {
				$pepModCol = $i;
				last;
			}
		}
		print OUTFILE $line;
		$phase = 2;
		next;
	}
	if ( $phase == 2 ) {
		my $mod = $columns [$pepModCol];
		my $oMod;
		if ( $mod !~ /^\s*$/ ) {				# If the mod is not blank
			my $start = $columns [$startCol];
			my @singMods = split ( ",", $mod );
			foreach ( @singMods ) {
				if ( /\[(\d+)\] ([+-]?(\d+\.\d+|\d+\.|\.\d+))/ ) {
					$oMod .= $2;
					$oMod .= '@';
					$oMod .= $1 - $start + 1;
					$oMod .= ';';
				}
			}
			chop $oMod;							#delete last semi colon
		}
		for ( my $i = 0 ; $i < $siz ; $i++ ) {
			my $f = $columns [$i];
			if ( $i == $pepModCol ) {
				$f = $oMod;
			}
			print OUTFILE $f;
			if ( $i != $siz - 1 ) {
				print OUTFILE "\t";
			}
		}
	}
}
close INFILE;
close OUTFILE;
The file viewer_conv.txt contains an entry for each MS-Viewer conversion script. An administrator can add new enties to this file or edit existing ones.
Note that title lines are lines in the report before the table. If it is possible for there to be a variable number of title lines it is best to delete these in the conversion script. Header lines refer to table column headers. These won't be sorted if the table is sorted. Column headers are necessary to allow the columns to be identified. If the column headers aren't unique the first one encountered will be used. It is best to have a single header line.
Within the viewer_conv.txt file an entry for a conversion script MUST contain 11 lines:
line 1) contains a name for the conversion method. This will be used in the MS-Viewer Results File Format menu.line 2) contains the name of the Perl script used to do the conversion.
line 3) contains the number of title lines in the converted file.
line 4) contains the number of header lines in the converted file.
line 5) contains the column separator, CSV = comma separated file, TAB = tab delimited.
line 6) contains the spectrum identifier:
PP RT = Protein Prospector RT column.
Spectrum Number = The number of the spectrum in the peak list file.
m/z = the precursor m/z.
line 8) contains the scan ID column header.
line 9) contains the peptide column header.
line 10) contains the charge column header.
line 11) contains the modifications column header.
The entries for the supplied conversion scripts mascot_converter.pl and tandem_converter.pl are given below:
Mascot CSV
mascot_converter.pl
0
1
CSV
Scan Title
N/A
pep_scan_title
pep_seq
pep_exp_z
pep_mod
X!Tandem Tab Delimited
tandem_converter.pl
0
1
TAB
Scan Title
N/A
spectrum
sequence
z
modifications
The file mq_silac_options.txt contains an entry for each MS-Viewer MaxQuant SILAC Labelling option. Some example entries are shown below:
Label:13C (R)
Label:13C (K)
Label:13C (K+R)
Label:13C 15N (R)
Label:13C 15N (K)
Label:13C 15N (K+R)
Label:13C (R) 13C 15N (L)
Label:13C (K) 13C 15N (R)
Label:2H (K) 13C 15N (K)
Label:13C (R) 13C 15N (R)
Label:2H (K) 13C 15N (K) 13C (R) 13C 15N (R)
Propionyl:13C(3) (N-term+K)
Dimethyl:2H4 (N-term+K)
If you add new enties to the menu they must be of the same form.
If at any point you need to update or edit the Javascript files located in the directory html/js you may notice that web pages using the files don't reflect the changes - at least not initially. The reason for this is that the old file has been cached by the browser. It is possible to clear the cache by displaying the Javascript file directly in the browser and pressing the browser reload (or refresh) button. An example of a URL to display one of the Javascript file (this depends on the server name and web-site setup) is:
http://localhost/html/js/info.js
This needs to be done individually for each Javascript file that has been updated.
Installing Protein Prospector on a LINUX platform does vary somewhat depending on the LINUX distribution used. The installation procedure is thus described below for some example distributions using the Oracle VM Virtualbox program. More will be added as different distributions are tried. If you are installing Protein Prospector on an actual LINUX server then obviously some of these steps can be skipped. As newer version of LINUX and Protein Prospector are released then the release numbers will change.
Note that if you are using Virtualbox you will probably need to install the Extension Pack. If this is already installed the file C:\ProgramFiles\Oracle\VirtualBox\ExtensionPacks\Oracle_VM_VirtualBox_Extension_Pack\ExtPack-license.htm should be present on your system. This could change if you have specified a custom path when installing VirtualBox. The Extension Pack can be downloaded from the VirtualBox web site and must match your version of VirtualBox.
For openSUSE download the file openSUSE-13.2-NET-x86_64.iso from the Open SUSE distribution directory.
For Debian Wheezy download the file debian-8.1.0-amd64-netinst.iso from the Debian Wheezy download directory.
For Centos download the file CentOS-6.6-x86_64-minimal.iso from the one of the mirrors in the Centos download directory.
Open the Oracle VM Virtualbox program.
Click the New Button.
For openSUSE on the first screen (Name and Operating System) enter a name, say OpenSUSE 13.2, set the Type to LINUX and the version to openSUSE (64-bit).
For Debian on the first screen (Name and Operating System) enter a name, say Debian wheezy 64-bit, set the Type to LINUX and the version to Debian 64-bit.
For CentOS on the first screen (Name and Operating System) enter a name, say Centos 64-bit, set the Type to LINUX and the version to Red Hat 64-bit.
On the Memory Size screen set the memory to 1024 MBytes.
On the Hard Drive screen select Create a virtual hard drive now.
On the Hard Drive file type screen select VDI (VirtualBox Disk Image).
On the Storage on physical hard drive screen select Dynamically allocated.
On the File location and size screen select 8 GBytes then press Create.
Select the newly created instance and press Start.
For OpenSUSE on the Select start-up disk screen select the openSUSE-13.2-NET-x86_64.iso file and press Start.
For Debian on the Select start-up disk screen select the debian-7.1.0-amd64-netinst.iso file and press Start.
For CentOS on the Select start-up disk screen select the CentOS-6.6-x86_64-minimal.iso file and press Start.
Wait for the open SUSE installer menu to appear and select Installation
In the Boot Option field enter a space followed by nopreload then press Enter to boot the system. This adds the nopreload kernel parameter. Continue with the first boot instructions. You will be asked to create a user, select a time zone, and choose software to install, etc. The default settings will work. Log in when asked to do so.
To add the nopreload parameter to the kernel automatically, you need to edit the file /boot/grub/menu.lst using a text editor such as vi. You will need to do this as superuser. Eg type:
cd /boot/grub
sudo vi menu.lst
For every line that starts with kernel go to the end of the line and add one space and nopreload. Then save the file. An example of such a line is given below.
kernel /boot/vmlinuz-2.6.37.1-1.2-desktop root=/dev/disk/by-id/ata-VBOX_HARDDISK_VB7dbd9a4f-dbf049d7-part2 resume=/dev/disk/by-id/ata-VBOX_HARDDISK_VB7dbd9a4f-dbf049d7-part1 splash=silent quiet showopts vga=0x314 nopreload
Restart openSUSE and it should boot cleanly.
Go through the installation procedure and boot into the desktop environment.
Select 'Install or upgrade an existing system', then skip the media test.
Go through the installation procedure during which you will be asked to enter a root password. Then boot into a command line environment.
Create a user using the adduser command. Eg. if the user is ppsvr the command would be:
useradd ppsvr
Set a password for the new user using the passwd command. Eg if the user was ppsvr:
passwd ppsvr
From Virtualbox's Machine menu select Settings... Select the Advanced tab and set Shared Clipboard to Bidirectional. This will allow you to easily cut and paste text between the host operating system and the one running on Virtualbox.
By default the openSUSE system will ask for the root password when using sudo before a command.
Check the /etc/apt/sources.list file. There may be an entry to get the packages from CD which needs commenting out if not appropriate.
Log into root from a terminal by using the su command.
If there is no /etc/sudoers file you need to install sudo.
Type the command:
apt-get -y install sudo
Open the file /etc/sudoers and, assuming your username is ppsvr add the line:
ppsvr ALL=(ALL:ALL) ALLunder the line:
root ALL=(ALL:ALL) ALL
Use the visudo command to edit the file /etc/sudoers to give the new user sudo capabilities. Add the line:
ppsvr ALL=(ALL) ALLunder the line:
root ALL=(ALL) ALL
From Virtualbox's Machine menu select Settings... Select the Network section then change Adapter 1 to Bridged Adapter.
Reboot the machine.
Edit the file /etc/sysconfig/network-scripts/ifcfg-eth0.
Change the line:
ONBOOT=no
to:
ONBOOT=yes
Change the line:
NM_CONTROLLED=yes
to:
NM_CONTROLLED=no
Type the command:
sudo service network restart
Note that in Centos 7 the file to edit is /etc/sysconfig/network-scripts/ifcfg-enp0s3 and you need to change the ONBOOT line from NO to YES.
There appears to be a problem when using the MPI package with Secure LINUX. As Protein Prospector installations using Secure LINUX have not been tested the current advice and the assumption during the rest of these installation instructions is that Secure LINUX has been turned off. To do this:
cd /etc/selinux
In the file config change the line:
SELINUX=enforcing
to either:
SELINUX=disabled
or:
SELINUX=permissive
Reboot the Operating System.
Install the software by entering:
sudo yum -y install ntp
If yum doesn't work you may need to go to the /etc/yum.repos.d directory in which there are files with .repo suffixes. Try removing the comments from lines starting with baseurl.
Enable the service with
sudo chkconfig ntpd on
Synchronize the system clock with
sudo ntpdate pool.ntp.org
Start the NTP service with:
sudo /etc/init.d/ntpd start
If this doesn't work try:
sudo systemctl enable ntpd
sudo systemctl start ntpd
For information on this process see this web page. You only need to install a desktop if you want to operate LINUX via a desktop environment.
Type the command:
sudo yum -y groupinstall "Desktop" "Desktop Platform" "X Window System" "Fonts"
Since the operating system was previously running in CLI (command line interface) mode, we need to change the initialization process for the machine to boot up in GUI mode. In the file /etc/inittab change the line:
id:3:initdefault:
to:
id:5:initdefault:
Note in Centos 7 the inittab file is no longer used. Instead type:
systemctl set-default graphical.target
After making change, reboot the machine into GUI mode using the command:
sudo init 6
Note that CentOS has a method for easily switching between CLI (Command Line Interface) and GUI (Graphical User Interface) mode:
GUI to CLI: Ctrl + Alt + F6
CLI to GUI: Ctrl + Alt + F1
If you want to use a web browser on the LINUX server install the Firefox Browser using the command:
sudo yum -y groupinstall "Internet Browser"
You can open a terminal window from the desktop via Applications->System Tools->Terminal
Type:
sudo zypper -n install p7zip
sudo zypper -n install unrar
sudo zypper -n install ghostscript
sudo zypper -n install R-base
If you are installing the full version with multiprocessor Batch-Tag searching then you also need to install openmpi. Type:
sudo zypper -n install openmpi
Reboot LINUX to enable openmpi.
Enter the commands:
sudo apt-get -y install p7zip-full
sudo apt-get -y install unrar-free
sudo apt-get -y install ghostscript
sudo apt-get -y install r-base
sudo cpan install XML::Simple
Answer yes to all questions. If this doesn't install cleanly you may need to install the follow package before trying it again.
sudo apt-get install libxml-sax-expat-incremental-perl
If you are installing the full version with multiprocessor Batch-Tag searching then you also need to install openmpi. Type:
sudo apt-get -y install openmpi-bin
Reboot LINUX to enable openmpi.
Install and enable the RPMForge repository.
sudo yum -y install wget
sudo wget http://pkgs.repoforge.org/rpmforge-release/rpmforge-release-0.5.2-2.el6.rf.x86_64.rpm
sudo rpm -Uvh rpmforge-release-0.5.2-2.el6.rf.x86_64.rpm
Enter the commands:
sudo yum -y install p7zip
sudo yum -y install unrar
sudo yum -y install ghostscript
sudo yum -y install R-base
sudo yum -y install perl-XML-Simple
If you are installing the full version with multiprocessor Batch-Tag searching then you also need to install openmpi. Type:
sudo yum -y install openmpi
Reboot LINUX to enable openmpi.
Apache is unnecessary if you only want to operate Protein Prospector from the command line.
To install Apache type:
sudo zypper -n install apache2
Start Apache.
sudo /etc/init.d/apache2 start
Stop Apache.
sudo /etc/init.d/apache2 stop
To install Apache type:
sudo apt-get -y install apache2
Start Apache.
sudo /etc/init.d/apache2 start
Stop Apache.
sudo /etc/init.d/apache2 stop
To install Apache type:
sudo yum -y install httpd
Start Apache.
sudo /etc/init.d/httpd start
Stop Apache.
sudo /etc/init.d/httpd stop
This section is only necessary if you wish to compile the Protein Prospector source code. It is thus unnecessary if you have been given a distribution with the compiled binaries in place.
The make and g++ packages are required along with the zlib, mysql and openmpi development environments.
Type the following dependent on which packages are required.
sudo zypper -n install make
sudo zypper -n install gcc-c++
sudo zypper -n install zlib-devel
If you are installing the full version with multiprocessor Batch-Tag searching then you also need to install openmpi.
sudo zypper -n install openmpi-devel
If you want to operate Batch-Tag through a web browser with a database you need to install mySQL. Batch-Tag can also be run from the command line without a mySQL database.
sudo zypper -n install libmysqlclient-devel
sudo apt-get -y install zlib1g-dev
If you are installing the full version with multiprocessor Batch-Tag searching then you also need to install openmpi.
sudo apt-get -y install libopenmpi-dev
If you want to operate Batch-Tag through a web browser with a database you need to install mySQL. Batch-Tag can also be run from the command line without a mySQL database.
sudo apt-get -y install libmysqlclient-dev
sudo yum -y install make
sudo yum -y install gcc-c++
sudo yum -y install zlib-devel
If you are installing the full version with multiprocessor Batch-Tag searching then you also need to install openmpi.
sudo yum -y install openmpi-devel
If you want to operate Batch-Tag through a web browser with a database you need to install mySQL. Batch-Tag can also be run from the command line without a mySQL database.
sudo yum -y install mysql-devel
Create a shared folder so that the Prospector code in your Windows filesystem can be seen by LINUX. In this example the source code folder is , the user's username is ppsvr and the location of the source code folder in the Windows file system is C:\ProspectorCode\. In the LINUX system the source code is going to be in .
cd / sudo mkdir
From Virtualbox's Machine menu select Settings... then Shared Folders.
Click the + icon to add a new shared folder definition in the Machine Folders section.
Enter the following into the Add Share window:
Folder path: C:\ProspectorCode\ Folder name: Auto-mount: Check this Make Permanent: Check this
From the LINUX prompt enter the following commands:
sudo mount -t vboxsf / sudo chown -R ppsvr:users cd /
sudo modprobe vboxsf sudo mount.vboxsf / sudo chown -R ppsvr:users cd /
sudo yum -y update
sudo yum -y install kernel-devel
Install Guest Addition by using the Virtualbox menu item Device->Install Guest Additions...
Reboot into command line mode and enter the following commands.
sudo mkdir /cdrom
sudo mount /dev/cdrom /cdrom
sudo /cdrom/VBoxLinuxAdditions.run
sudo mount -t vboxsf / sudo chown -R ppsvr:ppsvr cd /
Run the following command to modify the PATH variable:
echo 'export PATH=$PATH:/usr/lib64/openmpi/bin' >> $HOME/.bash_profile
Reboot the Operating System:
Change LIBDIRS in Makefile to:
LIBDIRS="-L../lib -L/usr/lib64/mysql"
To compile prospector type the following from the / directory:
make clean
Type one of the following commands depending on the type of system you want to make.
1). Version with no Batch-Tag option.
make allbasic
2). Version with single processor command line Batch-Tag.
make allcl
3). Version with multi processor command line Batch-Tag.
make allclmpi
4). Version with multi processor Batch-Tag with mySQL database.
make all
If the make fails then you should enter make clean before attempting a subsequent make.
The prospector distribution files are in a directory call web which should be placed in the directory /var/lib/prospector. In the example below it is assumed that the web directory and its contents are in the directory /home/ppsvr. Run the following commands:
cd /var/lib
sudo mkdir prospector
sudo chown wwwrun:www prospector
sudo chown www-data:www-data prospector
sudo chown apache:apache prospector
cd prospector
sudo cp -R /home/ppsvr/web .
sudo chown -R wwwrun:www web
sudo chown -R www-data:www-data web
sudo chown -R apache:apache web
If you have previously built the Prospector binaries from source code you need to now copy them into the distribution. It is assumed below that the source code is in the directory / so that the compiled binaries are in //bin.
cd /var/lib/prospector/web/cgi-bin sudo cp //bin/* .
This section is only relevant if you are installing a version with multiprocessor Batch-Tag searching.
Batch-Tag uses the MPI package to enable multi-process searches. On a LINUX system the Perl script mssearchmpi.pl in the web/cgi-bin directory is called by the Batch-Tag Daemon to initiate searches. The script attempts to detect the type of LINUX and the MPI package that is installed. Older versions used MPICH2 so the script tries to figure out whether openMPI is installed. If it can't find it it assumes MPICH2 is in use.
The number of cores used for a Batch-Tag job is controlled by the line:
my $num_processors = 2; ##### this is where you set the number of cores used by MPI
in the script. You can modify this line if you want to use more cores for a search to make the searches run faster. Note that the number of processes used when a search starts is one greater as the is a coordinating process which doesn't use much in the way of resources.
If you previously installed Apache it needs to be configured.
Create a file called prospector.conf with the following contents in the directory /etc/apache2/vhosts.d.
   AddHandler cgi-script .cgi
   AddHandler cgi-script .pl

   DirectoryIndex index.html
   ScriptAlias /prospector/cgi-bin /var/lib/prospector/web/cgi-bin
   Alias /prospector /var/lib/prospector/web

   <Directory "/var/lib/prospector/web">
      Options FollowSymLinks
      DirectoryIndex index.html
      AllowOverride None
      Order allow,deny
      Allow from all
   </Directory>
Add the rewrite module to the apache2 file.
cd /etc/sysconfig
vi apache2
Edit the line beginning with APACHE_MODULES so it contains rewrite as below.
APACHE_MODULES="actions alias auth_basic authn_file authz_host authz_groupfile authz_default authz_user autoindex cgi dir env expires include log_config mime negotiation setenvif ssl userdir php5 reqtimeout rewrite"
Start Apache again.
sudo /etc/init.d/apache2 start
Create a file called prospector.conf with the following contents in the directory /etc/apache2/sites-available.
   AddHandler cgi-script .cgi
   AddHandler cgi-script .pl

   DirectoryIndex index.html
   ScriptAlias /prospector/cgi-bin /var/lib/prospector/web/cgi-bin
   Alias /prospector /var/lib/prospector/web

   <Directory "/var/lib/prospector/web">
      Options FollowSymLinks
      DirectoryIndex index.html
      AllowOverride None
      Require all granted
   </Directory>
Run the following command.
sudo ln -s /etc/apache2/sites-available/prospector.conf /etc/apache2/sites-enabled/prospector.conf
In: conf-available/serve-cgi-bin.conf add:
       <IfDefine ENABLE_USR_LIB_CGI_BIN>
                ScriptAlias /cgi-bin/ /var/lib/prospector/web/cgi-bin/
                <Directory "/var/lib/prospector/web/cgi-bin">
                        AllowOverride None
                        Options +ExecCGI -MultiViews +SymLinksIfOwnerMatch
                        Require all granted
                </Directory>
        </IfDefine>
Fix apache using the following commands.
sudo rm /etc/apache2/mods-enabled/deflate.*
sudo ln -s /etc/apache2/mods-available/proxy.conf   /etc/apache2/mods-enabled/proxy.conf
sudo ln -s /etc/apache2/mods-available/proxy.load   /etc/apache2/mods-enabled/proxy.load
sudo ln -s /etc/apache2/mods-available/proxy_http.load   /etc/apache2/mods-enabled/proxy_http.load
sudo ln -s /etc/apache2/mods-available/rewrite.load /etc/apache2/mods-enabled/rewrite.load
sudo ln -s /etc/apache2/mods-available/cgid.conf   /etc/apache2/mods-enabled/cgid.conf
sudo ln -s /etc/apache2/mods-available/cgid.load   /etc/apache2/mods-enabled/cgid.load
Start Apache again.
sudo /etc/init.d/apache2 restart
Create a file called prospector with the following contents in the directory /etc/apache2/sites-available.
   AddHandler cgi-script .cgi
   AddHandler cgi-script .pl

   DirectoryIndex index.html
   ScriptAlias /prospector/cgi-bin /var/lib/prospector/web/cgi-bin
   Alias /prospector /var/lib/prospector/web

   <Directory "/var/lib/prospector/web">
      Options FollowSymLinks
      DirectoryIndex index.html
      AllowOverride None
      Order allow,deny
      Allow from all
   </Directory>
Run the following command.
sudo ln -s /etc/apache2/sites-available/prospector /etc/apache2/sites-enabled/prospector
Fix apache using the following commands.
sudo rm /etc/apache2/mods-enabled/deflate.*
sudo ln -s /etc/apache2/mods-available/proxy.conf   /etc/apache2/mods-enabled/proxy.conf
sudo ln -s /etc/apache2/mods-available/proxy.load   /etc/apache2/mods-enabled/proxy.load
sudo ln -s /etc/apache2/mods-available/proxy_http.load   /etc/apache2/mods-enabled/proxy_http.load
sudo ln -s /etc/apache2/mods-available/rewrite.load /etc/apache2/mods-enabled/rewrite.load
Start Apache again.
sudo /etc/init.d/apache2 start
cd /etc/httpd
sudo mkdir sites-available
sudo mkdir sites-enabled
cd conf
Edit the file httpd.conf and add the following line at the end:
Include /etc/httpd/sites-enabled/
Create a file called prospector.conf with the following contents in the directory /etc/httpd/sites-available.
   AddHandler cgi-script .cgi
   AddHandler cgi-script .pl

   DirectoryIndex index.html
   ScriptAlias /prospector/cgi-bin /var/lib/prospector/web/cgi-bin
   Alias /prospector /var/lib/prospector/web

   <Directory "/var/lib/prospector/web">
      Options FollowSymLinks
      DirectoryIndex index.html
      AllowOverride None
      Order allow,deny
      Allow from all
   </Directory>
Run the following command.
sudo ln -s /etc/httpd/sites-available/prospector.conf /etc/httpd/sites-enabled/prospector.conf
Start Apache.
sudo /etc/init.d/httpd start
Check whether iptables are blocking ports 80 and 443.
cd /etc/sysconfig
Edit the file iptables. Add the lines:
-A INPUT -m state --state NEW -p tcp --dport 80 -j ACCEPT -A INPUT -m state --state NEW -p tcp --dport 443 -j ACCEPT
After the line:
-A INPUT -m state --state NEW -m tcp -p tcp --dport 22 -j ACCEPT
Restart iptables by entering the command:
sudo /etc/init.d/iptables restart
If you want to operate Batch-Tag through a web browser with a database you need to install mySQL
First install the mysql server. Remember the root password that you set during installation.
sudo zypper -n install mysql-community-server
Start the the mysql server daemon.
sudo /etc/init.d/mysql start
sudo apt-get -y install mysql-server
Start the the mysql server daemon.
sudo /etc/init.d/mysql start
sudo yum -y install mysql-server
Start the the mysql server daemon.
sudo /etc/init.d/mysqld start
Set the mySQL root password. You might want to substitute your own password here. You should only do this if you didn't enter a root password during mySQL installation.
sudo mysqladmin -u root password root
Use the file prospector.sql to initialise the mySQL database used by the Batch-Tag and Search Compare programs.
sudo mysql -hlocalhost -uroot -proot < prospector.sql
Enter the mySQL client program.
mysql -u root -proot ppsd
Enter the following commands.
mysql> DROP USER 'prospector'@'%'; mysql> CREATE USER 'prospector'@'localhost' IDENTIFIED BY 'pp_password'; mysql> GRANT ALL PRIVILEGES ON ppsd.* TO 'prospector'@'localhost'; mysql> quit
In the prospector distribution file /var/lib/prospector/web/params/info.txt add the following parameters.
db_host localhost db_name ppsd db_password pp_password
After adding the parameters the relevant section of the file should look like it does below.
# # 10). Database parameters (the parameters are not required if the default value is used). # # # name: db_host # default value: localhost # # name: db_port # default value: 0 # comments: 0 means use the default port # # name: db_name # default value: ppsd # # name: db_user # default value: prospector # # name: db_password # default value: pp # ############################ db_host localhost db_name ppsd db_password pp_password ############################
If you are installing Protein Prospector on a cluster then one of the nodes will need to host the mySQL database. This is the server. The other nodes are clients. On the server you need to modify the file /etc/mysql/my.cnf to enable remote access. Change the line:
bind-address = 127.0.0.1
to
bind-address = 0.0.0.0
Restart the mysql daemon after making this change. Note this should only be done when there is no activity on the database.
Note that the daemon may be called mysql rather than mysqld.
sudo /etc/init.d/mysqld stop sudo /etc/init.d/mysqld start
You also need to grant database permissions to each node. On the server enter the command:
mysql -u root -proot ppsd
For each node enter the command below substituting the relevant node name (instead of node_name) and password (instead of pp).
mysql> GRANT ALL ON ppsd.* TO prospector@'node_name' IDENTIFIED BY 'pp';
Then quit the mysql console.
mysql> quit
Create the seqdb directory. Note that this directory need to be large enough to hold any sequence databases you want to search so may need to be a symbolic link.
cd /var/lib/prospector sudo mkdir seqdb
sudo chown wwwrun:www seqdb
sudo chown www-data:www-data seqdb
sudo chown apache:apache seqdb
In the prospector distribution file /var/lib/prospector/web/params/info.txt set the following parameter.
seqdb /var/lib/prospector/seqdb
After adding the parameter the relevant section of the file should look like it does below.
# # 1). The directory containing the sequence databases. # # name: seqdb # default value: seqdb # ############################ seqdb /var/lib/prospector/seqdb ############################
Check that the Perl package LWP::Simple is installed. Enter the following command:
sudo perl -MCPAN -e'install "LWP::Simple"'
If that doesn't work you could try the following (you will have to enter yes multiple times before the process finishes):
sudo yum -y install cpan sudo cpan cpan[1]> install LWP::Simple cpan[1]> exit
Next run the script autofaindex.pl to download and index the SwissProt database.
cd /var/lib/prospector/web/cgi-bin
sudo ./autofaindex.pl SwissProt cd /var/lib/prospector/seqdb sudo chown wwwrun:www *
sudo -u www-data ./autofaindex.pl SwissProt
sudo -u apache ./autofaindex.pl SwissProt
If you want to operate Batch-Tag through a web browser with a database you need to create a data repository.
Create the repository directories. Note that the repository needs to be big enough to hold all uploaded data, projects and results. It is possible to create a separate repository for data as it is collected off your laboratory instruments. The directories /var/lib/prospector/repository and /var/lib/prospector/repository/temp are created using the commands below,
cd /var/lib/prospector sudo mkdir repository sudo mkdir data
sudo chown wwwrun:www repository sudo chown wwwrun:www data
sudo chown www-data:www-data repository sudo chown www-data:www-data data
sudo chown apache:apache repository sudo chown apache:apache data
cd /var/lib/prospector/repository sudo mkdir temp cd /var/lib/prospector/data sudo mkdir peaklists sudo mkdir raw
cd /var/lib/prospector/repository sudo chown wwwrun:www temp cd /var/lib/prospector/data sudo chown wwwrun:www peaklists sudo chown wwwrun:www raw
cd /var/lib/prospector/repository sudo chown www-data:www-data temp cd /var/lib/prospector/data sudo chown www-data:www-data peaklists sudo chown www-data:www-data raw
cd /var/lib/prospector/repository sudo chown apache:apache temp cd /var/lib/prospector/data sudo chown apache:apache peaklists sudo chown apache:apache raw
In the prospector distribution file /var/lib/prospector/web/params/info.txt set the following parameters.
upload_temp /var/lib/prospector/repository/temp user_repository /var/lib/prospector/repository
After adding the parameters the relevant sections of the file should look like they do below.
# # 3). Upload temporary directory. # # name: upload_temp # default value: temp # ############################ upload_temp /var/lib/prospector/repository/temp ############################
# # 3). Upload repository home directory. # # name: user_repository # default value: # ############################ user_repository /var/lib/prospector/repository ############################
If you want to operate Batch-Tag through a web browser with a database you need to install the Batch-Tag daemon.
First install the deb package so start-stop-daemon (a Debian facility) works in the script below.
sudo zypper -n install deb
Firstly the Debian utility start-stop-daemon must be installed.
Download the dpkg package. Substitute the latest version in the following instructions by checking the website http://ftp.de.debian.org/debian/pool/main/d/dpkg.
wget http://ftp.de.debian.org/debian/pool/main/d/dpkg/dpkg_1.17.25.tar.xz
Install the following packages.
sudo yum -y install libselinux-devel sudo yum -y install ncurses-devel sudo yum -y install xz
Install the following packages if you haven't already installed them to compile the prospector source code.
sudo yum -y install make sudo yum -y install gcc-c++
Unpack the downloaded packages.
tar -xf dpkg_1.17.25.tar.xz
Run the following commands:
cd dpkg-1.17.25 ./configure make -C lib/compat make -C utils cd utils
Copy the binary to the /sbin directory.
sudo cp start-stop-daemon /sbin
Install the lsb package:
sudo yum -y install lsb
Add a script called btag-daemon to the directory /etc/init.d with the following contents:
#! /bin/sh
### BEGIN INIT INFO
# Provides: btag-daemon
# Required-Start: $remote_fs $all
# Required-Stop: $remote_fs
# Default-Start: 2 3 4 5
# Default-Stop: 0 1 6
# Short-Description: Start the Protein Prospector batch-tag daemon.
# Description: Start the Protein Prospector batch-tag daemon.
### END INIT INFO
#
# old way:
# update-rc.d btag-daemon start 95 2 3 4 5 . stop 15 0 1 6 .
# note: btag-daemon depends upon mpich2
# Do NOT "set -e"
# PATH should only include /usr/* if it runs after the mountnfs.sh script
PATH=/sbin:/usr/sbin:/bin:/usr/bin:/usr/local/bin
WORK_DIR=/var/lib/prospector/web/cgi-bin
DESC="Protein Prospector Batch-Tag daemon"
NAME=btag-daemon
DAEMON=${WORK_DIR}/${NAME}
DAEMON_ARGS="--options args"
PIDFILE=/var/run/${NAME}.pid
PIDOPTIONS="--make-pidfile --pidfile ${PIDFILE}"
SCRIPTNAME=/etc/init.d/$NAME
OPTIONS="run ${WORK_DIR}"
###################################################
system=unknown
if [ -f /etc/redhat-release ]; then
system=redhat
elif [ -f /etc/SuSE-release ]; then
system=suse
elif [ -f /etc/debian_version ]; then
system=debian
fi
if [ "$system" = "redhat" ]; then
DAEMON_UID=apache
PATH=$PATH:/usr/lib64/openmpi/bin
fi
if [ "$system" = "suse" ]; then
DAEMON_UID=wwwrun
PATH=$PATH:/usr/lib64/mpi/gcc/openmpi/bin
fi
if [ "$system" != "debian" ]; then
#
# Function that starts the daemon/service
#
log_daemon_msg ()
{
logger "$@";
}
log_end_msg ()
{
[ $1 -eq 0 ] && RES=OK; logger ${RES:=FAIL};
}
fi
if [ "$system" = "debian" ]; then
# Load the VERBOSE setting and other rcS variables
. /lib/init/vars.sh
DAEMON_UID=www-data
fi
###################################################
# Exit if the package is not installed
[ -x "$DAEMON" ] || exit 0
[ -x "$WORK_DIR" ] || exit 0
cd ${WORK_DIR}
# Read configuration variable file if it is present
[ -r /etc/default/$NAME ] && . /etc/default/$NAME
# Define LSB log_* functions.
# Depend on lsb-base (>= 3.0-6) to ensure that this file is present.
. /lib/lsb/init-functions
do_start()
{
# Return
# 0 if daemon has been started
# 1 if daemon was already running
# 2 if daemon could not be started
start-stop-daemon --start --quiet $PIDOPTIONS --exec $DAEMON \
--test > /dev/null \
|| return 1
## start-stop-daemon --start --quiet --pidfile $PIDFILE --exec $DAEMON -- \
start-stop-daemon --start --quiet $PIDOPTIONS --exec $DAEMON \
--chuid $DAEMON_UID --background --chdir $WORK_DIR \
-- ${OPTIONS} \
|| return 2
# Add code here, if necessary, that waits for the process to be ready
# to handle requests from services started subsequently which depend
# on this one. As a last resort, sleep for some time.
}
#
# Function that stops the daemon/service
#
do_stop()
{
# Return
# 0 if daemon has been stopped
# 1 if daemon was already stopped
# 2 if daemon could not be stopped
# other if a failure occurred
start-stop-daemon --stop --quiet --retry=TERM/30/KILL/5 --pidfile $PIDFILE --name $NAME --chuid $DAEMON_UID
RETVAL="$?"
[ "$RETVAL" = 2 ] && return 2
# Wait for children to finish too if this is a daemon that forks
# and if the daemon is only ever run from this initscript.
# If the above conditions are not satisfied then add some other code
# that waits for the process to drop all resources that could be
# needed by services started subsequently. A last resort is to
# sleep for some time.
start-stop-daemon --stop --quiet --oknodo --retry=0/30/KILL/5 --exec $DAEMON
[ "$?" = 2 ] && return 2
# Many daemons don't delete their pid files when they exit.
rm -f $PIDFILE
return "$RETVAL"
}
#
# Function that sends a SIGHUP to the daemon/service
#
do_reload() {
#
# If the daemon can reload its configuration without
# restarting (for example, when it is sent a SIGHUP),
# then implement that here.
#
start-stop-daemon --stop --signal 1 --quiet --pidfile $PIDFILE --name $NAME
return 0
}
case "$1" in
start)
[ "$VERBOSE" != no ] && log_daemon_msg "Starting $DESC" "$NAME"
do_start
case "$?" in
0|1) [ "$VERBOSE" != no ] && log_end_msg 0 ;;
2) [ "$VERBOSE" != no ] && log_end_msg 1 ;;
esac
;;
stop)
[ "$VERBOSE" != no ] && log_daemon_msg "Stopping $DESC" "$NAME"
do_stop
case "$?" in
0|1) [ "$VERBOSE" != no ] && log_end_msg 0 ;;
2) [ "$VERBOSE" != no ] && log_end_msg 1 ;;
esac
;;
#reload|force-reload)
#
# If do_reload() is not implemented then leave this commented out
# and leave 'force-reload' as an alias for 'restart'.
#
#log_daemon_msg "Reloading $DESC" "$NAME"
#do_reload
#log_end_msg $?
#;;
restart|force-reload)
#
# If the "reload" option is implemented then remove the
# 'force-reload' alias
#
log_daemon_msg "Restarting $DESC" "$NAME"
do_stop
case "$?" in
0|1)
do_start
case "$?" in
0) log_end_msg 0 ;;
1) log_end_msg 1 ;; # Old process is still running
*) log_end_msg 1 ;; # Failed to start
esac
;;
*)
# Failed to stop
log_end_msg 1
;;
esac
;;
*)
#echo "Usage: $SCRIPTNAME {start|stop|restart|reload|force-reload}" >&2
echo "Usage: $SCRIPTNAME {start|stop|restart|force-reload}" >&2
exit 3
;;
esac
:
Make sure the script has execute permission.
sudo chmod 777 btag-daemon
Start the Batch-Tag daemon.
sudo /etc/init.d/btag-daemon start
Make sure the Batch-Tag daemon starts automatically when booting.
sudo insserv -v btag-daemon
sudo chcon -t initrc_exec_t btag-daemon sudo chcon -u system_u btag-daemon
From the main menu select Applications->Systems->Administrator Settings (YAST)
Select System->System Services (Runlevel)
If you have installed Apache set apache2 to Yes.
If you have installed the Batch-Tag daemon set btag-daemon to Yes.
If you have installed the mySQL set mySQL to Yes.
Press OK then reboot LINUX if you have added any services.
If you have installed Apache.
sudo /sbin/chkconfig httpd on
If you have installed mySQL.
sudo /sbin/chkconfig mysqld on
If you have installed the Batch-Tag daemon.
sudo /sbin/chkconfig --add btag-daemon
sudo /sbin/chkconfig btag-daemon on
In v6.0.0 and later it is possible to connect to a Windows instance running a raw data daemon which extracts data from raw data files for both single data point spectral display and quantitation. Single point spectrum display is accessed via links from the m/z column in a Search Compare Peptide, Modification or Time report. This invokes a report from the MS-Display program in a separate web page. Quantitation is performed using Search Compare. The Windows instance can be a virtual machine running on the LINUX server, an instance in a cloud computing installation or a separate server. Once the Windows instance is in place it needs access to some directories on the LINUX server in order to access the data files, receive new job files and post the results. The raw data daemon can also be used in a Windows installation allowing quantitation jobs to be run in batch mode rather than interactively. This is more memory efficient as Search Compare doesn't need to be running whilst the raw data is being extracted.
The fact that the LINUX system is using a raw daemon is indicated by the raw_data_batch_option field in info.txt file which should be set to on.
Separate directories are used for single spectrum (MS-Display) and quantitation (Search Compare) jobs. Quantitation jobs, which can take several hours, are queued whereas single spectrum jobs are not. It is possible to set up the queuing so that multiple Search Compare jobs are run concurrently.
Once a raw data extraction job is initiated a file is generated in a directory that is shared between the Windows server and the LINUX server. MS-Display (single spectrum) and Search Compare (quantitation) use separate directories.
The parent directory for these separate directories is the directory defined as upload_temp in info.txt. For MS-Display the directory must be named rawFetch. For Search Compare it must be named searchCompare. Typical paths are:
/var/lib/prospector/repository/temp/rawFetch /var/lib/prospector/repository/temp/searchCompare
The job file that is created by MS-Display or Search Compare will have a name such as fileT6PZHr.xml on a LINUX system or s42g.0.xml on a Windows system. The filenames are generated randomly to avoid clashes.
A typical MS-Display job file is shown below.
<?xml version="1.0" encoding="UTF-8"?> <?Mon Feb 14 03:01:50 2022, ProteinProspector Version 6.3.23?> <raw_fetch> <parameters> <raw_type>MS Precursor</raw_type> <orbitrap>1</orbitrap> <version>6.3.23</version> <rt_interval_start>-10.00000</rt_interval_start> <rt_interval_end>30.00000</rt_interval_end> <default_resolution>60000.0</default_resolution> <raw_path>$Lumos/Outside/MonoTHP1_204/Z20200203-25_FTMSms2ethcd.raw</raw_path> </parameters> <d> 1020.9614 1014.9614 1030.9614 1-90.624-1-1-14214 </d> </raw_fetch>
The path to the raw filename is given in the <raw_path> field. The <raw_type> field indicates the type of report. The <rt_interval_start> and <rt_interval_end> fields indicate a range in seconds for averaging of scans. The <d></d> section is used to indicate the scan to extract. For a Search Compare job file there would typically be multiple scans.
1020.9614 here is the precursor mass. 1014.9614 and 1030.9614 are the display start and end masses. 1-90.624-1-1-14214 is the scan to extract. The 1 before 90.624 is the fraction number. For a quantitation report there can be multiple <raw_path> entries if there are multiple fractions in the data set. 90.624 is the retention time in minutes and 14214 is the scan number. This would be the central scan number in the case of averaging.
An example job file for quantitation with multiple fractions in Search Compare is shown below.
<?xml version="1.0" encoding="UTF-8"?> <?Mon Feb 14 08:59:00 2022, ProteinProspector Version 6.3.23?> <sc_quan> <parameters> <user>pbaker</user> <version>6.0.0</version> <quan_msms_flag>0</quan_msms_flag> <rt_interval_start>-10.00000</rt_interval_start> <rt_interval_end>30.00000</rt_interval_end> <default_resolution>60000.0</default_resolution> <raw_path>#d/0/d09jed4hnz/batchtag/data/2019_10/VwpmUasb2h6gFGQU/Z20190919-02.RAW</raw_path> <raw_path>#d/0/d09jed4hnz/batchtag/data/2019_10/VwpmUasb2h6gFGQU/Z20190919-03.RAW</raw_path> <raw_path>#d/0/d09jed4hnz/batchtag/data/2019_10/VwpmUasb2h6gFGQU/Z20190919-04.RAW</raw_path> <raw_path>#d/0/d09jed4hnz/batchtag/data/2019_10/VwpmUasb2h6gFGQU/Z20190919-05.RAW</raw_path> <raw_path>#d/0/d09jed4hnz/batchtag/data/2019_10/VwpmUasb2h6gFGQU/Z20190920-06.RAW</raw_path> <raw_path>#d/0/d09jed4hnz/batchtag/data/2019_10/VwpmUasb2h6gFGQU/Z20190920-07.RAW</raw_path> <raw_path>#d/0/d09jed4hnz/batchtag/data/2019_10/VwpmUasb2h6gFGQU/Z20190920-08.RAW</raw_path> <raw_path>#d/0/d09jed4hnz/batchtag/data/2019_10/VwpmUasb2h6gFGQU/Z20190920-09.RAW</raw_path> <raw_path>#d/0/d09jed4hnz/batchtag/data/2019_10/VwpmUasb2h6gFGQU/Z20190920-10.RAW</raw_path> <raw_path>#d/0/d09jed4hnz/batchtag/data/2019_10/VwpmUasb2h6gFGQU/Z20190920-11.RAW</raw_path> <raw_path>#d/0/d09jed4hnz/batchtag/data/2019_10/VwpmUasb2h6gFGQU/Z20190921-13.RAW</raw_path> <raw_path>#d/0/d09jed4hnz/batchtag/data/2019_10/VwpmUasb2h6gFGQU/Z20190921-14.RAW</raw_path> <raw_path>#d/0/d09jed4hnz/batchtag/data/2019_10/VwpmUasb2h6gFGQU/Z20190921-15.RAW</raw_path> <raw_path>#d/0/d09jed4hnz/batchtag/data/2019_10/VwpmUasb2h6gFGQU/Z20190921-16.RAW</raw_path> <raw_path>#d/0/d09jed4hnz/batchtag/data/2019_10/VwpmUasb2h6gFGQU/Z20190921-17.RAW</raw_path> <raw_path>#d/0/d09jed4hnz/batchtag/data/2019_10/VwpmUasb2h6gFGQU/Z20190922-18.RAW</raw_path> <raw_path>#d/0/d09jed4hnz/batchtag/data/2019_10/VwpmUasb2h6gFGQU/Z20190922-19.RAW</raw_path> <raw_path>#d/0/d09jed4hnz/batchtag/data/2019_10/VwpmUasb2h6gFGQU/Z20190922-20.RAW</raw_path> <raw_path>#d/0/d09jed4hnz/batchtag/data/2019_10/VwpmUasb2h6gFGQU/Z20190922-22.RAW</raw_path> <raw_path>#d/0/d09jed4hnz/batchtag/data/2019_10/VwpmUasb2h6gFGQU/Z20190922-23.RAW</raw_path> <raw_path>#d/0/d09jed4hnz/batchtag/data/2019_10/VwpmUasb2h6gFGQU/Z20190923-24.RAW</raw_path> <raw_path>#d/0/d09jed4hnz/batchtag/data/2019_10/VwpmUasb2h6gFGQU/Z20190923-25.RAW</raw_path> <raw_path>#d/0/d09jed4hnz/batchtag/data/2019_10/VwpmUasb2h6gFGQU/Z20190923-26.RAW</raw_path> <raw_path>#d/0/d09jed4hnz/batchtag/data/2019_10/VwpmUasb2h6gFGQU/Z20190923-27.RAW</raw_path> <raw_path>#d/0/d09jed4hnz/batchtag/data/2019_10/VwpmUasb2h6gFGQU/Z20190923-28.RAW</raw_path> </parameters> <d> 571.9334 565.9334 588.6056 2-24.550-1-1-3615 572.3177 557.3065 582.3177 4-85.883-1-1-12720 635.7845 629.7845 650.7886 4-93.883-1-1-14095 584.2750 578.2750 600.2825 8-80.117-1-1-11742 528.7728 517.7687 538.7728 8-80.317-1-3-11776 529.9375 523.9375 545.9450 8-81.600-1-2-11991 566.9598 560.9598 583.6320 8-90.550-1-2-13529 659.3130 649.3059 669.3130 8-111.283-1-1-17131 559.2723 553.2723 574.2764 11-25.933-1-1-3776 558.2879 552.2879 573.2920 11-91.250-1-2-14170 566.9601 560.9601 583.6323 12-89.917-1-1-13545 505.9389 493.2667 515.9389 13-80.950-1-2-12020 838.9329 828.9258 848.9329 13-116.833-1-2-18463 566.6038 560.6038 583.2760 14-10.667-1-1-1465 876.9217 861.9105 886.9217 14-104.067-1-2-15894 411.2026 405.2026 427.8748 16-23.850-1-1-3402 504.2406 498.2406 520.9128 16-25.917-1-3-3776 845.0954 839.0954 864.4390 17-111.800-1-1-17121 566.9603 560.9603 583.6325 20-92.317-1-2-13807 775.4442 761.4300 785.4442 20-133.767-1-3-21213 566.9606 560.9606 583.6328 21-92.400-1-1-13787 821.4033 810.3992 831.4033 21-100.550-1-1-15176 821.4034 810.3993 831.4034 22-98.233-1-3-14904 816.3994 810.3994 831.4035 22-99.167-1-2-15066 719.8646 708.8605 729.8646 24-99.033-1-1-14843 </d> </sc_quan>
It should be noted at this point that any package that could generate the appropriate job files and able to read the files containing the data could use the raw extraction daemon.
Once the raw data daemon picks up and runs a job then the file is renamed. Thus fileT6PZHr.xml becomes fileT6PZHr.xml.1. The .1 indicates that the job is running. It will then create the files fileT6PZHr.mz.1 (containing m/z values) and fileT6PZHr.int.1 (containing intensity values) for the scans which are interrogated. Again the .1 indicates that the job is running. Once finished the files are renamed fileT6PZHr.mz and fileT6PZHr.int. For Search Compare an additional file created is fileT6PZHr.log which contains information on the progress of the job for display by Search Compare or the Quantitation Extraction Table. Search Compare is aborted and replaced by the Quantitation Extraction Table once the Search Compare job is estimated to be going to take too long. Two settings in info.txt control this. The parameter quan_remain_time_measurement_point specifies the time in seconds at which the estimated remaining time is measured. The default value is 30 sec. Estimates of the remaining time are likely to be more accurate once the job has been running for some time. The parameter quan_remain_time_no_abort_limit is the estimated remain time under which the job is left to complete. The default value is 300 sec.
For MS-Display an additional file is created called fileT6PZHr.txt which contains the data used to populate the MS-Display RT menu. This allows you to select a different scan for display based on its retention time. An example file .txt file is shown below. It contains a comma separated list of retention times followed by the scan number in brackets. The last value, 54.318(8797), is the value which the RT menu is initialized to. Note that all the scans in the raw data file are not present. The idea being to only display every value near the selected value so the menu doesn't become too large.
0.005(1),0.303(50),0.606(100),0.909(150),1.214(200),1.520(250),1.821(300),2.127(350),2.437(400),2.744(450),3.050(500),3.352(550), 3.657(600),3.961(650),4.266(700),4.571(750),4.879(800),5.186(850),5.490(900),5.794(950),6.106(1000),6.414(1050),6.726(1100), 7.037(1150),7.351(1200),7.664(1250),7.976(1300),8.286(1350),8.598(1400),8.903(1450),9.213(1500),9.521(1550),9.830(1600), 10.137(1650),10.444(1700),10.749(1750),11.055(1800),11.363(1850),11.670(1900),11.980(1950),12.285(2000),12.592(2050),12.897(2100), 13.203(2150),13.510(2200),13.818(2250),14.123(2300),14.427(2350),14.733(2400),15.039(2450),15.344(2500),15.652(2550),15.965(2600), 16.269(2650),16.578(2700),16.883(2750),17.198(2800),17.504(2850),17.814(2900),18.124(2950),18.433(3000),18.741(3050),19.054(3100), 19.364(3150),19.671(3200),19.980(3250),20.290(3300),20.598(3350),20.907(3400),21.221(3450),21.531(3500),21.845(3550),22.155(3600), 22.470(3650),22.782(3700),23.091(3750),23.411(3800),23.725(3850),24.038(3900),24.351(3950),24.665(4000),24.976(4050),25.288(4100), 25.606(4150),25.916(4200),26.231(4250),26.543(4300),26.862(4350),27.176(4400),27.484(4450),27.793(4500),28.098(4550),28.401(4600), 28.709(4650),29.022(4700),29.331(4750),29.631(4800),29.940(4850),30.248(4900),30.563(4950),30.876(5000),31.184(5050),31.487(5100), 31.792(5150),32.105(5200),32.413(5250),32.725(5300),33.024(5350),33.335(5400),33.639(5450),33.941(5500),34.258(5550),34.567(5600), 34.879(5650),35.185(5700),35.497(5750),35.813(5800),36.118(5850),36.427(5900),36.727(5950),37.029(6000),37.334(6050),37.646(6100), 37.951(6150),38.253(6200),38.559(6250),38.868(6300),39.172(6350),39.474(6400),39.792(6450),40.103(6500),40.414(6550),40.730(6600), 41.041(6650),41.351(6700),41.663(6750),41.977(6800),42.286(6850),42.588(6900),42.896(6950),43.207(7000),43.518(7050),43.821(7100), 44.128(7150),44.431(7200),44.740(7250),45.052(7300),45.361(7350),45.674(7400),45.976(7450),46.289(7500),46.605(7550),46.915(7600), 47.225(7650),47.532(7700),47.839(7750),48.147(7800),48.452(7850),48.759(7900),49.064(7950),49.379(8000),49.683(8050),49.992(8100), 50.302(8150),50.612(8200),50.922(8250),51.230(8300),51.540(8350),51.846(8400),52.155(8450),52.466(8500),52.779(8550),53.090(8600), 53.403(8650),53.714(8700),54.011(8747),54.016(8748),54.023(8749),54.028(8750),54.035(8751),54.040(8752),54.047(8753),54.056(8754), 54.060(8755),54.067(8756),54.072(8757),54.079(8758),54.084(8759),54.091(8760),54.098(8761),54.103(8762),54.110(8763),54.115(8764), 54.122(8765),54.127(8766),54.134(8767),54.140(8768),54.145(8769),54.152(8770),54.157(8771),54.164(8772),54.168(8773),54.175(8774), 54.182(8775),54.187(8776),54.194(8777),54.199(8778),54.206(8779),54.211(8780),54.218(8781),54.226(8782),54.231(8783),54.238(8784), 54.243(8785),54.250(8786),54.255(8787),54.262(8788),54.270(8789),54.274(8790),54.282(8791),54.286(8792),54.294(8793),54.299(8794), 54.306(8795),54.313(8796),54.318(8797),54.325(8798),54.330(8799),54.337(8800),54.341(8801),54.349(8802),54.357(8803),54.362(8804), 54.370(8805),54.374(8806),54.382(8807),54.387(8808),54.393(8809),54.401(8810),54.406(8811),54.413(8812),54.418(8813),54.425(8814), 54.430(8815),54.437(8816),54.445(8817),54.450(8818),54.457(8819),54.462(8820),54.469(8821),54.474(8822),54.481(8823),54.489(8824), 54.494(8825),54.501(8826),54.506(8827),54.513(8828),54.518(8829),54.525(8830),54.533(8831),54.537(8832),54.545(8833),54.550(8834), 54.557(8835),54.562(8836),54.569(8837),54.576(8838),54.581(8839),54.588(8840),54.593(8841),54.600(8842),54.605(8843),54.612(8844), 54.619(8845),54.623(8846),54.631(8847),54.648(8850),54.959(8900),55.270(8950),55.577(9000),55.884(9050),56.191(9100),56.500(9150), 56.802(9200),57.106(9250),57.411(9300),57.715(9350),58.020(9400),58.321(9450),58.626(9500),58.930(9550),59.237(9600),59.540(9650), 59.844(9700),60.147(9750),60.448(9800),60.753(9850),61.058(9900),61.366(9950),61.672(10000),61.981(10050),62.304(10100),62.617(10150), 62.947(10200),63.272(10250),63.584(10300),63.893(10350),64.207(10400),64.520(10450),64.831(10500),65.140(10550),65.449(10600), 65.759(10650),66.068(10700),66.380(10750),66.692(10800),67.005(10850),67.316(10900),67.632(10950),67.940(11000),68.248(11050), 68.549(11100),68.850(11150),69.154(11200),69.459(11250),69.766(11300),70.073(11350),70.382(11400),70.694(11450),71.010(11500), 71.325(11550),71.638(11600),71.960(11650),72.275(11700),72.597(11750),72.913(11800),73.228(11850),73.537(11900),73.856(11950), 74.180(12000),74.495(12050),74.814(12100),75.137(12150),75.451(12200),75.766(12250),76.085(12300),76.405(12350),76.721(12400), 77.036(12450),77.364(12500),77.680(12550),78.004(12600),78.331(12650),78.652(12700),78.970(12750),79.304(12800),79.646(12850), 79.968(12900),80.306(12950),80.637(13000),80.963(13050),81.297(13100),81.634(13150),81.967(13200),82.315(13250),82.657(13300), 82.989(13350),83.316(13400),83.637(13450),83.960(13500),84.294(13550),84.644(13600),84.992(13650),85.341(13700),85.661(13750), 85.971(13800),86.283(13850),86.595(13900),86.905(13950),87.217(14000),87.528(14050),87.837(14100),88.150(14150),88.460(14200), 88.771(14250),89.086(14300),89.404(14350),89.728(14400),90.065(14450),90.406(14500),90.750(14550),91.118(14600),91.456(14650), 91.852(14700),92.271(14750),92.670(14800),93.080(14850),93.407(14900),93.714(14950),94.021(15000),94.333(15050),94.646(15100), 94.965(15150),94.997(15155),54.318(8797)
The .mz and .int files are binary files.
The m/z values in the .mz file are written out as 64-bit double precision binary numbers. The intensity values in the .int file are written out as 32-bit single precision floating point numbers. Before the intensity values in the .int file a 4 byte unsigned integer is used to store the number of points in the data.
Once the .mz and the .int files are complete then Search Compare processes them. Once the processing is complete all files associated with a job are deleted. If Search Compare has been replaced by the Quantitation Extraction Table this will give a link to run Search Compare once the job has finished.
| Files when job waiting to be processed | |
|---|---|
| .xml | parameters for the job |
| .json | Search Compare parameters (Search Compare only) |
| Files when data is being extracted from the raw file(s) | |
| .xml.1 | parameters for the job |
| .json | Search Compare parameters (Search Compare only) |
| .mz.1 | m/z values for all scans |
| .int.1 | intensity values for all scans |
| .log | job progress (Search Compare only) |
| Extraction finished. Waiting to be processed by Search Compare/MS-Display | |
| .json | Search Compare parameters (Search Compare only) |
| .mz | m/z values for all scans |
| .int | intensity values for all scans |
| Other files | |
| .sig | file signifies that job has been aborted |
| .err | job has failed, contains error message |
| .txt | data to populate MS-Display RT menu (MS-Display only) |
The procedure for installing the Raw Data Daemon involves the following steps:
1). Install Thermo File Reader and/or Sciex Analyst on the Windows instance.
2). Install the Raw Data Daemon service on the Windows instance.
3). Set up and specify the shared directory and access to the user repository and optionally the data repository.
4). Ensure the relevant IP filter rules are in place in say a cloud computing environment.
5). Install SAMBA on the LINUX server to allow the Windows instance to access the relevant directories.
The procedure for installing Thermo File Reader is described here. The procedure for installing Sciex Analyst is described here. At least one of these packages must be installed before the Raw Daemon will work.
The Raw Daemon service page package contains 5 files:
raw_daemon.exe is the daemon binaryraw_daemon.txt is the daemon parameter file
rdd.log is the daemon log file
batchRD.exe is the program invoked by the daemon to run jobs, it takes a job file and outputs a raw data file
libexpat.dll is a dll required by the package
The parameter section of a typical daemon parameter file is shown below. This is typical if both the Prospector installation and the Raw Daemon are on the same server running Windows.
daemon_loop_time 1 max_searches 1 shared_dir G:\prospector\repository\temp user_repository G:\prospector\repository raw_dir G:\prospector\data\raw multi_process false
If the Prospector installation is on a LINUX server and there is a separate server running Windows then the directories must be specified using UNC paths. These need to be directories you can browse to using Windows Explorer. Eg:
daemon_loop_time 1 max_searches 1 shared_dir \\128.150.58.78\ProteinProspector\repository\temp user_repository \\128.200.58.78\ProteinProspector\repository raw_dir \\128.150.58.78\ProteinProspector\data\raw multi_process false
daemon_loop_time is the gap in seconds that the daemon waits between checking for new jobs
max_searches is the maximum number of concurrent quantitation jobs, subsequent jobs will be queued
shared_dir is the interchange directory (see below) between the daemon and the Protein Prospector installation
user_repository is the root directory of the Protein Prospector user repository
raw_dir is the root directory of the Protein Prospector data repository if one is present
multi_process should be set to false as this feature hasn't been fully implemented yet
The raw data daemon runs as a Windows service. It can be installed by entering the following command into a Command Prompt window (or Powershell on Windows 10) run as administrator:
raw_daemon.exe install user password
Here user and password are the user and password that daemon will run under.
Note that if you are logging into a domain-joined machine and there is also a local account with the same name, the domain account will take precedence. To specify the local account you will need to specify the user as the computer name followed by the user (eg. Dell5550\user). The computer name can be found by right-clicking Computer, and then clicking Properties. The computer name appears under Computer name, domain, and workgroup settings. An alternative that works with most recent Windows versions is to use .\user instead. So in these cases example commands would be:
raw_daemon.exe install computer\user password raw_daemon.exe install .\user password
If you want the daemon to start automatically when the computer is booted then you will need to edit the startup-type for the raw data daemon service on the Services control panel once the service has been installed.
The daemon service can be uninstalled with the command:
raw_daemon.exe uninstall
If the daemon fails to start then first check the daemon log file (rdd.log) for error messages.
It is possible to run the batchRD.exe program from the command line to check if things are working. If you are working with a mixed LINUX/Windows system then on the LINUX side the daemon job files are written into subdirectories under the directory defined as upload_temp in info.txt. The current subdirectories used for this are rawFetch and searchCompare. rawFetch is used for single spectrum display and searchCompare is used for quantitation. The LINUX side creates an xml job file in the relevant directory (rawFetch for single spectrum display and searchCompare for quantitation. Single spectrum display jobs are processed sequentially immediately. Quantitation jobs are processed in a batch fashion based on the max_searches parameter defined above. When a job is running its suffix changes from ".xml" to ".xml.1". The output is either written to a single text file with a .txt suffix or 2 binary files with .mz and .int suffixes. Whilst they are incomplete the files will have suffixes .txt.1, .mz.1 and .int.1. After files are complete they are processed by the LINUX side and then deleted.
A file with a .log suffix is used while quantitation jobs are running so that the LINUX side can report on progress. This is deleted once the job has finished. If an error occurs whilst the extracting the raw data then the error is written into a file with a .err suffix. This can be read and displayed by the LINUX side before being deleted.
To run BatchRD manually first make sure the raw daemon isn't running. Then create an xml file in the rawFetch directory by attempting to display a spectrum from the LINUX side. Next rename the file with a .txt.1. You can run BatchRD.exe from a command prompt using a command such as:
BatchRD.exe R filevaCyB3.xml.1
This should create the relevant .txt and .mz/.int output files.
You would use S rather than R to process files from the searchCompare directory. The daemon is simply automatically running BatchRD in this manner.
Install the following packages if not already installed.
sudo apt-get -y install p7zip-full sudo apt-get -y install unrar-free sudo apt-get -y install ghostscript sudo apt-get -y install r-base sudo cpan install XML::Simple
Answer yes to all questions.
Note that this also installs make which is needed later.
sudo apt-get -y install apache2
Download the current installation archive. Currently this is prospector.basic_ubuntu20.04.tar.gz.
cd /var/lib sudo mkdir prospector sudo chown www-data:www-data prospector cd prospector
Copy the archive into this prospector directory.
sudo gunzip prospector.basic_ubuntu20.04.tar.gz sudo tar xvf prospector.basic_ubuntu20.04.tar sudo rm prospector.basic_ubuntu20.04.tar sudo chown -R www-data:www-data web
Create a file called prospector.conf with the following contents in the directory /etc/apache2/sites-available.
AddHandler cgi-script .cgi
AddHandler cgi-script .pl
DirectoryIndex index.html
ScriptAlias /prospector/cgi-bin /var/lib/prospector/web/cgi-bin
Alias /prospector /var/lib/prospector/web
<Directory "/var/lib/prospector/web">
Options FollowSymLinks
DirectoryIndex index.html
AllowOverride None
Require all granted
</Directory>
Run the following command.
sudo ln -s /etc/apache2/sites-available/prospector.conf /etc/apache2/sites-enabled/prospector.conf
In: conf-available/serve-cgi-bin.conf add:
<IfDefine ENABLE_USR_LIB_CGI_BIN>
ScriptAlias /cgi-bin/ /var/lib/prospector/web/cgi-bin/
<Directory "/var/lib/prospector/web/cgi-bin">
AllowOverride None
Options +ExecCGI -MultiViews +SymLinksIfOwnerMatch
Require all granted
</Directory>
</IfDefine>
Fix apache using the following commands.
sudo rm /etc/apache2/mods-enabled/deflate.* sudo ln -s /etc/apache2/mods-available/proxy.conf /etc/apache2/mods-enabled/proxy.conf sudo ln -s /etc/apache2/mods-available/proxy.load /etc/apache2/mods-enabled/proxy.load sudo ln -s /etc/apache2/mods-available/proxy_http.load /etc/apache2/mods-enabled/proxy_http.load sudo ln -s /etc/apache2/mods-available/rewrite.load /etc/apache2/mods-enabled/rewrite.load sudo ln -s /etc/apache2/mods-available/cgid.conf /etc/apache2/mods-enabled/cgid.conf sudo ln -s /etc/apache2/mods-available/cgid.load /etc/apache2/mods-enabled/cgid.load
Start Apache again.
sudo /etc/init.d/apache2 restart
Download the current seqdb archive. Currently this is seqdb.2019.09.18.zip.
cd /var/lib/prospector sudo mkdir seqdb sudo chown www-data:www-data seqdb cd seqdb
Copy the archive into this seqdb directory.
sudo unzip seqdb.2019.09.18.zip sudo mv seqdb.2019.09.18/* . sudo rmdir seqdb.2019.09.18 sudo rm seqdb.2019.09.18.zip sudo chown www-data:www-data S*
Install the following packages if not already installed.
sudo apt-get -y install p7zip-full sudo apt-get -y install unrar-free sudo apt-get -y install ghostscript sudo apt-get -y install r-base sudo cpan install XML::Simple
Answer yes to all questions.
Note that this also installs make which is needed later.
sudo apt-get -y install apache2
If you need to compile the Prospector source code do the following.
Obtain the source code pp.tar.gz
Install the following packages if not already installed.
sudo apt-get -y install zlib1g-dev sudo apt-get -y install libopenmpi-dev sudo apt-get install default-libmysqlclient-dev
Unpack the Prospector source code into your home directory.
gunzip pp.tar.gz tar xvf pp.tar
Compile the Prospector source code.
cd pp make all
At the end of the make the binaries will be in pp/bin
If you need to make it again run:
make clean
before
make all
Obtain the current installation archive. Currently this is prospector.debian_10.tar.gz.
cd /var/lib sudo mkdir prospector sudo chown www-data:www-data prospector cd prospector
Copy the archive into this prospector directory.
sudo gunzip prospector.debian_10.tar.gz sudo tar xvf prospector.debian_10.tar sudo rm prospector.debian_10.tar sudo chown -R www-data:www-data web
If you have previously compiled the code in your home directory.
cd web/cgi-bin sudo cp ~/pp/bin/* .
Batch-Tag uses the MPI package to enable multi-process searches. On a LINUX system the Perl script mssearchmpi.pl in the web/cgi-bin directory is called by the Batch-Tag Daemon to initiate searches. The script attempts to detect the type of LINUX and the MPI package that is installed. Older versions used MPICH2 so the script tries to figure out whether openMPI is installed. If it can't find it it assumes MPICH2 is in use.
The number of cores used for a Batch-Tag job is controlled by the line:
my $num_processors = 8; ##### this is where you set the number of cores used by MPI
in the script. You can modify this line if you want to use more cores for a search to make the searches run faster. Note that the number of processes used when a search starts is one greater as the is a coordinating process which doesn't use much in the way of resources.
Create a file called prospector.conf with the following contents in the directory /etc/apache2/sites-available.
AddHandler cgi-script .cgi
AddHandler cgi-script .pl
DirectoryIndex index.html
ScriptAlias /prospector/cgi-bin /var/lib/prospector/web/cgi-bin
Alias /prospector /var/lib/prospector/web
<Directory "/var/lib/prospector/web">
Options FollowSymLinks
DirectoryIndex index.html
AllowOverride None
Require all granted
</Directory>
Run the following command.
sudo ln -s /etc/apache2/sites-available/prospector.conf /etc/apache2/sites-enabled/prospector.conf
In: conf-available/serve-cgi-bin.conf add:
<IfDefine ENABLE_USR_LIB_CGI_BIN>
ScriptAlias /cgi-bin/ /var/lib/prospector/web/cgi-bin/
<Directory "/var/lib/prospector/web/cgi-bin">
AllowOverride None
Options +ExecCGI -MultiViews +SymLinksIfOwnerMatch
Require all granted
</Directory>
</IfDefine>
Fix apache using the following commands.
sudo rm /etc/apache2/mods-enabled/deflate.* sudo ln -s /etc/apache2/mods-available/proxy.conf /etc/apache2/mods-enabled/proxy.conf sudo ln -s /etc/apache2/mods-available/proxy.load /etc/apache2/mods-enabled/proxy.load sudo ln -s /etc/apache2/mods-available/proxy_http.load /etc/apache2/mods-enabled/proxy_http.load sudo ln -s /etc/apache2/mods-available/rewrite.load /etc/apache2/mods-enabled/rewrite.load sudo ln -s /etc/apache2/mods-available/cgid.conf /etc/apache2/mods-enabled/cgid.conf sudo ln -s /etc/apache2/mods-available/cgid.load /etc/apache2/mods-enabled/cgid.load
Start Apache again.
sudo /etc/init.d/apache2 restart
Obtain the initialisation script prospector.sql
sudo apt-get install mariadb-server sudo /etc/init.d/mysql start sudo mysql -u root MariaDB [(none)]> create database ppsd; MariaDB [(none)]> GRANT ALL ON ppsd.* TO prospector IDENTIFIED BY 'pp'; MariaDB [(none)]> quit mysql -u prospector -ppp -h localhost ppsd < prospector.sql
Note that the password (here pp) should match the one in /usr/lib/prospector/web/params/info.txt
Download the current seqdb archive. Currently this is seqdb.2019.09.18.zip.
cd /var/lib/prospector sudo mkdir seqdb sudo chown www-data:www-data seqdb cd seqdb
Copy the archive into this seqdb directory.
sudo unzip seqdb.2019.09.18.zip sudo mv seqdb.2019.09.18/* . sudo rmdir seqdb.2019.09.18 sudo rm seqdb.2019.09.18.zip sudo chown www-data:www-data S*
A repository is necessary to store uploaded data files, project files and results files for Batch-Tag searches. The data repository needs to be on a partition with sufficient space for your future needs. Below it is assumed that the data repository is in /mnt/repository.
cd /mnt sudo mkdir repository sudo chown www-data:www-data repository cd /mnt/repository sudo mkdir temp sudo chown www-data:www-data temp
Edit info.txt.
cd /var/lib/prospector/web/params sudo vi info.txt
Edit the repository directives to:
upload_temp /mnt/repository/temp user_repository /mnt/repository
This section applies if you want a data repository. This is optional. It allows you to arrange your data in convenient directories as you acquire it. Also you can search it directly with Batch-Tag rather than uploading it with Batch-Tag Web. The data repository needs to be on a partition with sufficient space for your future needs. Below it is assumed that the data repository is in /mnt/data.
Create the directories.
cd /mnt sudo mkdir data sudo chown www-data:www-data data cd /mnt/data sudo mkdir peaklists sudo mkdir raw sudo chown www-data:www-data peaklists sudo chown www-data:www-data raw
Edit info.txt.
cd /var/lib/prospector/web/params sudo vi info.txt
Edit the data directives to:
centroid_dir /mnt/data/peaklists raw_dir /mnt/data/raw
The Batch-Tag Daemon script can be found here (in the All section):
https://prospector.ucsf.edu/prospector/html/instruct/servadmn.htm#linux_daemon
cd /etc/init.d sudo vi btag-daemon
Paste in the daemon, save and quit
Make sure the script has execute permission.
sudo chmod 777 btag-daemon
Start the daemon:
sudo /etc/init.d/btag-daemon start
Ensure btag-daemon starts on boot.
sudo apt-get install insserv sudo update-rc.d btag-daemon defaults
The installation should now be complete.
There is an installation wizard for Windows. When installing you should check that you don't have more recent versions of the packages installed before proceeding. Also to run the Apache web server the user you install under needs permission to login as a service. This can be fixed after the installation if Apache can't be started during the installation.
Go to Control Panel, Administrative Tools, Local Security Policy, Local Policies, User Rights Assignment, Log on as a Service, click Add Users or Group and add the user name you are using. Note that for Windows 10 the Control Panel is accessed via Windows System on the main menu. You can also run Local Security Policy by running secpol.msc.
For Windows 10 installations you also need to close down any services which bind to port 80. This will also prevent Apache from starting. If any of the following services are running then change their 'Startup Type' to 'Disabled':
- SQL Server Reporting Services (ReportServer)
- Web Deployment Agent Service (MsDepSvc)
- BranchCache (PeerDistSvc)
- Sync Share Service (SyncShareSvc)
- World Wide Web Publishing Service (W3SVC)
- Internet Information Server (WAS, IISADMIN)
The Windows installers are built using the NSIS (Nullsoft Scriptable Install System) package version 2.46 (2010-04-18). The NSIS download page is located at https://nsis.sourceforge.io/Download.
After downloading and installing NSIS you need to copy the following dll files to the C:\Program Files (x86)\NSIS\Plugins directory:
AccessControl.dll Dialogs.dll DumpLog.dll GetVersion.dll NSISArray.dll nsRandom.dll nsSCM.dll SimpleSC.dll ZipDLL.dll
 .
.